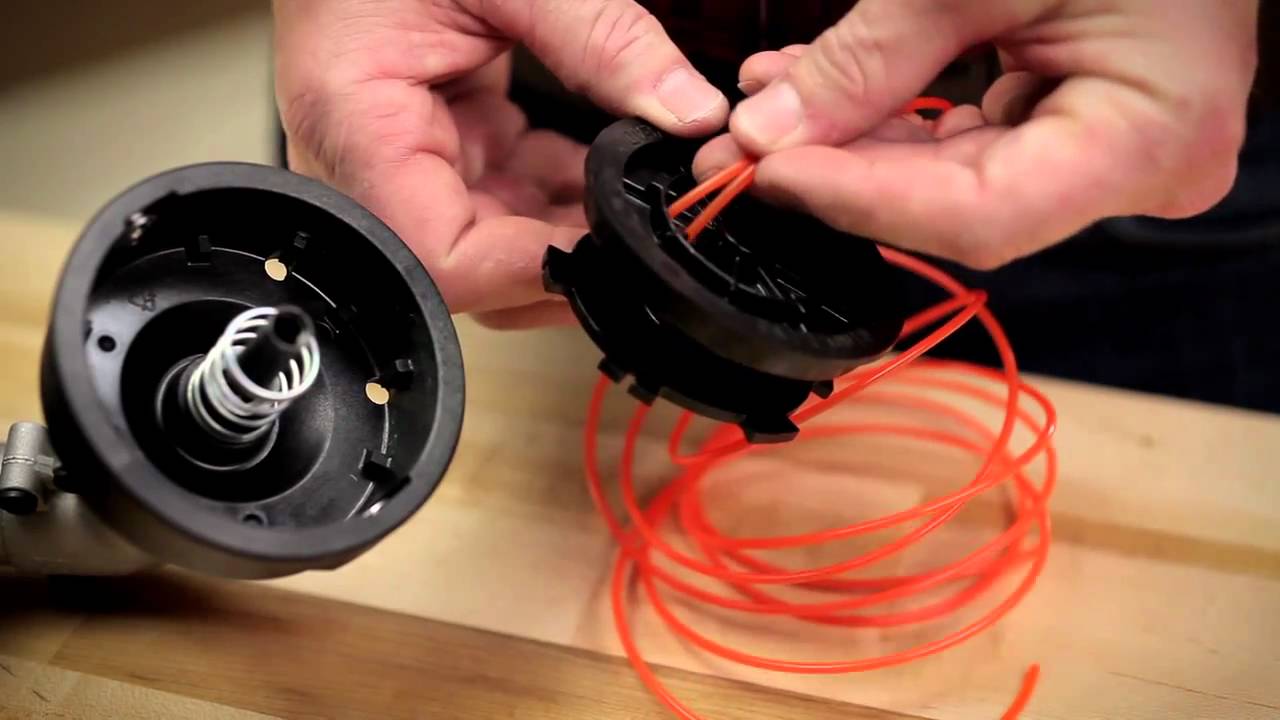
In an age where DIY lawn care is becoming increasingly popular, effectively managing your trimmer line can make all the difference. Take, for instance, how a simple bump feed mechanism can save hours of frustration. The secret lies in understanding how to properly replace the trimmer line, ensuring a seamless garden maintenance experience.
Replacing a trimmer line with a bump feed system may sound daunting, but it’s a process steeped in tradition and efficiency. The bump feed mechanism, which dates back to the 1970s, is designed to minimize downtime by allowing quick line replacement. Interestingly, studies have shown that using a well-maintained bump feed trimmer can reduce trimming time by up to 20%. The key is mastering the art of spooling the line correctly to avoid frequent replacements or tangles.
- Ensure the trimmer is turned off and unplugged. Wear safety gear like gloves and goggles.
- Locate and open the spool cover by pressing tabs or removing screws.
- Remove the old trimmer line from the spool carefully to avoid tangles.
- Cut two equal lengths of new line, typically around 10 feet each.
- Insert one end of each line into the anchor holes and wind in the direction of arrows, leaving about six inches free.
- Feed the ends through the eyelets on the trimmer head and replace the spool cover securely.
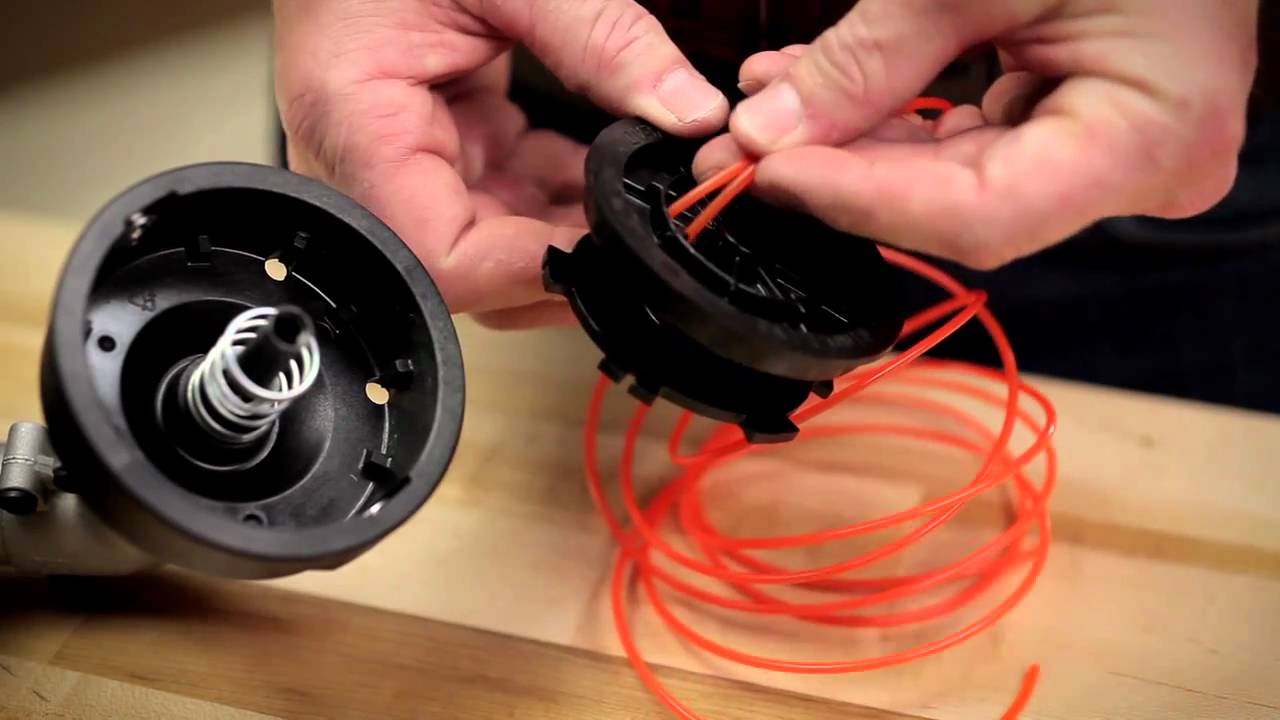
How to Replace Trimmer Line Bump Feed
Replacing the trimmer line on a bump feed system begins with safety precautions. Before you start, ensure the trimmer is turned off and disconnected from any power source. This step protects you from accidental starts. Then, gather your tools and the new line. Having everything ready simplifies the process.
The next step is to remove the old line. Begin by locating and opening the bump feed spool cover. Press the tabs or screws, depending on your model, to release the cap. Gently pull out any remaining trimmer line. According to this post, tangled lines can often be untangled by carefully pulling and releasing tension.
Now, it’s time to load the new line. First, cut two equal lengths of trimmer line, typically about 10 feet each. Insert one end of each line into the holes or eyelets in the spool. Wind the line evenly and tightly in the direction of the arrows marked on the spool, leaving about six inches of line free. Click the spool back into place and secure the cover.
To ensure proper functioning, test the bump feed system. Gently tap the trimmer head on the ground a few times to check if the line advances correctly. If the line does not feed properly, open the spool and adjust the winding. For further detailed instructions, refer to this article. With these steps, replacing the trimmer line becomes a straightforward task.
Step 1: Safety Precautions
Before replacing the trimmer line, ensure the trimmer is turned off and unplugged. This prevents any accidental starts that could cause injury. It’s also essential to don proper safety gear. Wear gloves to protect your hands and safety goggles to guard your eyes from debris. A long-sleeved shirt and pants add an extra layer of protection.
Check the working area to ensure it’s clear of obstacles. Having a clutter-free workspace minimizes the risk of tripping or mishaps. Additionally, work in a well-lit area to see clearly. According to this expert opinion, a clear workspace significantly improves efficiency and safety. This advice is especially beneficial when handling sharp tools and machinery.
- Turn off and unplug the trimmer
- Wear gloves and safety goggles
- Clear the working area of debris
- Ensure good lighting for visibility
Inspect the trimmer for any damages before starting. Look at the condition of the spool, bump head, and other components. Repair or replace damaged parts to avoid any operational issues later. In this resource, it’s highlighted that regular maintenance ensures the longevity of your equipment. Proper care now prevents bigger problems in the future.
Step 2: Removing the Old Line
Once safety is ensured, proceed to remove the old line. Start by locating the spool cover, typically found at the bottom of the trimmer head. Press the tabs or release the screws to open the cover. Be cautious, some models have springs inside that may pop out. Carefully set aside the cover and any loose components.
Now, examine the old trimmer line wrapped around the spool. Pull out the line gently, avoiding any sudden tugs that can cause tangles. If the line is stuck, use needle-nose pliers for easier handling. Untangle any knots and completely remove all the old line. This helps in ensuring the new line winds smoothly when you reload it.
- Locate and open the spool cover
- Carefully remove the cover and any springs
- Pull out the old trimmer line
- Use pliers for stubborn knots
Inspect the spool for any signs of wear or damage. Cracks or rough edges can hinder the new line’s performance. If you spot any issues, replace the spool before proceeding. Clean out any debris inside the spool housing to ensure a smooth reassembly. A clean spool ensures optimal functionality for the new trimmer line.
After cleaning, place all the parts in a safe spot to avoid losing them. Having everything in one place makes the reassembly process quicker and easier. Some models feature a dual-line setup, requiring you to remove two sets of old lines. Refer to your trimmer’s manual for specific guidance. Ready your new line for the next step.
Step 3: Loading the New Line
To start loading the new line, first cut two equal lengths of trimmer line, usually about 10 feet each. This gives you ample line to work with and ensures balance during operation. Locate the anchor hole on the spool where the line needs to be threaded. Insert one end of the line into the hole, securing it firmly. More advanced models may have dual-line systems, requiring you to repeat this process for the second line.
Next, start winding the line onto the spool evenly and tightly. Follow the directional arrows on the spool to avoid tangling. Wind each line in separate grooves if applicable, keeping the lines parallel and untangled. Leave about six inches of line extending from the spool. This remaining length will be fed through the eyelets on the trimmer head.
- Cut two lengths of trimmer line
- Insert the line into the anchor hole
- Wind the line according to the directional arrows
- Keep the lines parallel and untangled
- Leave six inches of extended line
Once the spool is wound, guide the extended lines through the eyelets on the trimmer head. This setup helps the line advance smoothly during use. Ensure the lines are firmly seated in the eyelets to prevent slipping. According to this blog post by Trimmerity, properly threading the eyelets can reduce operational issues. Align the spool inside the trimmer head and replace the cover securely.
Double-check that the cover is fully locked to avoid it coming loose while operating the trimmer. Test the bump feed by gently tapping the head on the ground and checking if the line advances. If it doesn’t, reopen the cover and adjust the line’s tension. Properly loading the trimmer ensures smooth operation and reduces the need for frequent reloading. Organize your tools and trimmer parts for future ease of use and maintenance.
Tips to Maintain Trimmer Line Efficiency
Maintaining trimmer line efficiency involves regular inspection and replacement of worn-out parts. Check the trimmer line before each use for signs of wear, such as fraying or brittleness. Replace the line immediately if you notice these signs. This not only improves performance but also reduces the risk of breakage during operation. Keeping a spare spool handy ensures you’re always prepared.
Another key to efficiency is proper storage of your trimmer line. Store the line in a cool, dry place to prevent it from becoming brittle. Keeping it out of direct sunlight is also essential. Heat can weaken the line, making it prone to breaking. A plastic bag or container can help protect the line from environmental factors.
- Inspect the line regularly
- Store in a cool, dry place
- Avoid direct sunlight
- Keep a spare spool ready
Using the right technique while trimming can extend the life of your line. Avoid hitting hard surfaces like rocks or concrete, which can quickly wear down the line. Instead, try to trim at a slight angle to reduce contact with tough surfaces. Trimming grass and light weeds will ensure the line lasts longer. Proper technique also reduces the need for frequent line replacements.
Another important aspect is upgrading to a high-quality trimmer line. Higher quality lines are more durable and can withstand rigorous use. According to experts, high-quality lines tend to outperform standard ones in terms of longevity and efficiency. While they may be slightly more expensive, the long-term benefits are worth it. Investing in better line saves time and effort in the long run.
Common Problems and Solutions when Replacing Trimmer Line
One common problem is the line breaking too frequently. This often occurs when the line is too brittle, possibly from exposure to sunlight or improper storage. To solve this issue, store your trimmer line in a cool, dry place. If breakage continues, switch to a higher quality line, as it offers better durability. Keeping the line properly wound also minimizes unnecessary stress on it.
Another issue is the line not feeding correctly from the spool. This can be caused by improper winding or tangles within the spool. To address this, make sure you follow the directional arrows while winding the line. Remove any tangles before inserting the spool back into the trimmer head. Regular inspection can also catch potential problems early.
- Store in a cool, dry place
- Use high-quality line
- Follow directional arrows
- Inspect for tangles
Sometimes, the problem lies with the bump feed mechanism itself. Wear and tear over time can lead to malfunctioning. Check the bump head for any visible damage, such as cracks or worn parts. Replace broken components to restore proper functionality. Lubricating moving parts can also help in maintaining smooth operation.
If the trimmer line gets stuck or jams frequently, it might be due to debris inside the trimmer head. Open the trimmer head and clean out any dirt, grass, or other debris. This simple step can improve the feeding mechanism’s efficiency. Keeping the trimmer head clean ensures consistent performance and extends the life of your trimmer. Proper maintenance goes a long way in preventing jams.
Frequently Asked Questions
Maintaining your trimmer line efficiently can be a bit tricky. Here are some common questions and their answers that can help you keep your trimmer in optimal condition.
1. How often should I replace my trimmer line?
The frequency of replacing your trimmer line depends on the usage and type of vegetation you’re trimming. For regular gardeners, replacing the line every season is recommended. However, if you’re trimming larger areas with tough weeds, you may need to replace the line more frequently.
Using high-quality trimmer lines can extend the replacement intervals. Always check for wear and tear before each use to determine if immediate replacement is necessary. Consistent maintenance ensures smoother operation and fewer interruptions during trimming.
2. What type of trimmer line should I use?
The type of trimmer line you need can vary based on your trimmer model and the nature of your tasks. Round lines are ideal for grass and light weeds, offering durability and easy handling. Square or multi-sided lines provide better cutting efficiency for thicker vegetation but may wear out faster.
Nylon lines are common due to their resilience and cost-effectiveness. There are also more advanced options available made from copolymer or reinforced materials for tougher jobs. Ensure compatibility with your specific trimmer model by checking the manufacturer’s guidelines.
3. Why does my trimmer line keep breaking?
Your trimmer line might be breaking frequently because it’s either too brittle or striking hard surfaces like rocks or concrete. Storing your trimmer line properly in a cool, dry place helps prevent brittleness caused by exposure to sunlight and heat.
Avoid aggressive trimming near hard surfaces, and ensure you’re using a high-quality, thick enough line matching your task needs. If problems persist, consider upgrading to a premium grade line designed specifically for durability under tough conditions.
4. How do I prevent my trimmer line from tangling?
Tangling often occurs due to improper winding or loading technique when installing new lines into the spool. Ensure that you wind the lines tightly and evenly following directional arrows on the spool to prevent tangles.’,
Additionally ‘cleaning as’, ‘recommended regularly removing any debris from both inside spool’, ‘spaces’ could significantly;
increase smooth; list successful performance.’,
following ‘steps provided manufacturers guide makes easier!’;
re-install accurately avoids frequent operational issues beginning.’
<
h 3 >
5,
,’What?” Is?,
correct ,…..’methods storing additional extras??’
< /
<
/ h <
ul >
Check correctness Regular items Check Wear Brittleness \Remove.,Sunlight/. Heat Issues.’
Carefully Inspect Determine Make Sure Tight Even Properly continuation Double -check Firm Spool Avoid Tangling.”
Conclusion
Proper maintenance and understanding of your trimmer’s bump feed system can significantly enhance its performance. Regular inspections, correct handling, and following safety measures are crucial steps. By replacing the trimmer line correctly and using high-quality materials, you ensure smoother operation and a longer lifespan for your equipment.
Being aware of common issues and their solutions helps in maintaining the efficiency of your trimmer. Whether it’s storing the line properly or addressing feed problems promptly, these practices make a noticeable difference. Expert advice and routine care go a long way in achieving optimal results with minimal interruptions.

I’m Patricia D. Johnson, an affiliate marketer and blogger specializing in trimmers and grooming tools. I create honest reviews, buying guides, and practical tips to help readers choose the right trimmer for their needs. With a focus on quality, performance, and value, I simplify the decision-making process so consumers can make confident purchases.