Setting up your DEWALT 60V trimmer line might seem daunting initially, but it’s simpler than you think. Picture the satisfaction of effortlessly slicing through thick grass without a hitch, knowing your tool is perfectly prepped. A well-installed trimmer line can make that difference, ensuring smooth operation every time you tackle your yard.
Begin by ensuring your trimmer is powered off for safety. The DEWALT 60V trimmer is known for its durability and efficiency, leveraging lithium-ion battery technology introduced in recent years. Follow the user manual for specifics, typically involving aligning the trimmer head and threading the line correctly, which minimizes downtime and maximizes productivity in your landscaping tasks.
- Ensure the trimmer is off and remove the battery.
- Remove the trimmer head cover and take out the old spool.
- Cut new trimmer line to appropriate length, usually around 15 feet.
- Insert one end into the anchor hole and wind evenly onto the spool.
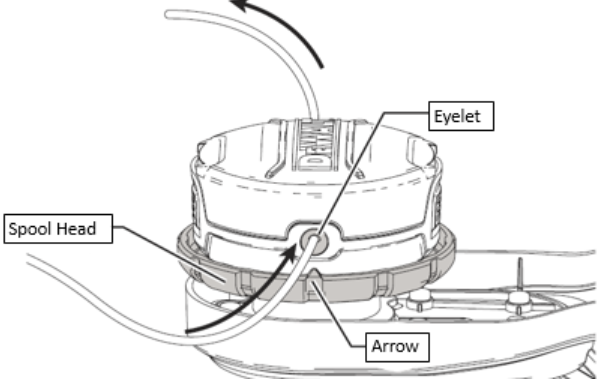
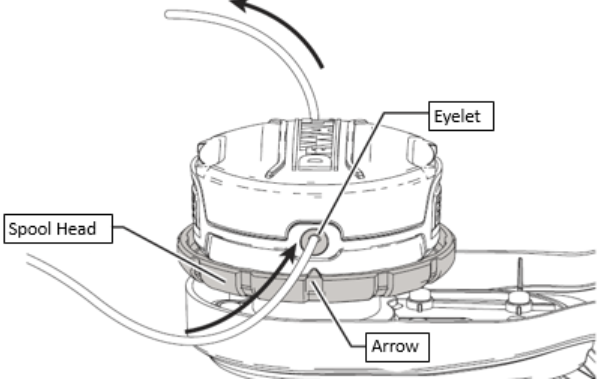
- Place the spool back into housing, threading ends through eyelets.
- Reattach trimmer head cover and ensure it’s secure.
- Reinsert battery and test for correct line feeding.
How to Install DeWalt Trimmer Line 60v
To begin installing your DeWalt 60v trimmer line, ensure the trimmer is switched off and the battery is removed. Safety should always come first. You’ll need to access the spool housing, which usually requires unscrewing or unclipping the trimmer head cover. According to this post, having the right tools nearby can speed up this process. Keep the spool and cover aside for later.
Next, measure out the appropriate length of trimmer line based on the manual’s instructions. Typically, a length of about 15 feet is sufficient. Follow the directions in the manual closely to ensure you’re threading the line correctly. The key is to wind the line evenly onto the spool to prevent tangles. Secure the ends of the lines in the notches provided on the spool.
After winding the line, place the spool back into the housing. Thread the line through the eyelets on the trimmer head, making sure it stays taut. Reassemble the trimmer head cover by snapping or screwing it back into place. Make sure everything is secure to avoid any operational issues later. If you are unsure about any step, refer to the manual provided by DeWalt.
Once reassembled, reattach the battery and test the trimmer to ensure the line feeds correctly. If the trimmer is unbalanced or the line does not feed smoothly, revisit the installation steps. Sometimes, it might take a couple of tries to get it perfect. For further troubleshooting tips, here is the article that might help. Remember, proper setup can extend the life of your trimmer line and improve performance.
Preparation for Installation
Before beginning the installation of your DeWalt 60v trimmer line, gather all necessary tools and materials. This includes the trimmer itself, a replacement spool, and the new trimmer line. Safety goggles and gloves are also recommended. Having everything ready can make the process smoother and quicker. Double-check that the trimmer is powered off and the battery is removed.
Clear a workspace to lay out the trimmer and tools. A flat, stable surface is ideal for this purpose. Make sure there is adequate lighting to see small parts clearly. Dirt and debris can interfere with the installation, so keeping your workspace clean is essential. An organized space minimizes the chances of losing any components.
Consult the user manual to familiarize yourself with the parts of the trimmer. Knowing the exact layout of your equipment will help you follow the instructions more effectively. According to this post, understanding how these parts fit together can prevent mistakes. Manuals usually come with diagrams which can be very helpful. Mark key pages for easy reference.
Lastly, inspect all parts for wear and tear before starting the installation. Pay special attention to the trimmer head and spool. Any damaged parts should be replaced to ensure optimal performance. This also prevents any unexpected issues while using the trimmer. Proper inspection can save both time and effort.
Actual Installation Process
Begin by removing the trimmer head cover. This usually involves pressing tabs or unscrewing the cap, depending on the model. Take out the old spool and discard any remaining line. Ensure the spool housing is clean and free of debris. Proper handling here sets the stage for a smooth installation.
Next, take your new trimmer line and cut it to the recommended length, usually about 15 feet. Insert one end of the line into the spool’s anchor hole. Begin winding the line evenly in the direction indicated on the spool. Wind it tightly, avoiding any overlapping to prevent tangles. This prepares the spool for reassembly.
Once the line is wound, leave a few inches of line free at both ends. Insert these ends into the notches provided on the spool to keep them secure. Place the spool back into the housing, ensuring the free ends of the line feed through the eyelets. It’s crucial to keep everything tight and properly aligned for effective trimming. At this point, you’re almost done.
Finally, reattach the trimmer head cover by either snapping it back on or screwing it in place. Give the line a final pull to ensure it feeds correctly through the eyelets. Reattach the battery and test the trimmer to see if the line advances smoothly. A properly installed line will improve both performance and durability.
Benefits of Correctly Installed Trimmer Line
A correctly installed trimmer line ensures your gardening tasks are efficient and smooth. Proper installation reduces the chances of the line breaking or tangling during use. This means you’ll spend less time fixing issues and more time trimming. A well-installed line cuts cleanly, providing better results. Less downtime means more efficiency in completing your tasks.
Another benefit is the longevity of the trimmer itself. Correct installation minimizes wear and tear on the trimmer’s motor and spool. This leads to a longer lifespan for your device, saving you money in the long run. You’ll also find that the trimmer operates more quietly and smoothly. This can make a big difference during extended use.
Garden safety is also enhanced with a properly installed trimmer line. A secure line prevents debris from being kicked back at you, reducing the risk of injury. This is particularly important when working in environments with rocks or other hard materials. Ensuring the line is installed correctly adds an extra layer of protection. For everyone involved, safety should never be compromised.
Cost-effectiveness is another significant advantage. When the trimmer line is installed correctly, it wears out more evenly. This means you won’t need to replace the line as frequently. In the long term, this saves both time and money. Efficient use of trimmer line materials contributes to overall cost savings.
Precision and control are also enhanced. A correctly installed line allows for more accurate trimming, especially along edges and tight corners. Consistent trimming reduces the chances of damaging plants or other garden features. It provides a level of professionalism to your gardening efforts. Better control means better overall results.
Lastly, improved performance is a key benefit. Your trimmer will handle thicker and tougher vegetation with ease. This makes your gardening tasks less labor-intensive. The enhanced performance can turn a daunting task into an enjoyable one. Having the trimmer operate at its best efficiency maximizes your efforts.
Troubleshooting Common Installation Issues
If your trimmer line is frequently breaking, it might be due to improper winding. Check that the line is wound evenly and tightly on the spool. Overlapping can cause the line to get stuck and break easily. Also, make sure you are using the correct type of line for your DeWalt 60v model. Refer to the manual for the recommended specifications.
Another common issue is the line not feeding correctly. This could be due to the line not being threaded through the eyelets properly. Make sure the line is free of any tangles before you start trimming. If the problem persists, your trimmer head may be worn out and need replacement. Consistent feeding problems can significantly hamper your trimming tasks.
If the trimmer is vibrating excessively, it could indicate that the line is not balanced. Uneven lengths of line can cause this issue. Simply trim the line to equal lengths to restore balance. Excessive vibration can also be a sign of a bent shaft, which should be straightened cautiously. A well-balanced line ensures smoother operation.
Sometimes, the trimmer line may not cut effectively. This can happen if the line is too thin or made from low-quality materials. Ensure you use high-grade line suitable for thick and tough vegetation. Additionally, check the trimmer’s cutting blade for dullness and sharpen it if necessary. Effective cutting improves overall performance and reduces effort.
A jammed spool is another common issue. This usually occurs when the line is not wound properly, causing it to get stuck. Open the trimmer head and remove any tangled line. Rewind the line carefully, ensuring no loops overlap. Regular maintenance of the spool can prevent such jams.
If you notice the line getting shorter quickly, you might be trimming too close to hard surfaces like concrete. Hard surfaces wear down the line rapidly. Adjust your trimming technique to avoid direct contact with such surfaces. This will help extend the life of your trimmer line and improve efficiency.
Frequently Asked Questions
Here are some common questions about using and maintaining your DeWalt 60V trimmer. These answers should help you keep your tool in top shape.
1. How often should the trimmer line be replaced?
The frequency of replacement depends on the usage and the type of vegetation you’re cutting. For heavy, regular use, it’s recommended to replace the line every few weeks.
If you’re trimming lighter vegetation less often, the line might last longer. Always check for wear and tear before each use to ensure optimal performance.
2. What type of trimmer line is best for the DeWalt 60V trimmer?
It’s best to use a high-quality, durable line that matches the manufacturer’s recommendations. Typically, a .080-inch or .095-inch diameter line works well with this model.
Avoid using cheap or unbranded lines as they may break easily or damage your trimmer. Check your user manual for exact specifications to get the best results.
3. Why is my trimmer line not feeding properly?
If your trimmer line isn’t feeding correctly, it might be installed incorrectly or wound too tightly on the spool. Make sure to follow installation instructions carefully.
Also, check if there are any blockages in the spool housing or eyelets that could hinder smooth feeding. Clearing these obstacles can resolve many feeding problems.
4. How do I extend the life of my trimmer line?
Avoid trimming near hard surfaces like concrete or stones since these can wear down the line quickly. Trimming at a moderate speed also reduces unnecessary wear.
Storing your trimmer in a cool, dry place helps preserve both the tool and its components. Regularly inspect and maintain your equipment according to manufacturer guidelines.
5. Can I use my DeWalt 60V trimmer in wet conditions?
No, it’s generally unsafe to operate electric tools like this one in wet conditions due to electrical hazards and potential damage to the trimmer itself. Always wait for dry weather
This also ensures better performance and reduces risks associated with slippery grass or uneven surfaces becoming hidden due left over rains that haven’t dried yet
Conclusion
Successfully installing the DeWalt 60V trimmer line ensures your gardening tasks are both efficient and effective. Following the correct steps can save you time and prolong the life of your tool. Regular maintenance and using the right materials are key to keeping your trimmer in optimal condition.
Understanding common issues and how to troubleshoot them can make your trimming experience hassle-free. With proper installation and care, you can achieve excellent trimming results every time. Equip yourself with the right knowledge and tools to maintain peak performance.

I’m Patricia D. Johnson, an affiliate marketer and blogger specializing in trimmers and grooming tools. I create honest reviews, buying guides, and practical tips to help readers choose the right trimmer for their needs. With a focus on quality, performance, and value, I simplify the decision-making process so consumers can make confident purchases.