Getting the right trimmer line installed can be the difference between a pristine lawn and a ragged mess. The DEWALT 20V trimmer is popular for its power and reliability in yard maintenance, but installing the trimmer line correctly is key to leveraging its full potential. With just a few steps, you can ensure your trimmer operates at optimal performance, making your landscaping tasks smoother and more efficient.
First, ensure the trimmer is off and remove the battery for safety. To begin installation, press the tabs on the side of the trimmer head to remove the cover. Once open, carefully thread the new trimmer line through the holes in the spool and wind it evenly. This straightforward process ensures the trimmer operates without jams and reduces wear on the line, providing a seamless cutting experience.
- Ensure the trimmer is off and the battery is removed for safety.
- Press the tabs on the trimmer head to remove the cover.
- Thread the new trimmer line through the spool holes and wind it evenly.
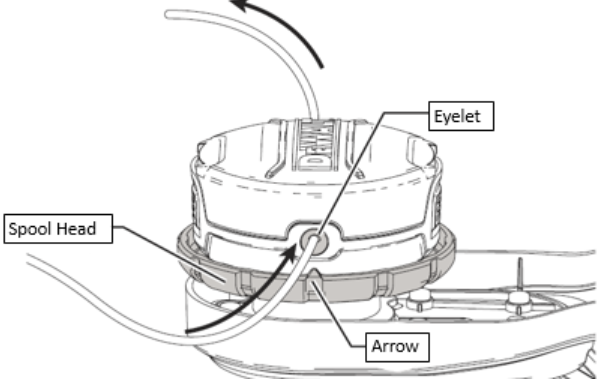
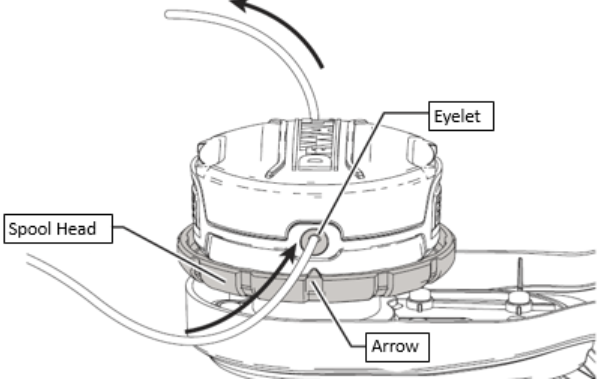
- Insert the line ends through the eyelets and snap the cover back on.
- Reinstall the battery and test for smooth operation.
How to Install Dewalt Trimmer Line 20v
Properly installing the Dewalt trimmer line 20v ensures your trimmer works efficiently and extends its lifespan. Start by making sure your trimmer is turned off and has the battery removed for safety. Press the tabs on the side of the trimmer head to remove the cover. This allows you to access the spool inside. According to this post, following these initial steps properly can prevent accidental starts and ensure user safety.
Next, you need to spool the new line through the holes. Insert the end of the new trimmer line into the small hole inside the spool, winding it neatly. Make sure you wind it in the correct direction as indicated on the spool. Keeping the line even and tight prevents tangling during use. Such careful winding ensures efficient trimming performance.
After winding, leave about six inches of line unwounded and thread it through the eyelets on the trimmer head. Replace the cover by aligning it with the tabs and snapping it back into place. Gently pull on the line to ensure it is securely in place. Finally, reinstall the battery. It’s now ready to use for your next trimming task.
Maintaining your trimmer is just as important as installing the line correctly. Regularly check the trimmer line for wear and replace it when necessary. Cleaning the trimmer head can also extend the lifespan of the tool. For more detailed steps, you can refer to here is the article. This keeps the trimmer running smoothly and makes yard work more efficient.
Step 1: Ensuring Safety Measures
Before starting any work with your Dewalt trimmer, safety is paramount. Always ensure the trimmer is turned off and the battery is removed. This simple step prevents accidental starts, reducing the risk of injuries. According to this expert opinion, most accidents occur from neglecting these initial safety precautions. Additionally, wearing safety goggles can protect your eyes from debris.
Proper clothing is also important when operating a trimmer. Wear long pants and closed-toe shoes to shield your legs and feet. Avoid loose clothing that can catch in the trimmer. Gloves can provide better grip and protect your hands during operation. These clothing tips keep you covered and safe.
A quick area inspection can help avoid unexpected issues. Remove any large debris like rocks or branches that could be caught by the trimmer. This ensures a smoother operation and less risk of the line breaking. Keeping the work area clear makes the trimming process more efficient. Plus, it helps prevent damage to your equipment.
Lastly, always check the trimmer for any signs of wear or damage before use. Look for cracks in the casing or worn-out line. A simple inspection can detect potential problems early. If you notice any issues, address them immediately. This proactive approach assures a safe and smooth trimming experience.
Step 2: Removing the Trimmer Head Cover
Once you’ve ensured safety measures, the next step is removing the trimmer head cover. Locate the tabs on the sides of the trimmer head. Gently press these tabs simultaneously to unlock the cover. This action allows the cover to pop off easily, providing access to the spool inside. Ensuring you don’t force it will prevent any potential damage.
After unlocking the tabs, lift the cover away from the trimmer head. Take note of how the cover is positioned before you remove it, as this will make reassembly easier. Place the cover aside in a safe spot where it won’t get lost. This small step helps keep your workplace organized. Such organization ensures you won’t spend unnecessary time looking for parts later.
With the cover removed, you’ll see the spool inside the trimmer head. The spool holds the trimmer line and can be taken out for reloading. Carefully lift the spool from its compartment, making sure not to disturb any of the internal mechanisms. Keeping everything intact makes it easier to replace the line. This careful handling prevents additional issues.
Inspect the inside of the trimmer head for any debris or old line fragments. Cleaning out any leftover pieces will ensure the new line works smoothly. A quick wipe with a cloth is usually sufficient. Additionally, check for any wear or damage. Regular maintenance like this extends the life of your trimmer and keeps it functioning effectively.
Step 3: Threading and Winding the Line
With the trimmer head cover removed, the next step is threading and winding the new line. Begin by cutting a piece of trimmer line to the appropriate length, as indicated in your manual. Insert one end of the line into the hole on the spool. Make sure it’s securely inserted before you start winding. This secures the line for even distribution.
Start winding the trimmer line around the spool, following the directional arrows. The arrows indicate the correct direction to wind the line. Winding it properly ensures the line feeds out smoothly during operation. Keep the line tight and neat to avoid tangling. Ensuring an even wind extends the spool’s efficiency.
Continue winding until the trimmer line covers the spool evenly. Leave about six inches of line unwound to thread through the trimmer head eyelets. This extra length allows for easy feeding during assembly. Make sure each layer of the line is tightly wound against the previous one. Proper winding prevents interference during use.
Once the line is wound, insert the ends through the eyelets in the trimmer head. Pull the line tight to ensure it’s firmly in place. Carefully replace the spool back into the trimmer head. Align it as it was before. Place the trimmer head cover back on, snapping it into position.
For added security, gently tug on the trimmer line to ensure it’s firmly in place. Power up your trimmer to make sure it works correctly. If the line feeds out smoothly, then the job is done. Regular inspection of the line and spool will maintain this balance. This upkeep allows for long-lasting, effective trimming sessions.
Benefits of Correct Line Installation
Proper installation of the trimmer line ensures your Dewalt trimmer operates at peak efficiency. When the line is correctly installed, it feeds out smoothly during use, reducing the chance of jams. This smooth operation allows for uninterrupted trimming, making yard work less frustrating. Additionally, a well-installed line cuts cleaner and more evenly. This results in a more polished and professional-looking lawn.
With correct line installation, you also extend the lifespan of your trimmer. Proper installation minimizes wear on the internal components of the trimmer head. This means fewer replacements and repairs over time. It’s a cost-effective way to maintain your equipment. Simply put, proper installation saves money in the long run.
Another benefit is improved safety. A properly threaded and wound line is less likely to snap or break during use. This reduces the risk of debris flying and causing injury. It also means less downtime spent replacing broken lines. By adhering to correct installation methods, you create a safer environment for yard work.
According to landscaping experts, a correctly installed trimmer line is key to achieving optimal performance. It ensures the trimmer operates with less strain, preserving battery life. This is especially important for extended yard projects. You get more done with fewer interruptions. Overall, it makes your work more efficient.
Correct installation also offers environmental benefits. Using the trimmer at its most efficient reduces power consumption. This means less energy is used during operation, which is better for the environment. It’s a small step with a positive impact. Thus, proper installation is an eco-friendly choice.
Lastly, following the correct installation process boosts your confidence in operating the trimmer. Knowing you’ve done it right gives you peace of mind. It allows you to focus on the task at hand without worrying about equipment failure. This makes yard work more enjoyable and less stressful. Proper line installation is essential for an overall better experience.
Tips to Maintain Your Dewalt Trimmer Line
Maintaining your Dewalt trimmer line is crucial for prolonging the life of your equipment. Always check the line for wear and tear before each use. If the line looks frayed or weak, replace it immediately. This ensures that the trimmer performs efficiently every time. Regular inspections prevent unexpected issues.
Proper storage of the trimmer line is essential for its longevity. Store the line in a cool, dry place away from direct sunlight. This prevents the line from becoming brittle or damaged. Humidity and heat can weaken the line over time, making it less effective. Storing it correctly keeps it in optimal condition.
During use, avoid hitting the trimmer against hard objects like rocks or concrete. Impact with hard surfaces can cause the line to snap or wear quickly. When trimming near these obstacles, proceed with caution. Adjust your approach to minimize contact. This careful technique extends the life of the line.
Regular cleaning of the trimmer head can also help maintain the line’s effectiveness. After each use, remove any debris or grass clippings caught in the head. This reduces the buildup that can interfere with the line’s performance. A clean trimmer head operates more smoothly, promoting better line wear.
Consider using a high-quality trimmer line designed specifically for your Dewalt model. High-quality lines are more durable and offer better performance. Although they might cost more upfront, they last longer and reduce the frequency of replacements. Investing in good line pays off over time. This ensures you’re getting the most out of your trimmer.
Lastly, read and follow the manufacturer’s maintenance guidelines. These guidelines provide specific tips for your trimmer model. They are designed to optimize performance and extend the life of the equipment. Adhering to these instructions keeps your trimmer in top condition. Proper maintenance leads to reliable and efficient yard work.
Frequently Asked Questions
Here you’ll find answers to common questions about handling and maintaining your Dewalt trimmer. These responses aim to help you get the most out of your equipment.
1. How often should I change the trimmer line?
The frequency of changing the trimmer line depends on usage and wear. For regular home use, replacing the line every few months is typical. If you notice the line fraying or breaking frequently, it’s a sign that a replacement is needed sooner.
Heavy-duty use may require more frequent changes. Always check the condition of your line before each use. This ensures optimal performance and prevents unexpected interruptions during work.
2. Can I use any type of trimmer line in my Dewalt 20v trimmer?
Using a compatible trimmer line specific to Dewalt models is recommended for best results. While generic lines may fit, they might not perform as well or last as long. Different types of lines are designed for various cutting tasks, from light trimming to heavier brush clearing.
Always refer to your user manual for recommended specifications on the correct type and size of trimmer line. This ensures optimal performance and protects the longevity of your trimmer.
3. What safety measures should I take when using a Dewalt trimmer?
Safety measures include wearing protective clothing like gloves, goggles, long pants, and closed-toe shoes. Ensure the area is clear of debris before starting work to avoid objects flying around. Always make sure that the battery is removed when installing or adjusting the trimmer line.
Avoid using the trimmer in wet conditions as this can create dangerous situations. Regularly inspect your equipment for damage or wear, addressing any issues immediately to maintain safe operation.
4. How can I avoid my trimmer line from tangling or jamming?
Tangling or jamming often occurs due to improper winding of the trimmer line onto the spool. Make sure you wind it evenly and tightly according to the directional arrows on your spool.
If problems persist, consider using high-quality lines that are less prone to twisting and breaking quickly during operation.
Cleaning out any built-up debris inside your spool mechanism also helps avoid jams.
5. Why does my Dewalt 20v trimmer stop working suddenly during operation?
The sudden stoppage could be due to various reasons like an overheated motor or depleted battery charge.
Check if there’s adequate ventilation around air vents and make sure they are free from blockages caused by grass clippings.
A fully charged battery should be used at all times for effective trimming sessions .
If these solutions don’t work , refer back through manufacturer guidelines for troubleshooting tips specific towards mechanical faults within power tool mechanics . Proper maintenance keeps working seamlessly over extended periods providing better overall productivity while ensuring machine durability remains intact following each successfully completed lawn care task .
Conclusion
Properly installing and maintaining your Dewalt trimmer line ensures efficient operation and extends the life of your equipment. Following the correct steps for installation minimizes interruptions and enhances performance. Regular checks and proper storage can make a significant difference.
By adhering to safety measures and using high-quality materials, you can achieve professional results with your Dewalt 20v trimmer. These practices not only save time but also reduce costs in the long run. Ensuring your trimmer is always in top condition makes yard work a breeze.

I’m Patricia D. Johnson, an affiliate marketer and blogger specializing in trimmers and grooming tools. I create honest reviews, buying guides, and practical tips to help readers choose the right trimmer for their needs. With a focus on quality, performance, and value, I simplify the decision-making process so consumers can make confident purchases.