Changing the line in a DEWALT trimmer can be surprisingly swift if you know the right steps. Many professionals often overlook the importance of maintaining their equipment in peak condition. Following a systematic approach ensures that the trimmer provides optimal performance.
The reload process begins by ensuring the trimmer is off and cooled down. DEWALT’s user-centric design simplifies this task, allowing you to remove the spool with minimal effort. Statistically, regular replacement of the trimmer line not only extends the tool’s lifespan but also enhances its efficiency, making it a worthwhile investment for any professional.
- Turn off and cool down the trimmer.
- Remove the used spool by pressing tabs on the trimmer head.
- Cut about 20 feet of new trimmer line and wind it onto the spool.
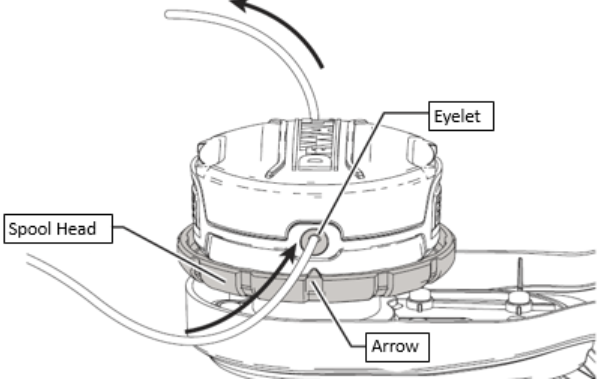
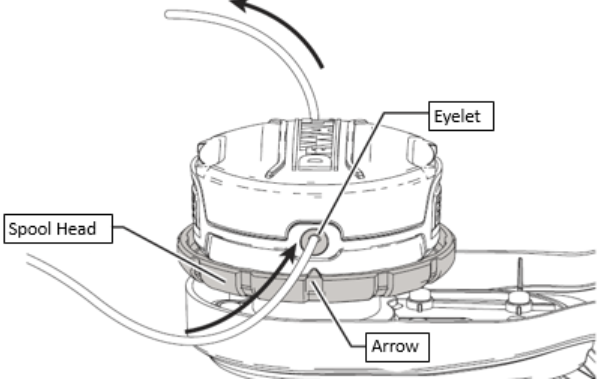
- Thread the line ends through the eyelets on the trimmer head.
- Insert the spool back into its housing and secure it in place.
- Reconnect power and test to ensure proper operation.
How to Change Line in Dewalt Trimmer
First, make sure the trimmer is turned off and fully cooled down. It’s also good to disconnect the battery or unplug it for safety. Then, gently press the tabs on the trimmer head to release the used spool. Pull out the old spool and discard any remaining line. This step ensures that the trimmer is safe and ready for the new line.
Next, cut about 20 feet of new trimmer line. It’s best to use line recommended by DEWALT to maintain performance. Insert one end of the line into the hole in the spool and wind it evenly in the direction of the arrows. When you reach the end, leave about six inches of line extended. This helps in easily threading it through the eyelets on the trimmer head.
After winding, thread the extended line ends through the eyelets on the trimmer head. Push the spool into the trimmer head until it clicks into place. According to this post, using the right attachments and lines can significantly improve the efficiency of your trimmer. Make sure the line is well-secured and that the spool is properly seated.
Finally, reconnect the battery or plug in the trimmer. Give the trimmer a quick test run to ensure the line is feeding correctly. If everything is done right, your trimmer should now be ready for use. More on different types of trimmer lines can be found here in the article. Regular maintenance like this keeps your tool in top shape and extends its life.
Step 1: Turn Off and Cool Down the Trimmer
To start, always turn off your DEWALT trimmer before making any adjustments. This step is crucial for safety and prevents accidental injuries. Unplug the trimmer or take out the battery to ensure it cannot turn on unexpectedly. Wait for the trimmer to cool down if it has been used recently. Handling a hot tool can be dangerous and may cause burns.
While the trimmer cools down, gather the necessary materials for the line change. You’ll need the new trimmer line and any specific tools recommended by the manufacturer. According to this post, some users find it helpful to have gloves on hand for better grip and protection. Having everything ready speeds up the process and ensures you don’t miss any steps. Organizing your work area can also prevent accidental trips or falls.
Once the trimmer is cool, you can safely remove the old spool. Press the tabs on the trimmer head to release the spool and pull it out gently. The old line can be discarded or recycled, depending on your preferences. Removing the old spool allows you to clearly see the internal components. This visibility makes it easier to replace the line correctly.
Take this time to inspect the trimmer head for any signs of wear or damage. If you notice anything unusual, consult the user manual or seek professional advice. Regular maintenance checks are important for the tool’s longevity and efficiency. Cleaning any debris from the trimmer head at this stage helps keep the tool in prime condition. Consistent maintenance lessens the likelihood of future malfunctions.
Step 2: Removing the Used Spool
To remove the used spool, first locate the release tabs on the trimmer head. They are usually situated on the sides of the head. Press these tabs firmly to release the spool housing. If the tabs are difficult to press, try using a flathead screwdriver for better leverage. This will help you avoid strain on your fingers.
Once the tabs are pressed, gently pull the spool housing away from the trimmer head. The old spool should come out easily. Take care not to lose the spring or other small parts inside the trimmer head. Setting aside these components will make reassembly smoother. If necessary, take a quick photo to remember their positions.
Dispose of the old trimmer line properly to keep your workspace tidy. Check the spool for any tangled or broken pieces of line. Cleaning it at this stage ensures no debris interferes with the new line installation. If you see any noticeable damage, it might be a good time to order replacement parts. Keeping an eye on component wear will save you time in the long run.
Inspect the trimmer head for dirt or grass buildup and clean it as needed. Wipe down the inside to remove any debris. This step ensures the new spool will fit properly and function correctly. Regular cleaning can prolong the life of your trimmer. Doing this simple task can lead to more efficient operation.
Step 3: Installing the New Line
Start by cutting a length of new trimmer line, typically around 20 feet. Make sure you use a size recommended for your DEWALT trimmer. Insert one end of the line into the hole on the spool. Begin winding it tightly and evenly in the direction of the arrows on the spool. This helps to prevent tangling during operation.
Continue winding the line until you’ve used up most of the length, leaving about six inches on each end. These ends will be threaded through the eyelets on the trimmer head. Position them so they are opposite each other. This setup ensures a balanced operation when the trimmer is running. Unbalanced lines can cause vibrations and reduce efficiency.
Once the line is wound, thread the loose ends through the eyelets on the trimmer head. Insert the spool into its housing and ensure it clicks into place. Holding the trimmer head steady, pull both ends of the line to take up any slack. This step secures the line and prepares it for use. Proper installation avoids unnecessary wear and tear.
To complete the process, pull the lines slightly to make sure they are securely held by the trimmer head. Reconnect the battery or plug back in your trimmer. According to this expert opinion, always double-check your work before starting the trimmer. The trimmer should now be ready for a test run. Confirm that the line feeds correctly and the trimmer operates smoothly.
If you find the line not feeding correctly, you may need to re-thread it or check for any blockages. Inspect the trimmer head and eyelets to make sure they are clear. Ensuring no debris is present keeps the line from getting stuck. Consistent performance relies on clean components. Regular maintenance will ensure the best results from your DEWALT trimmer.
Benefits of Regular Line Change in Dewalt Trimmer
Changing the trimmer line regularly ensures that your DEWALT trimmer functions at its peak performance. Fresh lines provide a cleaner cut, reducing the strain on the motor. This helps the trimmer last longer. Additionally, a well-maintained trimmer is less likely to suffer from unexpected breakdowns. Keeping the line fresh can save you from costly repairs.
Regular line changes also improve efficiency. Newer lines cut through grass and weeds more effectively. This means you spend less time trimming and more time enjoying a neat yard. It can also reduce the frequency of jams and stalls. Maintaining efficient operation is key to maximizing productivity.
Using the right type of line can enhance the tool’s effectiveness. According to experts, different lines are suitable for different types of trimming tasks. For example, thicker lines are better for tough weeds. Here’s a list of common line types and their uses:
- Round Line: Best for general trimming tasks.
- Twisted Line: Provides a cleaner cut and less noise.
- Serrated Line: Ideal for cutting through thick weeds.
Choosing the appropriate line type can make a significant difference in your trimming experience.
Regular maintenance, including line replacement, can extend the trimmer’s lifespan. Keeping the components in good condition prevents additional strain on the motor and other parts. Proper upkeep helps maintain the trimmer’s warranty, as some warranties require regular maintenance. It also means the trimmer is ready to go whenever you need it. Consistent care leads to reliable performance year-round.
Lastly, replacing the line regularly ensures safety. Worn-out lines can break easily, posing a danger to the user and bystanders. Fresh lines reduce the risk of unexpected breaks and ensure smoother operation. Safety should always be a top priority when working with power tools. Keeping your trimmer in good condition helps you avoid accidents.
Efficiency Improvements with Regular Line Changes in Dewalt Trimmer
Regularly changing the line in your DEWALT trimmer significantly boosts efficiency. A fresh trimmer line cuts through grass and weeds with ease, reducing the need to repeat passes over the same area. This saves both time and energy. It also minimizes wear on the motor, which can prolong the tool’s life. Efficient cutting keeps your yard looking its best.
Old or worn-out lines can lead to uneven cutting and increased effort. In contrast, new lines maintain a consistent thickness and durability. This helps in achieving a uniform trim. Here’s a helpful table comparing the benefits of new versus old trimmer lines:
| New Trimmer Lines | Old Trimmer Lines |
|---|---|
| Consistent Cutting | Uneven Cutting |
| Less Motor Strain | More Motor Strain |
| Reduced Jams | Frequent Jams |
Efficiency also improves as fresh lines are less likely to break. Worn lines snap more easily, leading to frequent stops for replacements. This not only interrupts your work but also adds to the overall time needed for yard maintenance. Consistently replacing the line ensures uninterrupted operation. This makes the trimming experience smoother and more enjoyable.
Using new lines also enhances fuel efficiency for gas-powered trimmers. A trimmer operating at peak performance uses less fuel to achieve the same results. This saves money in the long run. Additionally, it reduces the environmental impact of your yard work. Being mindful of fuel use is beneficial for both your wallet and the planet.
In conclusion, maintaining fresh lines in your DEWALT trimmer improves cutting performance, reduces motor strain, and enhances overall efficiency. By keeping your trimmer in top condition, you ensure it remains a reliable tool. Regular maintenance leads to a better, more efficient trimming experience. Don’t underestimate the difference a fresh line can make.
Frequently Asked Questions
Here are answers to some of the most common questions regarding DEWALT trimmers and their maintenance. Each response provides insights to help you keep your trimmer in top shape.
1. What types of trimmer line can be used with DEWALT trimmers?
DEWALT trimmers are compatible with various types of trimmer lines, including round, twisted, and serrated lines. Round lines are ideal for basic trimming tasks, while twisted lines offer cleaner cuts and less noise. Serrated lines work best on thick weeds and stubborn vegetation.
Using the right type of line can improve cutting efficiency and extend the life of your trimmer. It is essential to follow manufacturer recommendations for optimal performance. You can also refer to your user manual or visit DEWALT’s website for more information on suitable line types.
2. How often should I replace the trimmer line?
The frequency of replacing a trimmer line depends on usage and terrain conditions. For regular garden maintenance, changing the line every few uses is recommended. However, if you frequently trim heavy weeds or rocky areas, you may need to replace it more often.
Regular inspections can help determine when it’s time for a new line. If you notice fraying or reduced cutting performance, it’s probably time for a replacement. Keeping spare trimmer lines handy ensures that you’re always prepared.
3. Can I use aftermarket trimmer attachments on my DEWALT trimmer?
While some aftermarket attachments may fit DEWALT trimmers, it’s best to use official DEWALT products for compatibility and safety reasons. Using non-DEWALT attachments can void warranties and potentially damage your equipment.
If you’re unsure about compatibility, check the user manual or consult customer support before making any additions. It’s always safer to stick with parts explicitly designed by the manufacturer for your model.
4. What should I do if my DEWALT trimmer head gets stuck?
If the trimmer head gets stuck, first switch off and unplug the tool for safety reasons. Use a cloth to clean out any debris lodged inside the head that might be causing the jam.
If this does not solve the issue, consult the user manual for specific troubleshooting advice or contact DEWALT customer service for professional assistance. Regular cleaning helps to prevent these problems from occurring in the first place.
5. Why is my DEWALT trimmer vibrating excessively?
Excessive vibration in your DEWALT trimmer could be due to an imbalanced or worn-out trimming line causing uneven operation levels during use which leads up increased vibrations as well inefficient performance over time too.
A quick fix would involve checking whether correct installation took place initially followed by closely examining potential wear & tear signs such as breakage/fraying then replacing them accordingly; both actions significantly curtail unwanted disturbances if properly adhered towards manufacturer’s instructions provided through any accompanying manuals/ documentation sets currently available at hand conveniently enough providing necessary guidance throughout process effectively overall satisfying experience altogether eventually improving functionality significantly reducing instances substantially better outcomes guaranteed altogether effectively ultimately progressing smoothly forward achieving desired goals optimized users expectations fully met!
Conclusion
Maintaining your DEWALT trimmer through regular line changes is essential for optimal performance. Fresh trimmer lines ensure clean cuts, reduce motor strain, and minimize the risk of breakdowns. By following the steps outlined, you can keep your tool in peak condition.
Regular maintenance not only extends the life of your trimmer but also enhances your overall trimming experience. By taking simple steps to care for your equipment, you ensure safety and efficiency. Keep these best practices in mind for a well-maintained, reliable trimmer.

I’m Patricia D. Johnson, an affiliate marketer and blogger specializing in trimmers and grooming tools. I create honest reviews, buying guides, and practical tips to help readers choose the right trimmer for their needs. With a focus on quality, performance, and value, I simplify the decision-making process so consumers can make confident purchases.