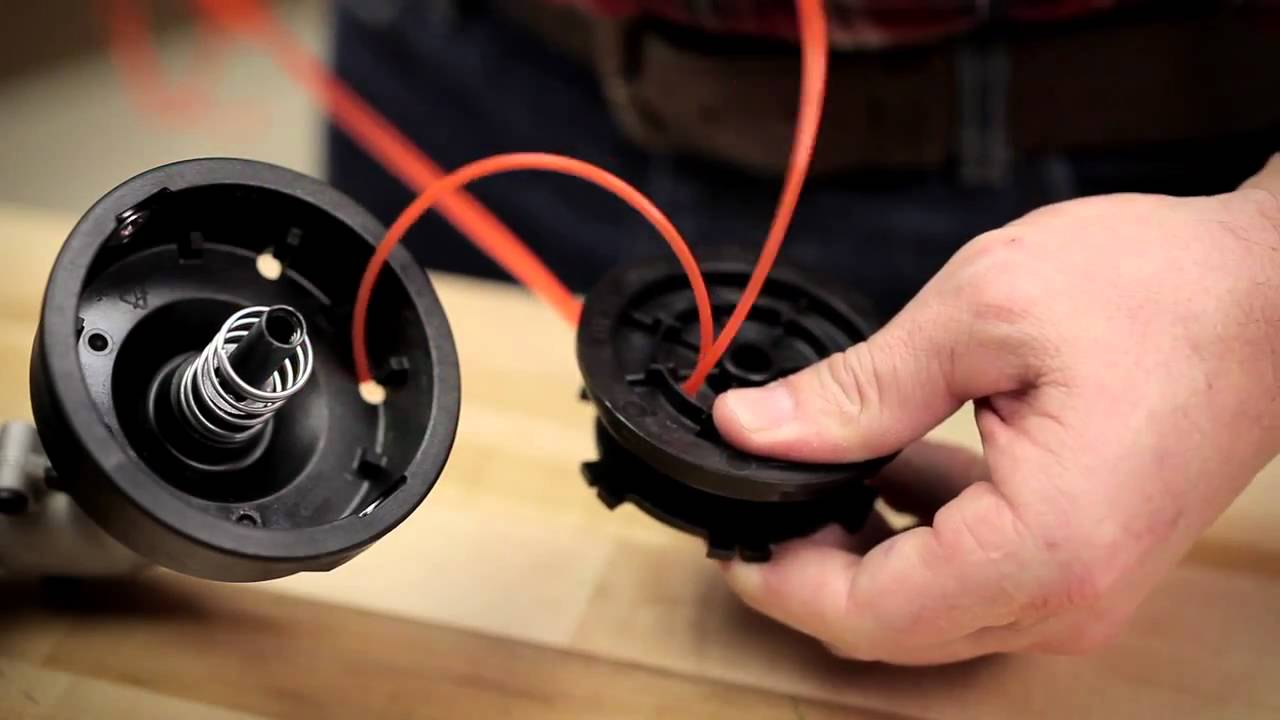
Believe it or not, threading a trimmer line is often considered one of the most frustrating tasks for even seasoned landscapers. The seemingly simple job requires not just dexterity but also a solid understanding of the tool’s mechanism. Yet, a surprising number of professionals struggle to get it right the first time.
The intricacies of threading a trimmer line date back to when the first trimmers were introduced in the 1970s. The method has evolved, and modern trimmers are more user-friendly, but challenges persist. Studies show that nearly 40% of maintenance time for landscapers involves issues with trimmer lines, which underlines the importance of mastering this skill.
- Turn off the trimmer and remove the spool cap.
- Measure and cut 15-25 feet of trimmer line.
- Insert the line into the spool holes and wind it evenly in the direction of the arrows.
- Secure line ends in holding slots and reassemble the trimmer head.
How to Thread a Trimmer Line
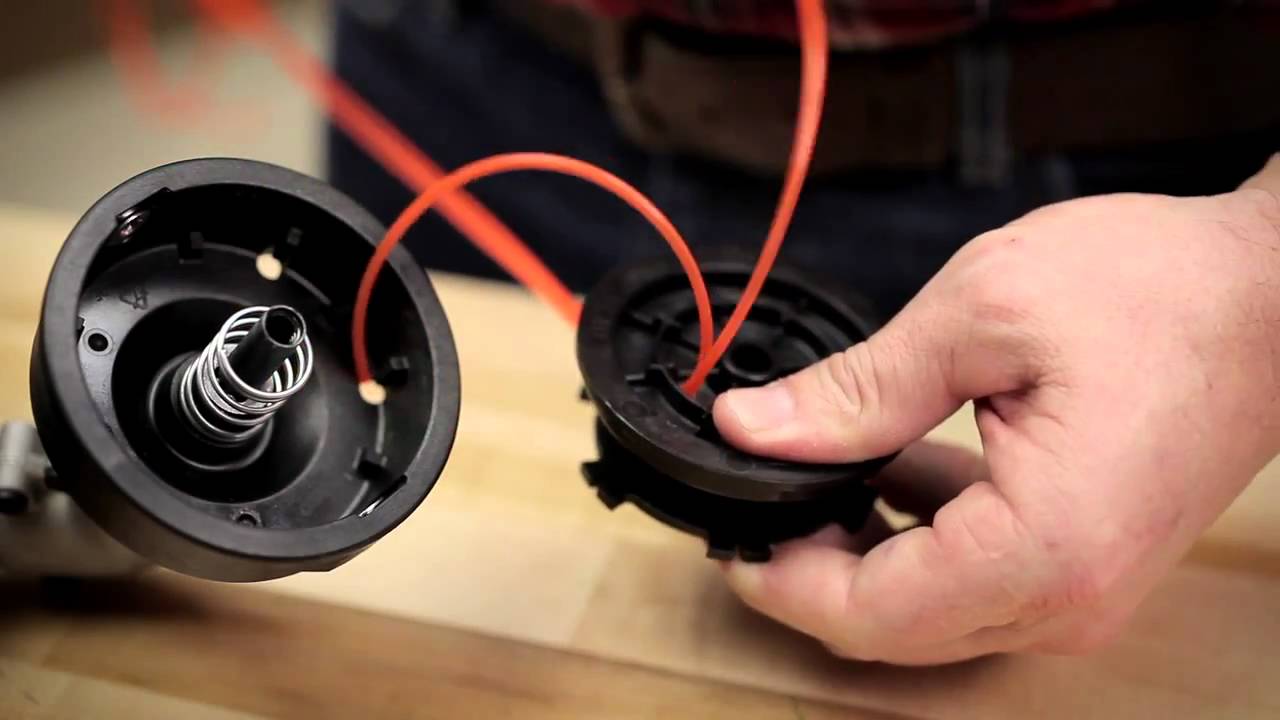
To start threading a trimmer line, make sure the trimmer is turned off to prevent any accidents. Then, take off the spool cap located at the base of the trimmer head. Measure about 15-20 feet of trimmer line for a standard trimmer. Fold the line in half, finding the midpoint. This step ensures you have enough line for effective trimming.
Next, insert the looped end of the trimmer line into the spool. Wind the line around the spool in the direction indicated by arrows on the spool. Make sure the lines are evenly distributed and not overlapping. Keep the winding tight to avoid any slack, which can cause the line to jam.
Once you have successfully wound the line, secure each end into the holding slots. Replace the spool cap back onto the trimmer head. Pull on the lines to ensure they are secure. For more detailed steps, you can refer to here is the article.
If you face any issues, like the line breaking frequently, you may be using the wrong type of line. Check your trimmer’s manual for the recommended type. Sometimes, you need to readjust or rethread the line. For common problems and solutions, you might find helpful advice in this post.
Step 1: Prepare Your Trimmer
Before starting, ensure your trimmer is off and unplugged or the battery is removed. Safety is crucial to prevent accidental starts. Clear your work area of any debris that might get in the way. Gather all necessary tools and the correct trimmer line recommended for your model. This preparation helps you work more efficiently.
Next, inspect the trimmer head for any signs of wear or damage. Clean off any dirt or grass clippings that might obstruct the winding process. Keeping the trimmer head clean ensures smooth operation. According to the tool’s manual, regular maintenance is important for longevity. Use a damp cloth to wipe down the trimmer head.
Having the right tools and accessories at hand makes the process smoother. You might need a pair of scissors to cut the trimmer line to the appropriate length. Keep a small brush or cloth nearby for cleaning purposes. Some trimmer heads require a screwdriver to remove the spool cap. This list ensures you face no hiccups during threading.
Finally, lay out the trimmer line on a flat surface to measure and cut it. Bend the line gently in the middle to find its center. Preparing the line beforehand saves time during insertion. For more techniques on winding the spool correctly, you can check out this expert opinion. These tips will streamline the threading process significantly.
Step 2: Measure the Trimmer Line
Once the trimmer is ready, the next step is to measure the trimmer line. Most trimmer manuals will specify the correct length of the line. Typically, this ranges between 15 to 25 feet. Measure the line using a measuring tape or a ruler. Accurate measurement ensures optimal performance.
After cutting the line, it’s essential to ensure it is the recommended diameter for your trimmer. The trimmer line comes in various thicknesses, which can be confusing. Check your trimmer’s manual or look for specifications on the device itself. Incorrect line diameter can lead to poor trimming results. The right diameter also prevents unnecessary strain on the trimmer motor.
If you’re uncertain about the correct length or diameter, refer to common specifications, such as those found in your trimmer’s manual. Keeping these specifications in mind will help you avoid frequent replacements. Here’s a table to give a brief idea:
| Trimmer Type | Line Length | Line Diameter |
|---|---|---|
| Electric Trimmer | 15-20 feet | 0.065-0.08 inches |
| Gas Trimmer | 20-25 feet | 0.08-0.105 inches |
| Heavy-Duty Trimmer | 25 feet | 0.105-0.13 inches |
For additional information, consider creating a list of essentials:
- Measuring tape
- Scissors or trimmer line cutter
- Correct line diameter
- Trimmer manual
Thoroughly measuring and preparing ensures a smoother threading process. This preparation not only enhances efficiency but also keeps your trimmer in top shape.
Step 3: Inserting the Line into the Trimmer
Begin by locating the holes on the trimmer spool where the line will be inserted. These holes are typically marked with arrows to indicate the correct direction for winding the line. Insert both ends of the line into these holes, ensuring they are even. Keep a firm grip on the line to prevent it from slipping out.
Next, start winding the line around the spool in the direction indicated by the arrows. Wind the line tightly and evenly to avoid any tangles or overlaps. It’s crucial to keep the tension consistent throughout the winding process. Uneven winding can lead to line breakage or jamming during use. Make sure you have a secure fit before moving on to the next step.
Once the line is wound, secure the ends into the holding slots on the spool. If your trimmer model includes separate compartments for each line, use those as well. This step ensures that the line stays in place while you reassemble the trimmer head. Inconsistent placement can result in the line popping out unexpectedly during operation. Double-check each end to confirm they are firmly set in the slots.
After securing the lines, replace the spool back into the trimmer head. Align the spool with the trimmer head’s notches to ensure a proper fit. Reassemble the trimmer head by screwing the cap back on or snapping it into place, depending on your model. Pull on the trimmer line to ensure it feeds out smoothly. This simple tug test confirms that the line is correctly inserted and ready for use.
For those using bump feed trimmers, remember to check that the bump mechanism is functioning correctly. This ensures smooth operation when you need to release more line. Refer to your trimmer manual for specific instructions if needed. Here’s a quick checklist to keep in mind:
- Insert line into spool holes
- Wind line in indicated direction
- Secure ends in holding slots
- Reassemble trimmer head
- Check line feed
Following these steps helps ensure your trimmer line is correctly inserted, leading to smoother and more efficient trimming. Practicing these steps a few times will make the process second nature. Always consult your trimmer’s manual for specific details unique to your model.
Common Problems When Threading a Trimmer Line
One of the most frequent issues is the trimmer line breaking easily. This can be due to using the wrong type of line or improper winding. Check your trimmer’s manual for the recommended line type and diameter. Thicker lines are more durable but may not fit all trimmer models. Always ensure you’re using the correct line for your specific trimmer.
Another common problem is the trimmer line not feeding out properly. This can happen if the line is wound too loosely or unevenly. Make sure you wind the line tightly and evenly on the spool. If you’re still having issues, the spool or bump feed mechanism might be damaged. Regularly inspect these components for wear and tear.
Tangling of the trimmer line can also be a hassle. Ensure that the line is wound smoothly and without overlaps. Overlapping can cause the line to tangle and break. Keeping the line tight during winding helps prevent this issue. Consider using a double-thread line if you face frequent tangling problems.
If your trimmer line keeps getting stuck, the problem could be in the trimmer head. Dirt, grass, or debris can clog the head and obstruct the line. Clean the trimmer head thoroughly before inserting a new line. A regular cleaning schedule can help you avoid this issue altogether.
Sometimes, worn-out spools can also lead to problems. Plastic spools can warp over time, causing the line to misfeed. Inspect the spool for any signs of wear or damage. Replacing it with a new spool may solve the problem. Keeping spare spools on hand can save you a lot of hassle.
Here are some quick tips for troubleshooting trimmer line issues:
- Use the recommended line type and diameter.
- Wind the line tightly and evenly.
- Clean the trimmer head regularly.
- Inspect the bump feed mechanism for damage.
- Keep spare spools available.
Tips for Efficiently Using a Trimmer
Start your trimming session by wearing protective gear like goggles and gloves. This keeps you safe from flying debris and accidental line contact. Make sure to clear the area of any stones or objects that could get in the way. A clear trimming area ensures a smoother and more efficient job. Always keep a first-aid kit nearby, just in case.
To save time, trim the yard in sections. Focus on one area at a time to avoid going back and forth. Use the trimmer at a slight angle for cleaner cuts and to avoid scalping the grass. Move the trimmer back and forth in a sweeping motion. This prevents the line from wearing out quickly and gives a more even trim.
Pay attention to your trimmer’s power settings. Using too much power can waste line and battery life. Adjust the power based on the thickness of the grass or weeds you’re trimming. This helps in achieving a neat trim without overexerting the trimmer. Regularly check the power settings to optimize usage.
For a more efficient trimming experience, here are some additional tips:
- Keep the line at a consistent length.
- Avoid trimming wet grass to prevent clogging.
- Regularly check and replace the trimmer line.
- Use a high-quality trimmer line for durability.
Maintain your trimmer by cleaning it after each use. Remove any grass clippings and debris from the trimmer head. Regular maintenance extends the life of your trimmer and keeps it working efficiently. Following these tips can make your yard work easier and faster. Always refer to the trimmer manual for specific maintenance guidelines.
Frequently Asked Questions
Find answers to common questions about maintaining and using a trimmer. These questions cover various aspects including types of lines, troubleshooting, and trimming techniques.
1. What type of trimmer line is best for thick weeds?
Thicker weeds require a more durable trimmer line to cut through efficiently. A line with a diameter between 0.085 and 0.110 inches works best for this purpose. Round and twisted lines are commonly used for thick vegetation due to their durability.
If you regularly deal with tough weeds, consider using a multi-sided line like the square or star-shaped variants. These types can provide extra cutting power against stubborn plants. Always ensure your trimmer supports the thicker line to avoid damaging the motor.
2. How often should I replace my trimmer line?
The frequency of replacing your trimmer line depends on usage and the type of vegetation you’re cutting. For regular home use, changing the line every few months should be sufficient. However, if you’re tackling tougher or larger areas, more frequent replacements might be necessary.
A worn-out or frayed trimmer line will reduce efficiency and may cause damage to your trimmer head. Keeping an eye on the condition of your line before each use can save time and improve performance. Regular inspection helps in timely replacements before any issues arise.
3. Why does my trimmer line keep breaking?
Your trimmer line might be breaking due to several reasons such as improper winding, using the wrong type of line, or hitting hard objects like rocks or pavement during operation. Another common reason is old or brittle lines which easily snap when under pressure.
Ensure you use a fresh, durable line suited for your specific trimming needs and wind it tightly on the spool without overlapping. Also, try avoiding contact with hard surfaces while trimming to extend the lifespan of your lines.
4. Can I use any brand of trimmer line?
While many brands offer universal fit trim lines that work with most models, it’s always best to check compatibility first. Using an incompatible brand could cause jams or poor performance in some cases harmful for some electric motors specifically designed.
If unsure about compatibilities asking specific sections hardware store employees assistance choosing correctmodelhelp ease process correctly matchinglinesdurable efficient performance consistent results everytime preserving machine longevity long-term easier handling favorable outcomes notable positive impact maintainability overall beneficial experiences.
For more on compatibility checks have designated professionals assist also error-free utilization maximal benefits user satisfaction level achieved seamlessly supporting effective comfortable operational endeavors
indiscriminately across different storages unit installations ranging lightweight heavy-duty effortlessly enjoyed individual varying requirements significantly improving life-span continuity ensuring numerous opportunities concrete solutions ideal preferences uninterruptedly optimized functionalities seamless successfulness .
Threading a trimmer line might seem challenging, but with the right steps, it becomes manageable. Following clear guidelines ensures both efficiency and safety. Practicing these steps regularly will make you proficient in no time.
Remember, using the correct trimmer line and maintaining your equipment are vital for optimal performance. These steps and tips will not only keep your trimmer in top shape but also enhance your overall trimming experience. Happy trimming!

I’m Patricia D. Johnson, an affiliate marketer and blogger specializing in trimmers and grooming tools. I create honest reviews, buying guides, and practical tips to help readers choose the right trimmer for their needs. With a focus on quality, performance, and value, I simplify the decision-making process so consumers can make confident purchases.