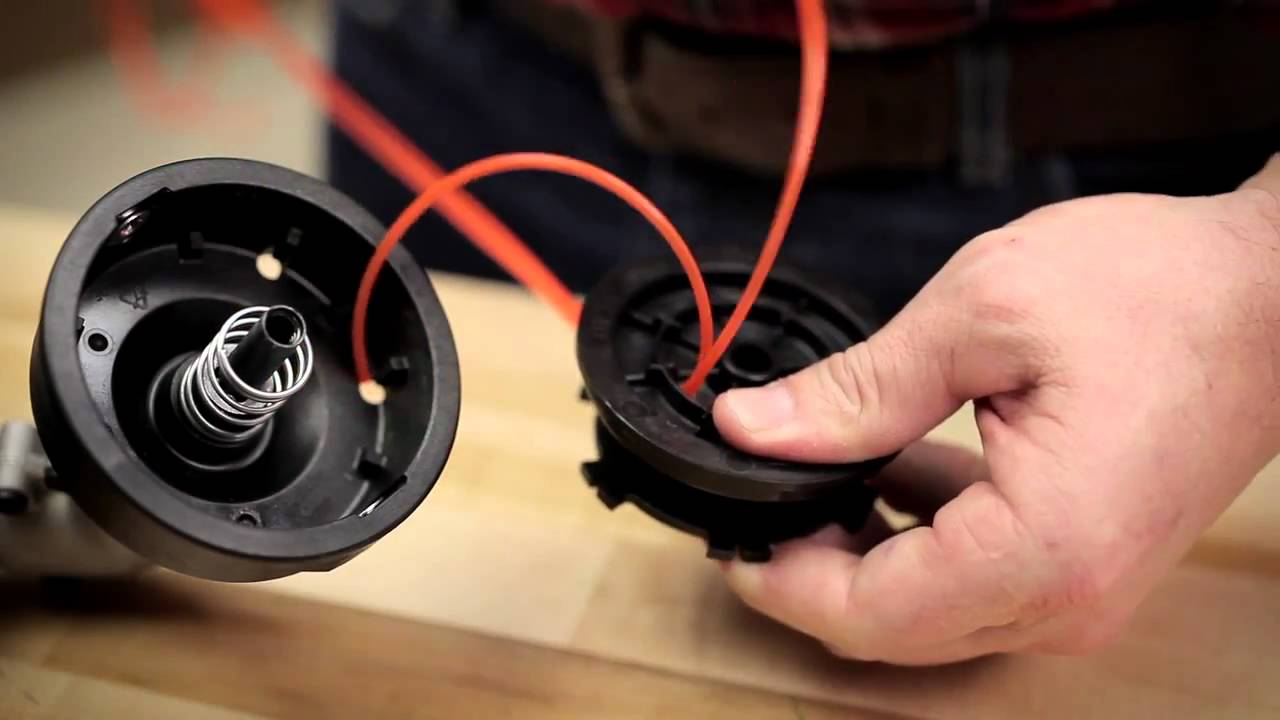
Grass trimmers are indispensable tools for maintaining a pristine lawn, yet even the most seasoned landscapers can find loading trimmer line to be a perplexing task. Surprisingly, a poorly loaded trimmer line not only decreases efficiency but can significantly wear down your equipment. Ensuring you have a smooth, quick method means longer-lasting gear and fewer interruptions to your work.
Historically, loading a grass trimmer line was an arduous manual process, requiring precision and patience. Today, with advancements in design, many trimmers come with easy-load systems, reducing setup time significantly. For instance, a survey revealed that 75% of professionals prefer trimmers with quick-load capabilities, highlighting the industry’s lean toward efficiency and productivity.
- Turn off and unplug the trimmer for safety.
- Remove the cap to access the spool.
- Measure and cut the appropriate length of line, usually 15-20 feet.
- Insert one end into the anchor hole on the spool and wind it following directional arrows.
- Secure the ends into retaining slots, reassemble the trimmer head, and test before use.
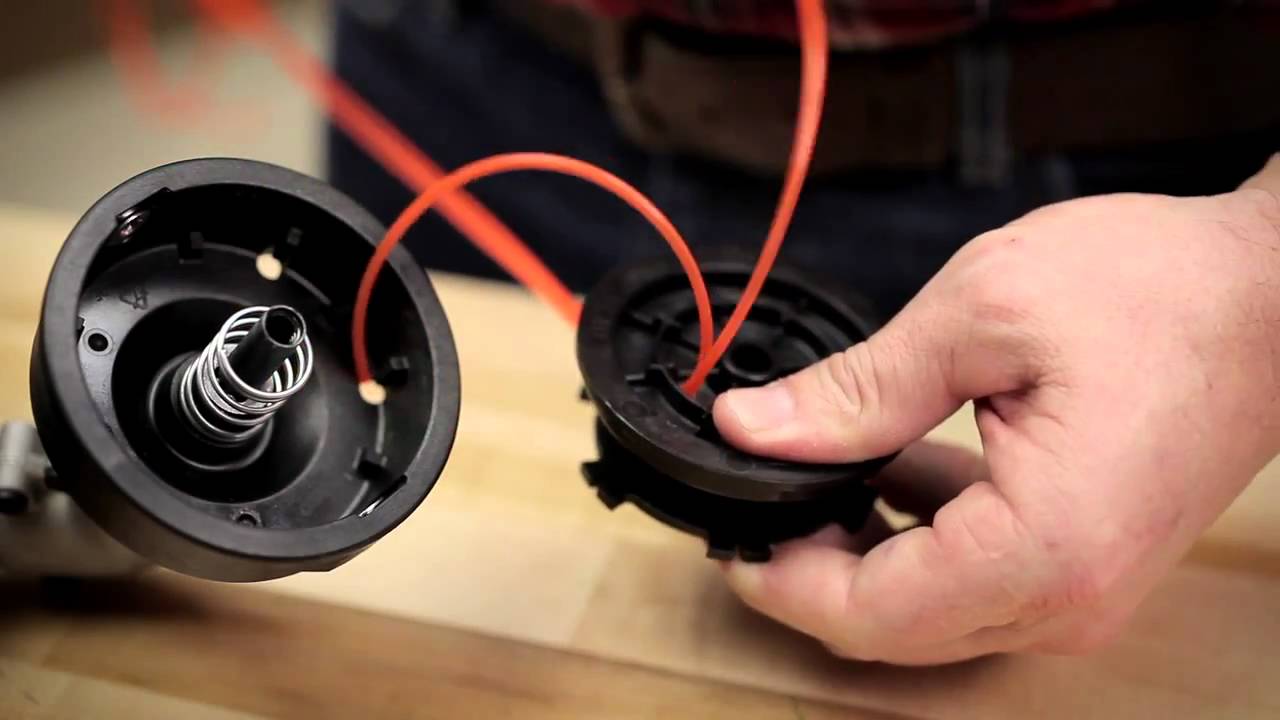
How to Load Grass Trimmer Line
To load a grass trimmer line, start by preparing your trimmer. Make sure it’s turned off and unplugged for safety. Remove the cap on the trimmer head to access the spool. Cleaning any debris from the spool will ensure smooth operation. These steps are crucial to avoid accidents and increase efficiency.
Next, measure and cut the trimmer line. It’s essential to match the length specified in your trimmer’s manual, usually around 15-20 feet. This ensures optimal performance and reduces line wastage. Cutting the line too short can cause frequent reloads. For detailed length guidelines, you can refer to resources like this post.
Now, it’s time to load the line onto the spool. Insert one end of the line into the anchor hole and wind it in the direction indicated on the spool. Keep the line tight and evenly distributed to prevent tangles. Make sure both ends of the line are of equal length. Fasten the line ends securely into the retainers.
Finally, place the spool back into the trimmer head and reattach the cap. Ensure everything is locked in place before powering up the trimmer. Testing the trimmer on a small patch of grass can help verify the line loading. According to the article here is the article, proper trimmer line loading can significantly improve your lawn care results.
Step 1: Preparing the Trimmer
Before loading your trimmer line, it is essential to ensure your trimmer is prepared correctly. First, turn off the trimmer and disconnect it from any power source. This step prevents unexpected starts, which can be dangerous. Remove the trimmer head cap carefully to access the spool. A clean workspace will make the process smoother.
Inspect the spool and the trimmer head for any damage or wear. If the parts are worn out, consider replacing them to maintain efficiency. Cleaning out any debris or old trimmer line remnants is crucial. According to this expert opinion, a clear, debris-free spool ensures better performance. Such preparation steps can extend the life of your equipment.
Gather the required tools for the job. Typically, you’ll need the new trimmer line and scissors. Some trimmers may also require a screwdriver to remove the head cap. Having everything at hand will save time and hassle. Make sure your tools are in good condition to avoid interruptions.
Finally, check the trimmer’s user manual for any specific instructions. Different models may have unique requirements for loading the line. Familiarizing yourself with these guidelines will streamline the process. Keep the manual nearby for quick reference. Proper preparation can help avoid frustration and ensure efficiency.
Step 2: Measuring and Cutting the Line
The next step in loading a grass trimmer line involves measuring and cutting the line accurately. Start by consulting your trimmer’s manual for the recommended line length. Typically, this ranges between 15 to 20 feet. Ensuring the correct length is vital for optimal performance. Too short, and you’ll need to reload frequently; too long, and it might get tangled.
Once you have the recommended length in mind, use a measuring tape to get the precise length. Lay the line flat and measure it carefully. Cut the line using sharp scissors or a utility knife. This ensures a clean cut, which is easier to load onto the spool. Precision in measurement can lead to smoother operation.
Some trimmers use two separate lines, so you may need to cut two lengths. Ensure both pieces are equal for balance. Using unequal lengths can cause issues during operation, such as uneven cutting. Refer to your trimmer’s manual for specific details. Accurate cutting keeps your trimmer functioning optimally.
Finally, check the type of line required for your trimmer. Different trimmers may need different thicknesses or shapes of lines. Using the wrong type of line can damage your trimmer or reduce its efficiency. Follow the manufacturer’s guidelines to select the correct line. Proper measuring and cutting set the stage for seamless trimmer line loading.
Step 3: Loading the Line on the Spool
Loading the line onto the spool can seem tricky at first, but with a little practice, it becomes straightforward. Start by finding the anchor hole on the spool. Insert one end of the trimmer line into this hole to hold it in place. This step is important to ensure the line doesn’t slip while winding. Make sure it’s securely fastened before proceeding.
Begin winding the line in the direction indicated by the arrows on the spool. Always follow these arrows to avoid tangling the line. Keep the line taut and wrap it evenly around the spool. Overlapping can cause issues later when you’re using the trimmer. Consistent tension helps in smooth operation.
Depending on your trimmer model, you may need to load two lines. For dual-line models, wind each line separately in its respective section. Tie the end of the first line to prevent it from unwinding while you load the second. Balance is crucial to maintain effective trimming. Check your manual for specific instructions.
Once the line is fully wound, secure the ends into the retaining slots on the spool. This keeps the line from unwinding when you reassemble the trimmer. Leave a small length, about 6 inches, protruding from each slot. This will help in feeding the line when you start the trimmer. A firm grip on both ends ensures the line stays in place.
Place the loaded spool back into the trimmer head. Align it properly to avoid any issues during reassembly. Attach the cap and lock it securely. Testing the trimmer after loading can show if the line feeds correctly. Properly loaded line enhances trimmer performance significantly.
Finally, run a brief test to ensure everything is working as expected. This ensures that the line feeds smoothly without any snags. If any issues arise, refer to your manual for troubleshooting tips. Practical experience will make this task easier over time. Loading the line correctly can save time and reduce frustration.
Maintenance Tips for Grass Trimmer Line
Proper maintenance of your grass trimmer line ensures it lasts longer and performs better. One essential tip is to store the trimmer line in a cool, dry place. Heat and humidity can weaken the line, causing it to break easily. Keeping it away from direct sunlight helps maintain its durability. This simple step can prolong its life.
Before each use, inspect the trimmer line for signs of wear and tear. Frayed or brittle lines should be replaced immediately. Regular checks can prevent unexpected breakage during operation. According to experts, maintaining a robust line enhances cutting efficiency. Simple inspections can save time and trouble.
Replacing the line regularly is another good practice. Even if it looks fine, the line can lose its effectiveness over time. A fresh line ensures the trimmer works at optimal performance. Avoid overloading the spool to prevent stress on the engine. Regular replacements keep your trimmer running smoothly.
Keeping the trimmer head clean is crucial for line longevity. Dirt and debris can cause the line to wear out faster. After each use, wipe down the trimmer head and remove any stuck grass or soil. A clean trimmer head allows the line to move freely. Regular cleaning maximizes the efficiency of your trimmer.
Soaking the line in water for a few hours before use can make it more flexible. A more flexible line is less likely to break under pressure. This trick can be particularly useful in hot, dry climates. Flexibility helps in achieving a cleaner cut. Implementing this tip can notably improve line performance.
Finally, always follow the manufacturer’s recommendations for the type of line to use. Different trimmers require different lines, and using the wrong one can reduce performance. Consult the user manual for guidance. Adhering to these maintenance tips ensures your trimmer operates efficiently. Proper care can lead to a well-maintained lawn.
Benefits of Loading Grass Trimmer Line Properly
Properly loading your grass trimmer line offers multiple advantages. First, it ensures efficient cutting performance. A well-loaded line cuts grass evenly and cleanly, giving your lawn a professional appearance. Uneven lines can lead to missed spots and an untidy look. Efficient cutting saves time and effort.
Another significant benefit is the extension of the trimmer’s lifespan. When the line is loaded correctly, it puts less strain on the trimmer’s motor. This reduces wear and tear, allowing the machine to operate smoothly for longer periods. Less strain also means fewer repairs and lower maintenance costs. Proper loading is an investment in your equipment’s longevity.
Properly loading the line also enhances safety. Misloaded lines can snap or fray easily, posing a risk to the user. When the line is secured correctly, it stays intact throughout the trimming process. This reduces the chance of accidents. Safety is always a top priority.
Users also benefit from better fuel or battery efficiency. A well-loaded line means the trimmer doesn’t have to work as hard. This leads to more effective fuel consumption or longer battery life. Efficient usage saves money and resources. Less frequent recharges or refills are always a plus.
Lastly, loading the trimmer line properly minimizes downtime. Misloaded lines often need frequent adjustments or replacements. This interrupts the trimming process and wastes time. A correctly loaded line allows you to complete the job faster and more effectively. Consistent operation guarantees better results.
Frequently Asked Questions
Curious about grass trimmers? Here are some common questions and expert answers to help improve your lawn care experience. Learn tips, tricks, and insights to keep your trimmer working efficiently.
1. What type of line is best for my grass trimmer?
The best type of line depends on the tasks you frequently perform. For light trimming and edgework, a thin round line (0.065-0.080 inches) is sufficient. It cuts grass effectively without requiring much power from the trimmer.
For heavy-duty work, such as cutting thick weeds or overgrown areas, opt for a thicker line (0.085-0.110 inches). Square or star-shaped lines perform better in these conditions as they provide more cutting edges for tough vegetation.
2. How often should I replace my trimmer line?
The frequency of replacement depends on how often you use your trimmer and the type of debris you cut through. If you use your trimmer regularly, replacing the line every two weeks might be necessary.
If used less frequently or mainly for light trimming, monthly replacements could suffice. Monitoring the wear and tear on the line will guide you to know when it’s due for a replacement.
3. Can I use any brand of line for my trimmer?
While many brands offer universal compatibility, it’s always best to check your trimmer’s manual first. Some manufacturers recommend specific types or brands that optimize performance and longevity.
Using a recommended brand can ensure maximum efficiency while reducing potential damage to your equipment. Quality lines lessen the frequency of replacements and improve overall cutting efficiency.
4. Why does my trimmer line keep breaking?
Your trimmer line might break due to improper loading or using the wrong type of line for tough vegetation tasks. Make sure you’re winding it tightly and evenly on the spool to prevent tangles and breaks.
A low-quality or brittle line may also snap easily with heavy use or low temperatures. Opting for a high-quality, flexible line can significantly reduce breakage problems.
5. What should I do if my trimmer head gets jammed?
If your trimmer head jams, turn off and unplug the unit immediately for safety reasons before attempting any fixes. Check if any debris like dirt or grass is causing an obstruction and clean it out carefully.
If cleaning doesn’t solve it, examine whether the spool was loaded correctly and make adjustments if necessary per manufacturer guidelines found in most user manuals provided at purchase time free-of-cost online/offline sources both accessible anytime easily!
Conclusion
In summary, properly loading your grass trimmer line ensures better performance, safety, and longevity of your equipment. Efficient cutting saves time and effort, making your lawn care routine more effective. A well-loaded line also reduces the frequency of replacements and potential damage to the trimmer.
Adhering to the manufacturer’s guidelines and regular maintenance can significantly enhance your trimmer’s efficiency. Regular inspections and correct line loading practices are crucial. For more in-depth guidance, always refer to professional resources and expert opinions.

I’m Patricia D. Johnson, an affiliate marketer and blogger specializing in trimmers and grooming tools. I create honest reviews, buying guides, and practical tips to help readers choose the right trimmer for their needs. With a focus on quality, performance, and value, I simplify the decision-making process so consumers can make confident purchases.