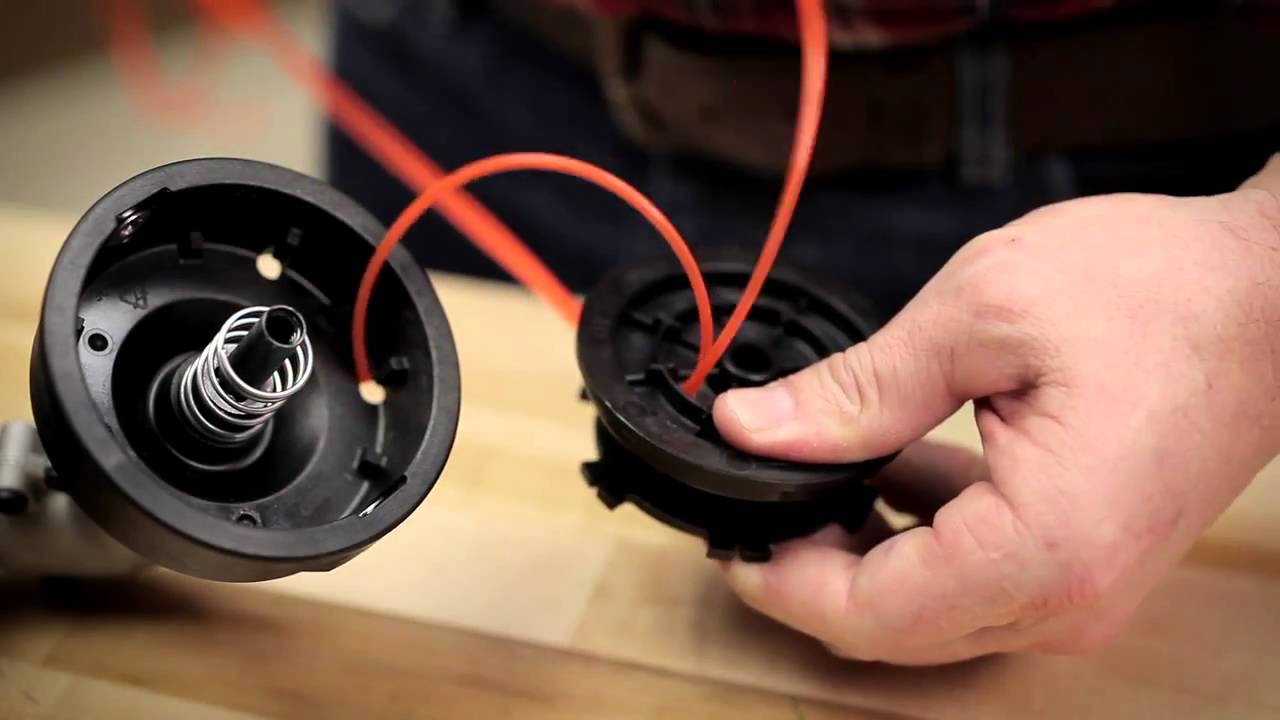
Believe it or not, incorrect installation of grass trimmer line is one of the leading causes of ineffective yard maintenance. This small yet crucial detail can make a significant difference in achieving that pristine look professionals aim for. It’s more than just snapping the line into place; it requires precision and knowledge.
Understanding the mechanics of your trimmer is essential. Most experts agree that familiarity with the specific model can prevent up to 30% of common mishaps. By ensuring the line is evenly wound and properly secured, you enhance both performance and longevity of your equipment.
- Turn off and unplug the trimmer.
- Remove the spool cap and old line.
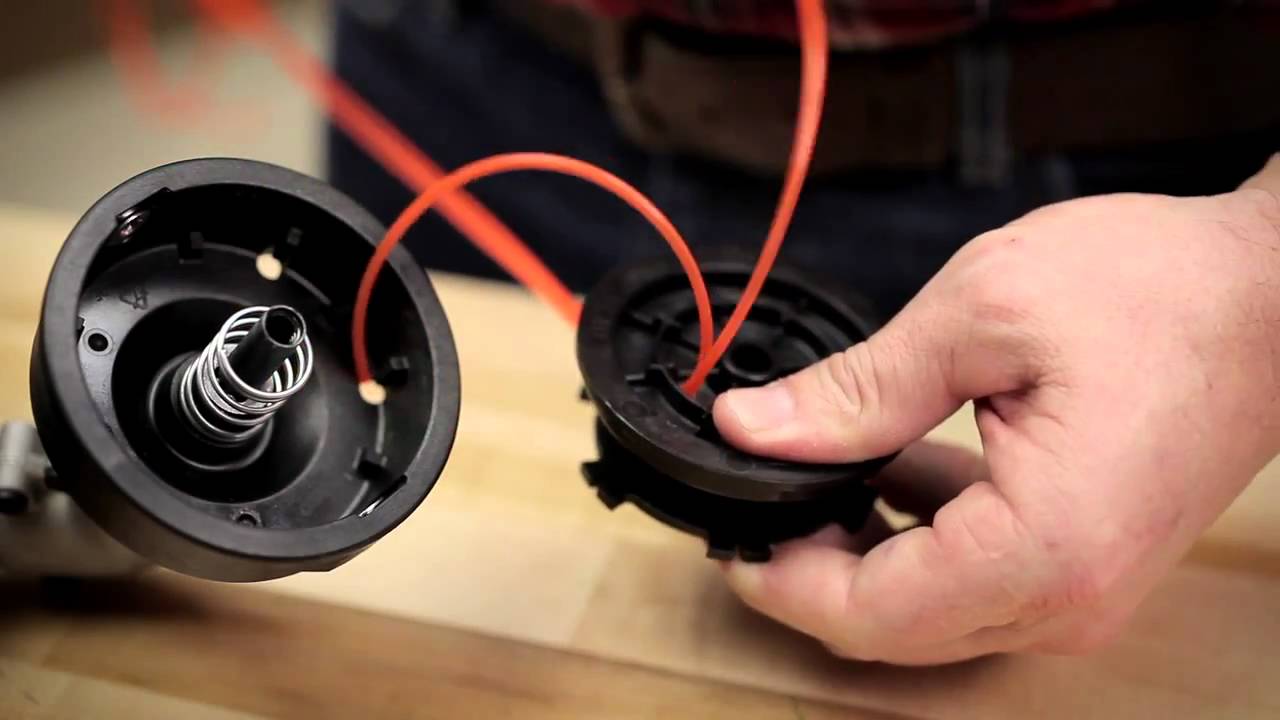
- Insert the new line into the anchor hole.
- Wind the line evenly in the direction indicated on the spool.
- Secure the line in retaining slots and reattach the spool cap.
Source: ytimg.com
How to install grass trimmer line
Installing a grass trimmer line involves a few simple steps. First, you need to choose the right line for your trimmer. Ensure it matches your trimmer’s specifications. According to this post, using the wrong type of line can lead to poor performance. It’s best to refer to the user manual for guidance.
Next, prepare your trimmer for the new line by turning it off and disconnecting it from power. Carefully remove the spool cap. Following this, remove any remaining line from the spool. Keep the spool and cap clean to avoid any debris causing issues. Clean surfaces make the process smoother.
Now comes the important part: winding the line onto the spool. Insert one end of the line into the anchor hole. Wind it evenly and firmly according to the directional arrows on the spool. Avoid overlapping as this can cause tangling or breaking. Finally, secure the line in place before reattaching the spool cap.
Avoid common mistakes like winding the line too loosely or using too thick a line for your trimmer. This can lead to the line getting stuck or not feeding properly during use. Regularly check and replace the line for optimal performance. For more detailed steps and tips, check out here is the article.
Step 1: Choosing the right line for your trimmer
Selecting the correct trimmer line is crucial for efficient yard maintenance. Different trimmer models require specific line types and sizes. Always refer to your trimmer’s manual to avoid compatibility issues. Using an incorrect line can cause operational problems. According to this expert opinion, correctly choosing and winding the line is vital for smooth operation.
Trimmer lines come in various shapes including round, square, and twisted. Each shape has its advantages. Round lines are common and versatile. Square lines provide more cutting power. Twisted lines are quieter and more durable.
Thickness matters too. Thicker lines are suitable for heavier jobs, like dense weeds. Thinner lines work best for regular grass trimming. Make sure to match the line thickness with your trimmer’s capacity to avoid jams or performance issues.
Consider the material of the line. Nylon is the most popular choice due to its balance of durability and flexibility. Some lines even come with added features like reinforced cores for extra strength. Choose a line that matches your needs and the type of trimming you do most often.
Step 2: Preparing the trimmer for new line
Before installing a new trimmer line, make sure your trimmer is turned off and unplugged. Safety is crucial to avoid any accidental injuries. Place the trimmer on a flat surface for better stability. This way, you’ll have better control while handling the spool. Clear away any residual grass or debris from the head area.
Remove the spool cap by pressing the tabs or unscrewing it, depending on your model. Gently pull out the old line from the spool. If there are any tangled or stuck pieces, use a tool to remove them carefully. Keeping the area clean will ensure smoother installation. It’s a good habit to inspect the cap and spool for any wear or damage.
Take note of the orientation and any arrows indicating the winding direction on your spool. These indicators are there to guide you when you wind the new line. Mismatching the direction can cause line feeding issues. Ensure everything is aligned properly before proceeding. A little extra caution here saves time later.
If your trimmer has dual lines, make sure both lines are of equal length. This keeps the trimmer balanced during use. Insert the line into the holding slot or hole as indicated. Check if it holds securely before reattaching the spool cap. These steps may seem small but are essential for smooth operation.
Step 3: Winding the line properly on the spool
Winding the line properly on the spool is essential for the trimmer’s performance. Begin by cutting a piece of trimmer line to the appropriate length, usually indicated in the trimmer’s manual. Insert the end of the line into the anchor hole on the spool, if present. This helps secure the line while you wind it. Ensuring a tight and even wrap will prevent tangles and feed issues.
Start winding the line in the direction indicated by the arrows on the spool. Keeping the line taut, wrap it firmly around the spool. Avoid overlapping the lines as this can cause jams during operation. Use even tension to ensure smooth winding. When you reach the end, secure the line in the retaining slots on the spool.
For dual-line trimmers, repeat the process for the second line. Make sure both lines have equal lengths. Insert each line end into its respective slot or anchor. This helps in maintaining balance. Uneven lines can cause vibration and poor cutting performance.
Next, guide the line through the eyelets on the trimmer head. Check that the lines are feeding correctly. Pull slightly to ensure they move freely. This step is crucial to prevent line blockages. Improper feeding can disrupt your trimming work.
- Insert line into the anchor hole
- Wind in the direction of the arrow
- Keep tension even
- Secure line in retaining slots
- Guide line through eyelets
Finally, reattach the spool and cap it securely. Double-check everything before powering up your trimmer. Test the line feed by tapping the head on the ground. If it feeds smoothly, you’re good to go. Properly wound lines ensure an efficient and hassle-free trimming experience.
Common mistakes to avoid when installing grass trimmer line
One common mistake is using the wrong type of trimmer line. Each trimmer has specific line requirements. Check the user manual to confirm the correct type and size. Choosing the wrong line can lead to poor performance and potential damage. Always double-check before purchasing.
Another mistake is not winding the line tightly on the spool. Loose winding can cause the line to tangle or jam. Keep an even tension while winding to ensure a smooth operation. Overlapping lines can also create issues. Follow the directional arrows on the spool closely.
Improperly feeding the line through the eyelets is another problem. Ensure the line is fed correctly and moves freely. Check the eyelets for any dirt or debris that could obstruct the line. This small step can save a lot of frustration. Clean eyelets improve line movement.
Failing to secure the line in the retaining slots is another common issue. The lines should be firmly secured before reattaching the spool. This prevents the lines from unwinding prematurely. An unsecured line can lead to redoing the entire process. Always double-check line security.
- Using incorrect line type or size
- Loose or uneven winding
- Improper feeding through eyelets
- Not securing the line properly
Lastly, avoid overfilling the spool. Adding too much line can cause jamming. Stick to the recommended line length specified in the manual. Overfilling makes it difficult for the line to advance properly. Following these guidelines will help ensure a smoother trimming experience.
How to maintain your grass trimmer line
Maintaining your grass trimmer line is essential for optimal performance. Regularly inspect the line for wear and tear. Replace it as needed to avoid breakage during use. Keeping the line in good condition ensures efficient cutting. This also prolongs the life of your trimmer.
Store your trimmer line in a cool, dry place. Exposure to sunlight and moisture can weaken the line. Avoid coiling it too tightly, as this can cause kinks. Proper storage preserves the line’s flexibility. This ensures it’s always ready for use.
Cleaning your trimmer’s spool and head after each use is a good habit. Remove any debris or grass buildup that might obstruct line movement. A clean spool reduces friction and wear on the line. This allows the line to advance smoothly. Simple cleaning can make a big difference.
| Maintaining Tips | Benefits |
|---|---|
| Regular inspection | Prevents breakage |
| Proper storage | Preserves flexibility |
| Cleaning spool and head | Reduces friction |
Also, make sure to use the trimmer correctly. Avoid hitting hard surfaces like concrete or rocks. This can cause the line to snap or wear out quickly. Use the trimmer at the recommended speed and avoid overloading it. Correct usage extends the life of your line and trimmer.
Lastly, consider using a higher-quality line. Premium lines often include reinforced cores or special coatings. These features add durability and reduce wear. Investing in quality lines can save you time and effort in the long run. Consult your trimmer’s manual for recommended options.
Frequently Asked Questions
Here, we address common queries about grass trimmer lines. These questions will help you maintain and use your trimmer more effectively.
1. What type of trimmer line should I use?
The type of line depends on your trimmer model and the task at hand. Round lines are versatile and excellent for general trimming. Square or star-shaped lines offer more cutting power for tougher vegetation.
Always check the manufacturer’s recommendations in your user manual. Using the wrong type can reduce performance and potentially damage your equipment.
2. How often should I replace my trimmer line?
The frequency of replacement depends on how often you use your trimmer and the thickness of the line. Thicker lines tend to last longer but may require stronger motors.
If you notice your trimmer losing effectiveness or speed, it’s time to replace the line. Regular inspection helps ensure optimal performance.
How do I prevent my trimmer line from breaking?
To prevent breakage, avoid hitting hard surfaces like concrete or rocks with your trimmer. Keep an even pressure while trimming and don’t overload the motor beyond its capacity.
Using a high-quality, reinforced line also reduces breakage chances. Always trim at the recommended speed settings as indicated by the manufacturer.
Can I use any brand of trimmer line with my machine?
While many brands make universal fitment lines, it’s best to stick to the manufacturer’s recommendations for optimal performance. Compatibility ensures better efficiency and durability.
Certain premium lines may offer added benefits such as enhanced durability or reduced noise, but always verify compatibility first using your manual.
What should I do if my trimmer line keeps getting jammed?
If jamming occurs frequently, it could be due to improper winding or using a worn-out spool cap. Ensure you wind the line evenly and under consistent tension following manufacturer guidance.
If problems persist, check for debris in eyelets or contact customer support for advice specific to your model. Clean components significantly enhance performance quality over time.
Conclusion
Maintaining and installing your grass trimmer line correctly is crucial for efficient yard care. Following the right steps ensures your trimmer performs at its best. Avoiding common mistakes can save you time and frustration.
Regular inspections and cleaning can extend the life of your equipment. Always refer to the manufacturer’s recommendations for best results. This approach keeps your lawn looking pristine and your tools in top shape.

I’m Patricia D. Johnson, an affiliate marketer and blogger specializing in trimmers and grooming tools. I create honest reviews, buying guides, and practical tips to help readers choose the right trimmer for their needs. With a focus on quality, performance, and value, I simplify the decision-making process so consumers can make confident purchases.