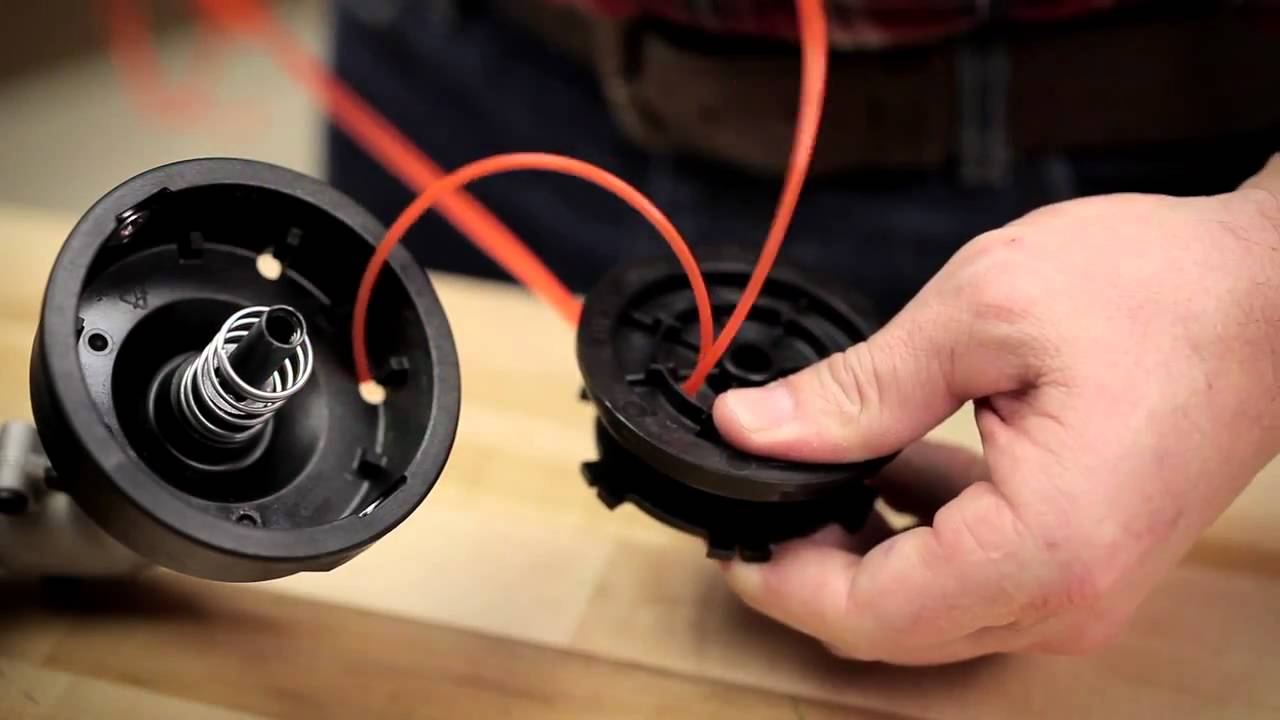
Have you ever considered that a well-maintained trimmer line can make all the difference in achieving a pristine lawn? Professionals know that attaching a trimmer line correctly is not just about replacing worn-out parts; it’s about efficiency and precision. The right technique minimizes downtime and enhances the performance of your trimmer.
Understanding how to attach a trimmer line is essential for any lawn care expert. Historically, the use of trimmer lines dates back to the 1970s, revolutionizing lawn maintenance. With the right approach, you can replace a trimmer line quickly, ensuring your equipment runs smoothly, and that your work remains top-notch.
- Ensure the trimmer is turned off and unplugged.
- Remove the trimmer head by pressing tabs or unscrewing a cap.
- Cut the trimmer line to the length specified by the manufacturer.
- Feed and wind the line tightly and evenly onto the spool.
- Reattach the trimmer head securely onto the shaft.
- Test the trimmer to ensure proper operation. Adjust if necessary.
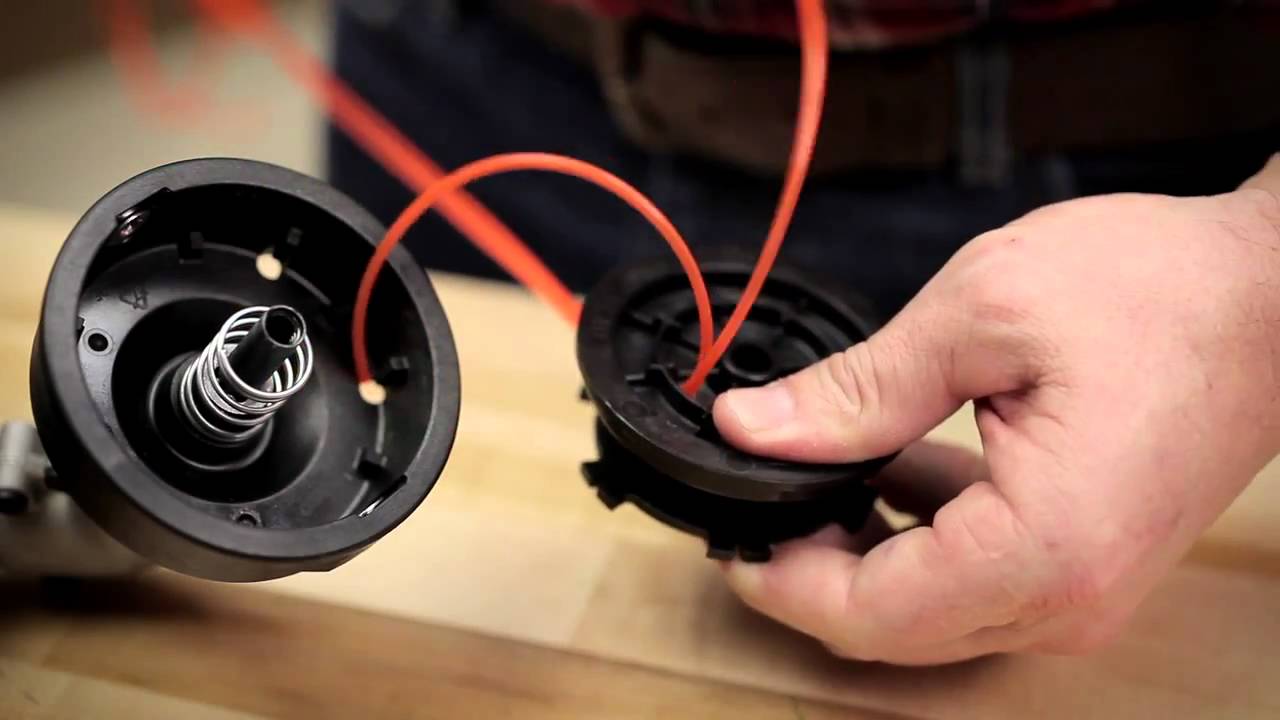
How to Attach Trimmer Line
First, ensure your trimmer is turned off and unplugged. Safety is a priority, so wear gloves to protect your hands. Start by removing the trimmer head, which usually involves pressing tabs or unscrewing a cap. Check your trimmer’s manual if you’re unsure. Once removed, clean any debris from the head.
Next, take your trimmer line and cut it to the length specified by the manufacturer. Normally, this is around 15-20 feet. Feed the line into the trimmer’s spool, making sure it goes evenly. Some trimmers have marks to guide you. Wind the line tightly and evenly to avoid any issues.
Reattach the trimmer head by securing it back into place. You might need to align specific tabs or slots. According to this post, ensuring a firm fit helps prevent the line from tangling. Double-check that everything is tightened properly before proceeding.
Finally, test the trimmer to make sure the line feeds correctly. Hold it away from your body and turn it on briefly. If the line is too long, it might get cut by the trimmer’s blade guard. For more tips on properly stringing a trimmer, here is the article you can refer to.
Step 1: Prepare the Trimmer
Start by ensuring your trimmer is turned off and disconnected from any power source. This is crucial for safety. Next, lay out all necessary equipment, including the new trimmer line. Having everything within reach saves time and prevents disruptions. Make sure you also have gloves to protect your hands.
Inspect the trimmer head for any damage or excessive wear. A cracked or damaged head needs to be replaced before fitting new trimmer line. According to this expert opinion, checking the condition of your trimmer head routinely can extend your trimmer’s lifespan. Ensure the area around the head is clean and free of debris. This helps in a smoother line replacement process.
Refer to the user manual for any specific instructions related to your trimmer model. Manuals often provide diagrams for disassembling and assembling the trimmer head. This can be very helpful if it’s your first time. Keep the manual nearby during the entire process. Understanding these instructions can prevent errors.
Finally, clear the workspace of any obstacles that could cause you to trip or lose your balance. A comfortable and secure working environment is essential. Ensure that all tools and parts are organized and easily accessible. This preparation step sets the stage for a seamless trimmer line attachment process. Simple steps like these can help you get the job done efficiently.
Step 2: Remove the Trimmer Head
First, stabilize the trimmer on a flat surface to make the removal process easier. Using both hands, grasp the trimmer head firmly. Depending on your model, you may need to press tabs or use a screwdriver to loosen the head. Some heads simply twist off by turning counterclockwise. Always follow the instructions specific to your trimmer’s make.
After loosening the trimmer head, carefully pull it away from the shaft. This action exposes the inner spool and housing. If the process seems difficult, recheck for hidden clips or screws. Knowing where all the attachment points are can save a lot of hassle. Easy removal usually indicates proper maintenance is being done.
It’s a good idea to clean the exposed areas of any debris or tangled grass. Residue build-up can negatively affect performance and make future maintenance harder. Cleaning these parts ensures the new trimmer line will feed smoothly. Use a damp cloth or a small brush for this task. Keeping these parts clean can extend the life of your trimmer.
Inspect the components for any signs of wear or damage. Replace any broken parts before reassembling. This ensures the trimmer functions efficiently once the new line is attached. Ignoring damaged parts can lead to bigger problems down the line. Regular inspection is key to maintaining optimal performance.
Step 3: Feed the Trimmer Line
Begin by cutting a length of trimmer line that matches the length specified in your trimmer’s manual. Usually, this is around 15 to 20 feet. Split the line if your trimmer uses a dual-line spool. Make sure both lines are even for balanced operation. This ensures the trimmer functions efficiently.
Next, look for the holes or slots on the spool where the line will be inserted. Push the line through these openings until you feel resistance. Wind the line tightly and evenly around the spool, following the direction marked by arrows. This prevents tangling when the trimmer is in use. Make sure to leave about 6 inches of line free on each end.
After winding, secure the ends of the line in the notches on the spool to keep it from unraveling. These notches hold the line in place and make reattaching the head easier. Align the spool with the trimmer head and gently pull on the free ends to check if they are secure. If done correctly, the line will not slip out of place.
For models with dual-line spools, repeat the process for the second line. Ensure both lines are wound evenly and that they are not crisscrossing each other. According to experts, balanced lines contribute to smoother trimming performance. This step is crucial for maintaining the trimmer’s efficiency. Consistent winding avoids operational issues.
Finally, double-check everything before reattaching the trimmer head. Make sure the ends of the line are through the appropriate eyelets. This helps in feeding the line properly during operation. Confirm that the lines are of equal length to avoid vibrations. Proper alignment here can save time and ensure effective trimming.
Step 4: Replace the Trimmer Head
Begin by aligning the spool with the trimmer head. Make sure the lines are threaded through the appropriate eyelets or holes. This helps the line feed correctly during operation. Carefully position the spool so it sits securely in the trimmer head. Proper placement prevents it from slipping out.
Once in place, reattach the trimmer head to the shaft. This usually involves snapping it back into place or screwing it back on. Follow any specific locking mechanisms indicated in your trimmer’s manual. Make sure to tighten it firmly. A loose head can cause the line to feed improperly.
Double-check that the trimmer head is securely attached and doesn’t wobble. Give it a gentle tug to ensure it’s locked in place. This step is crucial for safe operation. If the head feels loose, recheck the alignment and retighten as necessary. Secure attachment ensures optimal performance.
Next, pull the free ends of the line to release them from the notches. These should now extend through the eyelets of the trimmer head. Trim any excess if the lines are too long. According to best practices, the line should extend just beyond the trimmer guard. This step ensures efficient trimming.
Lastly, turn on the trimmer to test the new setup. Listen for any unusual sounds, which might indicate an issue. The line should feed smoothly without any hitches. Resolving any problems now will save you time later. Make sure everything is running correctly before proceeding to use your trimmer.
Step 5: Test the Trimmer
With the trimmer head securely in place, it’s time to test your equipment. Move to an open area free from obstructions. Turn on your trimmer and listen closely. Any unusual noises indicate a potential issue. Ensure the line feeds out smoothly and cuts precisely.
Hold the trimmer at an angle and begin trimming a small section of grass. Observe if the line is cutting evenly and efficiently. If the line seems too short or too long, adjust it accordingly. This fine-tuning ensures your trimmer’s optimal performance. Your cuts should feel balanced and straightforward.
Check to see if the trimmer head remains stable during operation. A wobbling head suggests it might not be properly secured. Additionally, ensure there are no vibrations more significant than usual. Make adjustments if you notice any instability. Consistent stability is crucial for safety and performance.
After testing, pause and inspect the trimmer head again. Verify that the line hasn’t tangled or broken. If everything looks good, proceed with your trimming tasks. This final check confirms that your setup is ready. Addressing minor issues during testing can save you from major troubles later.
Finally, run the trimmer for a few more minutes to complete the test. This longer run helps ensure everything is working seamlessly. Listen for any last-minute issues and address them promptly. Regular maintenance checks keep your equipment in top shape. Testing your trimmer completes the setup process effectively.
Importance of Proper Trimmer Line Attachment
Proper trimmer line attachment is crucial for maintaining the efficiency of your equipment. When the line is installed correctly, it enhances cutting performance. This ensures even trimming, reducing the time you spend on lawn care. A secure line also minimizes the risk of breakage. Consistent performance saves both time and money on replacements.
An improperly attached trimmer line can lead to several problems. For instance, it might get tangled or break frequently, disrupting your work. This could mean taking extra breaks to fix the line, interrupting your workflow. Additionally, a poorly attached line can cause vibrations, affecting precision. Over time, it can even damage the trimmer head.
Safety is another significant concern when attaching a trimmer line properly. A loose or ill-fitted line can become hazardous if it detaches during operation. Ensuring the line is securely fastened reduces this risk substantially. It’s important for users to follow safety guidelines during attachment phases. Secure fittings help avoid potential injuries.
Proper attachment also contributes to prolonging the lifespan of your trimmer. Regular maintenance and correct installation prevent unnecessary wear and tear on its components. This ensures that all parts operate in harmony, avoiding premature breakdowns. Investing a bit of time in proper setup pays off in longevity and reliability.
Good attachment practices enhance overall user experience as well. Using a well-maintained trimmer with correctly installed lines makes lawn care easier and more enjoyable. You’ll notice smoother operation without frequent disruptions or adjustments needed during use. For these reasons, paying attention to how you attach your trimmer line is vital for effective lawn maintenance.
Troubleshooting Common Issues When Attaching Trimmer Line
Even with careful attention, issues can arise when attaching a trimmer line. One common problem is line breakage. This might be due to using an incorrect line size or excessive force during operation. Double-check your trimmer’s specifications to match the correct line type. Properly winding the line on the spool can also minimize breakage.
Another frequent issue is when the line gets tangled inside the spool. This can disrupt your trimming workflow and cause frustration. To avoid this, ensure that the line is wound evenly and not too tightly. Rewinding the line might be necessary if you notice irregularities. Keeping an eye on the winding process can prevent tangling.
Sometimes, the line doesn’t feed out correctly during trimming. This could be caused by blockages or an improperly attached trimmer head. Clean the trimmer head and the eyelets to ensure smooth line feeding. Make sure the head is securely fastened, following the manufacturer’s instructions. Regular maintenance checks can help you identify these issues early.
Vibrations during operation are another sign of potential problems. This often indicates that the trimmer head is not mounted correctly. Recheck all the attachment points and ensure everything is tight. Balanced lines also play a crucial role in reducing vibrations. Addressing this keeps the trimmer functioning at its best.
Lastly, a trimmer line that wears out too quickly might suggest operational or attachment issues. Ensure you’re using recommended practices for trimming and attaching the line. Consult your trimmer’s manual for guidelines on optimal usage. Routine checks and adjustments go a long way in resolving these common problems. Your trimmer will thank you with consistent performance.
Best Practices for Maintaining a Trimmer Line
Regular maintenance is key to keeping your trimmer line in top condition. Always check the line before each use for any signs of wear or damage. Replace it if necessary to prevent it from snapping during operation. Store the line in a cool, dry place to keep it from becoming brittle. Proper storage ensures the line remains flexible and durable.
Keep the trimmer head clean to facilitate smooth line feeding. Debris and grass clippings can accumulate, causing blockages. Regularly take apart the trimmer head for thorough cleaning. This extends the life of both the line and the trimmer. An efficiently running trimmer reduces strain and increases effectiveness.
Use the appropriate line type recommended by the manufacturer. Different trimmers require different line thicknesses and materials. Consult your user manual to select the best line for your equipment. Using the wrong type can lead to poor performance and frequent breakage. Adhering to recommendations ensures optimal functionality.
Learn to wind the line correctly to avoid tangling and uneven feed. Follow the directional arrows on the spool for proper winding. Keep the tension consistent to prevent the line from loosening. Consistent winding ensures a smooth trimming experience. Proper winding techniques save time and reduce frustration.
Finally, avoid hitting the trimmer line against hard surfaces like sidewalks and trees. This can cause it to fray or break prematurely. Maintain a steady pace while trimming to avoid excessive wear on the line. A gentle approach enhances the longevity of your trimmer line. Following these best practices helps maintain your trimmer’s efficiency.
Regular inspections and proper handling go a long way in maintaining your trimmer. Investing time in these practices ensures you get the most out of your equipment. Your lawn care routine will be smoother, saving you from unexpected interruptions. A well-maintained trimmer line makes a noticeable difference in your yard work.
Frequently Asked Questions
If you’re new to lawn care, attaching a trimmer line can seem daunting. These questions and answers will help you navigate the process with ease.
1. What type of trimmer line should I use for my machine?
Selecting the correct trimmer line is important for optimal performance. Always check your trimmer’s user manual to see the recommended line type and size. Different lines are suitable for various tasks, such as edging or heavy brush cutting.
Using the wrong type can reduce efficiency and even damage the machine. Generally, thicker lines are better for tough vegetation, while thinner lines are ideal for lighter tasks like lawn edges.
2. How often should I replace my trimmer line?
The frequency of replacing your trimmer line depends on how often you use it and what you’re cutting. If you notice the trimming isn’t as effective or if the line breaks frequently, it’s time to replace it.
On average, frequent users might need to replace it every couple of weeks during peak season, while occasional users may only require a replacement every few months. Keeping an eye on wear and tear helps maintain efficiency.
3. Can I use any brand of trimmer line?
You can generally use different brands of trimmer lines as long as they meet your machine’s specifications. Check your user manual for recommended sizes and materials before purchasing a new brand.
Differing qualities among brands mean some may perform better than others in wear resistance and cutting power. It’s wise to read reviews or ask experts when trying a new brand.
4. Why does my trimmer line keep breaking?
Trimmer line breakage can be due to several factors like old or brittle lines, using incorrect types, or hitting hard surfaces frequently. Ensure you’re using fresh, appropriate-sized lines made for your specific task to minimize breakage.
Avoid constant contact with hard objects like sidewalks or rocks to reduce stress on the line. Regular maintenance checks also help in identifying any issues early on that could lead to breakages.
5. How do I avoid tangling when winding new trimmer lines?
Tangling happens mainly because of improper winding technique on the spool. Wind the line evenly and tightly according to directional arrows marked on the spool to prevent this issue.
Mismatched tensions result in tangled lines during operation. Following proper procedures ensures a smoother trimming experience without interruptions from tangled lines.
Conclusion
Properly attaching a trimmer line is essential for ensuring the efficiency and longevity of your trimmer. Paying attention to each step, from selecting the right line to testing the trimmer, makes a significant difference. Regular maintenance checks are also crucial for optimal performance.
Understanding and following best practices can save time and reduce frustrations. With these insights, experts can achieve precise and efficient trimming. A well-maintained trimmer contributes to beautiful, tidy lawns effortlessly.

I’m Patricia D. Johnson, an affiliate marketer and blogger specializing in trimmers and grooming tools. I create honest reviews, buying guides, and practical tips to help readers choose the right trimmer for their needs. With a focus on quality, performance, and value, I simplify the decision-making process so consumers can make confident purchases.