
A trimmer stud is a vertical framing member. It supports openings like doors or windows in a wall.
Trimmer studs play a crucial role in construction. They help distribute the load around openings, ensuring structural integrity. Builders often use them alongside headers and king studs. These components work together to form a robust framework. Without trimmer studs, walls could sag or fail.
They are essential for maintaining the strength of a building. Carpenters position them adjacent to the opening edges. This placement helps in evenly distributing weight. Understanding trimmer studs is vital for anyone involved in building or renovating. Their correct installation ensures long-lasting, secure structures.

Credit: www.jlconline.com
Introduction To Trimmer Studs
Understanding the role of trimmer studs is crucial in home framing. These essential components support structural integrity. This blog section provides a clear overview.
Basics Of Trimmer Studs
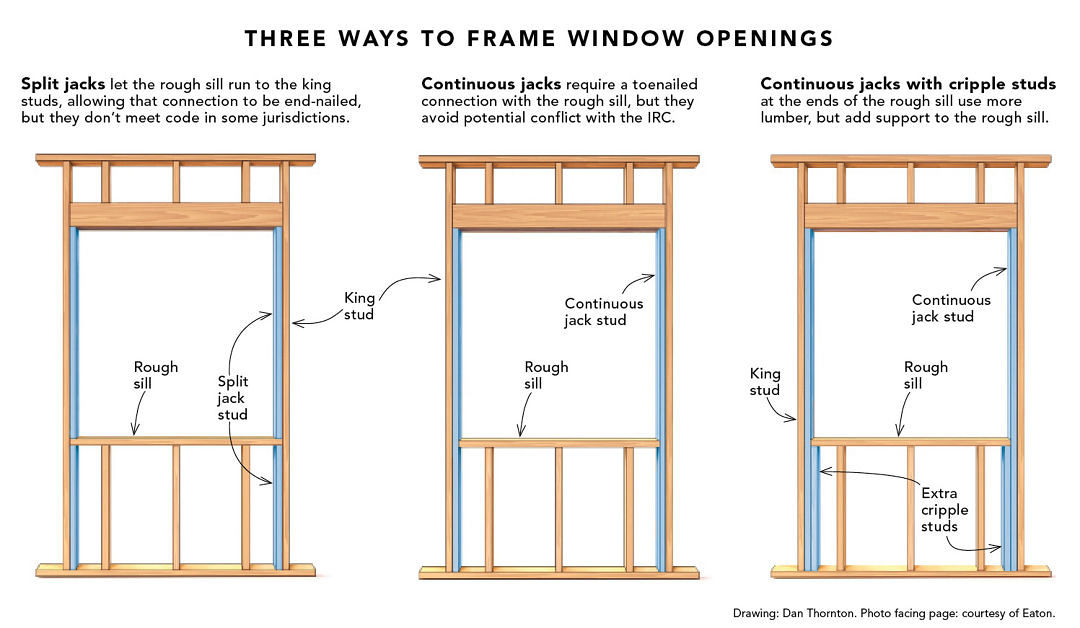
Trimmer studs are vertical framing members. They are found on either side of a window or door opening. They help support and transfer loads from the header above the opening to the floor below.
- Trimmer studs are also known as jack studs.
- They are typically shorter than regular studs.
- They work in pairs with king studs for added support.
Here is a simple table showing the differences between trimmer studs and regular studs:
| Feature | Trimmer Studs | Regular Studs |
|---|---|---|
| Location | Next to openings | Throughout the wall |
| Length | Shorter | Full height of wall |
| Function | Support headers | Support wall sheathing |
Importance In Home Framing
Trimmer studs play a vital role in home framing. They ensure that door and window openings remain structurally sound. Without trimmer studs, the load above openings could cause walls to sag or collapse.
- Support Load: Trimmer studs help distribute loads evenly.
- Prevent Sagging: They keep openings from sagging or shifting.
- Structural Integrity: They maintain the overall strength of the wall.
In summary, trimmer studs are indispensable for safe and durable construction. They provide the necessary support for door and window openings.
Materials Used
Understanding the materials used in trimmer studs is important. Different materials offer various benefits and suitability for construction projects.
Common Materials
Trimmer studs are typically made from a variety of materials. Below are some common choices:
- Wood: Often used for residential construction.
- Steel: Popular in commercial buildings.
- Engineered Wood: Combines wood fibers with adhesives.
Advantages Of Each Material
Different materials offer unique benefits. Here are the advantages of each:
| Material | Advantages |
|---|---|
| Wood |
|
| Steel |
|
| Engineered Wood |
|
Trimmer Stud Vs. King Stud
Understanding the differences between a Trimmer Stud and a King Stud is crucial in construction. These components play vital roles in framing structures. Let’s dive into their key differences and when to use each.
Key Differences
Both Trimmer Studs and King Studs are essential in wall framing, but they serve different purposes.
| Feature | Trimmer Stud | King Stud |
|---|---|---|
| Location | Next to openings like doors and windows | Runs along the full height of the wall |
| Function | Supports the header | Supports the trimmer stud and the wall |
| Load-bearing | Supports vertical loads | Supports both vertical and horizontal loads |
When To Use Each
Knowing when to use a Trimmer Stud or a King Stud is essential for proper framing.
- Trimmer Stud:
- Use when framing doorways
- Use when framing window openings
- Supports the header above openings
- King Stud:
- Use along the entire height of the wall
- Supports the overall wall structure
- Works with trimmer studs for strength
Both studs are crucial in wall framing. Correct use ensures strong, stable structures.
Installation Process
Installing a trimmer stud can be straightforward with the right tools and steps. This section will guide you through the installation process.
Required Tools
Before starting, gather the following tools:
- Measuring tape
- Level
- Hammer
- Nails or screws
- Saw
- Safety gear (gloves, goggles)
Step-by-step Guide
- Measure the space where the trimmer stud will go. Use the measuring tape.
- Mark the spot. Ensure it is level using the level tool.
- Cut the wood to the required length. Use a saw for this step.
- Position the trimmer stud in the marked spot.
- Secure the trimmer stud with nails or screws. Use a hammer for nails or a screwdriver for screws.
- Double-check the level. Adjust if necessary to make sure it is straight.
Following these steps ensures a secure and stable installation. Always wear safety gear to protect yourself during the process.
Load-bearing Considerations
A trimmer stud plays a vital role in structural stability. Load-bearing considerations are crucial when incorporating trimmer studs in construction. They ensure the safety and durability of the building. Understanding how to calculate loads and ensure structural integrity is essential.
Calculating Loads
Calculating loads on trimmer studs is important for safety. Loads include the weight from the roof, floors, and walls. Each of these elements adds stress to the trimmer stud.
Use a simple formula to calculate the load:
Load (P) = (Roof Load + Floor Load + Wall Load) / Number of Studs
Ensure to measure each load type accurately. This ensures the trimmer stud can handle the stress. Miscalculations can lead to structural failures.
Ensuring Structural Integrity
Ensuring structural integrity involves checking the trimmer stud’s material. Use high-quality wood or metal for better support. The placement of trimmer studs is also important.
Follow these steps to ensure structural integrity:
- Inspect the quality of the material.
- Measure the exact location for installation.
- Ensure proper spacing between trimmer studs.
- Check for any signs of damage or wear.
A well-maintained trimmer stud can last for many years. Regular inspections help in maintaining their strength and durability.
Credit: www.finehomebuilding.com
Common Mistakes
Installing a trimmer stud correctly is crucial for structural integrity. Many people make mistakes that can compromise safety. Here are some common errors to avoid.
Avoiding Errors
One common mistake is incorrect measurements. Incorrect measurements can lead to a weak structure. Always double-check your measurements before cutting.
Another frequent error is using the wrong materials. Using the wrong materials can affect the strength and durability of the stud. Ensure you use the appropriate type of wood or metal specified for the job.
Poor alignment is also a significant issue. Poor alignment can cause instability. Use a level to ensure your trimmer stud is perfectly vertical.
Tips For Correct Installation
Here are some tips for a correct installation:
- Measure twice, cut once.
- Use high-quality materials.
- Ensure proper alignment with a level.
- Secure the stud with strong fasteners.
Follow these steps to avoid common mistakes. Proper installation ensures your structure is safe and secure.
Building Codes And Regulations
Understanding the building codes and regulations for trimmer studs is essential. This ensures the safety and durability of your construction projects. Let’s delve into the local requirements and safety standards for trimmer studs.
Local Requirements
Each region has its own set of local requirements for trimmer studs. These rules vary based on the area’s climate, geography, and building practices. Compliance is crucial to avoid penalties and ensure safety.
| Region | Key Requirements |
|---|---|
| California | Earthquake-resistant structures, fire safety |
| Florida | Hurricane-proof designs, moisture control |
| New York | Snow load capacity, insulation standards |
Check your local building department for specific guidelines. This ensures your project meets all necessary codes.
Safety Standards
Safety standards for trimmer studs are vital to prevent accidents. They ensure the structural integrity of your building. Adhering to these standards protects both workers and occupants.
- Material Quality: Use high-quality wood or steel for trimmer studs.
- Proper Installation: Follow guidelines for spacing and alignment.
- Load-Bearing Capacity: Ensure studs can support intended loads.
Refer to the International Building Code (IBC) for detailed safety standards. This code provides comprehensive guidelines for construction practices.
Example Code for Trimmer Stud Installation
Place trimmer studs at intervals of 16 inches on center.
Ensure proper nailing and bracing for stability.
Always prioritize safety and compliance in your construction projects. This ensures a safe and durable structure.
Maintenance And Inspections
Keeping a trimmer stud in good condition is crucial. Regular maintenance ensures it functions properly. Inspections help identify issues early. This section covers how to maintain and inspect a trimmer stud.
Regular Checks
Perform regular checks to keep your trimmer stud in top shape. Follow these steps:
- Inspect the trimmer stud every month.
- Look for any signs of wear or damage.
- Clean the trimmer stud to remove any debris.
- Lubricate moving parts to ensure smooth operation.
Signs Of Damage
Knowing the signs of damage can save you time and money. Watch out for these indicators:
- Cracks or splits in the material.
- Loose or missing screws.
- Rust or corrosion on the surface.
- Unusual noises during operation.
| Inspection Task | Frequency |
|---|---|
| Check for cracks | Monthly |
| Clean debris | Monthly |
| Lubricate parts | Quarterly |
| Inspect screws | Monthly |
By following these steps, you ensure your trimmer stud works efficiently. Regular maintenance and inspections prolong its life. Always address issues immediately to prevent further damage.

Credit: diy.stackexchange.com
Frequently Asked Questions
What Is The Purpose Of A Trimmer Stud?
A trimmer stud supports structural loads around openings like doors and windows. It reinforces and distributes weight efficiently.
Is A Trimmer Stud The Same As A Jack Stud?
Yes, a trimmer stud and a jack stud are the same. Both support the load above doors or windows.
Where Is The Trimmer Stud Located?
The trimmer stud is located on the side of the engine housing, near the carburetor.
What Size Is A Trimmer Stud?
A trimmer stud is typically 2×4 or 2×6 inches in size. It supports door and window frames.
Conclusion
Understanding what a trimmer stud is can significantly enhance your building projects. This essential structural component ensures stability and support. By incorporating trimmer studs, your constructions will meet safety standards. Always consult a professional for proper installation. Embrace the benefits of trimmer studs for a robust and durable structure.
