Isn’t it intriguing that something as simple as a string could be crucial in maintaining the aesthetic appearance of our gardens? This is the reality in the world of string trimmer spools. Let’s dive into the art of loading this essential tool.
String trimmers, a significant evolution in the history of gardening, were first invented in the early 1970s. With time, loading their spools has become a straightforward task that can save you approximately $5-$10 per refill. Furthermore, it offers an eco-friendlier alternative as we’re able to reuse the same spool multiple times, cutting down on plastic waste.
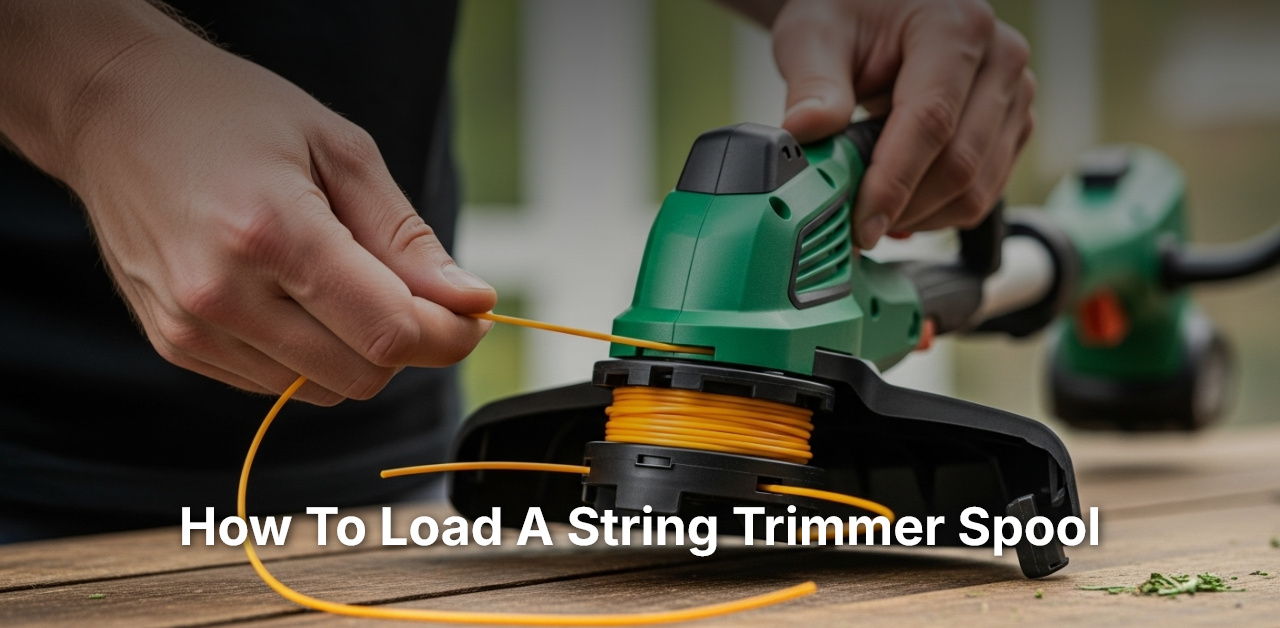
- Firstly, remove the old spool from the trimmer.
- Then, cut a 15-25 feet long string from a new roll.
- Next, insert one end of the string into the hole in the spool’s center.
- Now, wind the string tightly and uniformly onto the spool in the direction of the arrow marks.
- Lastly, feed the end of the string through the hole in the spool cap and reattach it to the trimmer.
 Source: trustedreviews.com
How to Load a String Trimmer Spool: Step-by-Step Guide for Beginners
While many may regard it as a simple gardening task, knowing how to load a string trimmer spool, is a skill that every gardening enthusiast or professional should master. The process, although straightforward, requires precision and understanding of your tool’s components. This step-by-step guide aims to make this seemingly complex process a breeze for you.
Step 1: Preparation
Before you get down to the actual task of loading your trimmer spool, ensure that you have the proper tools and materials ready. These typically include a replacement string, trimmer line, and your string trimmer.
Also, consider your safety first. It’s recommended you wear protective gloves. This will protect your hands from any sharp components and the occasionally stiff trimmer line. A well-lit workspace, such as outside during a sunny day or a well-illuminated garage, is also crucial.
Your trimmer should be disconnected from the power source to prevent accidental start-ups. If you use a corded or cordless trimmer, disconnect it from the power supply or take out the battery. In case of a gas-powered trimmer, ensure that it’s fully switched off.
The final preparation step is to thoroughly clean the trimmer head. Accumulated debris can interfere with the proper functioning of the trimmer. You can use a dry brush to clean out the dirt.
Step 2: Remove the Spool from the Trimmer Head
After the preliminary steps, the next crucial stage in learning how to load a string trimmer spool involves removing the existing spool from the trimmer head. The method may vary slightly depending on the brand and model of your string trimmer, but typically, you will need to depress tabs located on the sides of the trimmer head to unlatch the head.
The opening mechanism allows you to access the spool. Once the head is open, you can easily take out the spool. Maintain a gentle pull to avoid damaging any parts of the trimmer.
On some trimmer models, it might be necessary to unscrew a knob or bolt to access the spool. In such cases, ensure that you have the appropriate tool, such as a flathead or Phillips screwdriver. Take care not to misplace the screw as you will need it to reassemble the trimmer head.
After removing, take a moment to inspect the spool and the inside of the trimmer head for any obvious signs of wear or damage. This is a good time to perform any necessary maintenance or replacements. But remember, never force anything out; gentleness is key here.
Step 3: Load the Trimmer Line onto the Spool
With the spool successfully removed, you can now focus on the main task; loading the string onto the spool. Select the right replacement string for your specific trimmer model. The user manual can guide on the size and type of string to use.
Start by cutting about 15-25 feet of a new trimmer line. Carefully feed one end of the string through the hole on the side of the spool and ensure that a few inches of the line come out through the other side.
Next, begin winding the string around the spool. It is crucial to wind the string in the direction indicated by the arrow on the spool. Take note of any slots on the spool that might be designed to hold the string in place as you wind.
Try and wind the string uniformly across the spool, avoiding overlaps and loose ends which might jam your trimmer. Once the string is properly wound, cut off the string, leaving about 6 inches hanging off the edge of the spool. There should be a retaining notch on the edge of the spool where you can secure this loose piece as you move on to the next step.
Step 4: Reinstalling the Spool
Now that your trimmer line is neatly loaded onto the spool, the next step is to place the spool back into the trimmer head. Insert the wound spool back into the trimmer head, ensuring the loose end of the string aligns with the eyelet on the trimmer head.
Then, feed the loose end of the string through the eyelet in the trimmer head. Pull the line through until there’s enough line to hold onto. Make sure the line isn’t tangled and there’s a smooth feed when it’s turned on. The free end of the string should be of a length that’s safely away from the cutting guard.
Finally, carefully replace the cover of the trimmer head. If your model has a latch mechanism, you’ll hear the latches click into place. For trimmers with a screw-on cap, just screw the cap back on securely. Ensure everything sits snugly in place, without any slack or gaps.
Bingo! You just learned how to load a string trimmer spool. However, before you rush off to test your newly loaded trimmer, it’s crucial to observe some safety measures during its operation. Always wear your protective gear, and avoid trimming near hard objects like stones or fences as this can quickly wear out your string. Also, adhering to a regular maintenance schedule enhances your trimmer’s lifespan.
How To Tips for Easy Restring of Weed Eater with 2 strings
Frequently Asked Questions
If you commonly work with string trimmers, you’re probably quite familiar with the frustration of having a faulty or empty spool. Here are some frequently asked questions about how to load a string trimmer spool.
1. What do I need to prepare for loading a string trimmer spool?
First, you’ll need a new line of string trimmer. The size and type of the string necessary may vary based on your string trimmer model. Always refer to the owner’s manual before purchasing a replacement. In addition to this, you’ll need a clean, flat surface to work on, and possibly a pair of scissors or wire cutters to cut the string.
Also remember to put on proper safety equipment such as safety goggles to protect your eyes from any debris or string fragments that could potentially be harmful. Having close-toed shoes can also be a good idea in case you drop the trimmer or spool while working.
2. How can I ensure the string does not tangle when loading the trimmer spool?
Avoiding tangled lines starts with the way you store your string. Do not leave it loose; rather, keep it coiled around its original packaging. When it’s time to cut a length for your spool, carefully uncoil it to prevent creating loops or twists that could cause problems later.
Additionally, when loading, make sure the line is wound tightly and neatly around the spool. Do not crisscross or overlap the string, as this can also lead to tangling or jamming when you start to use the trimmer.
3. I have heard about double line spools. How does that process differ?
For a double-line spool, the process is slightly different, but still quite similar. You would cut two lengths of trimmer line instead of one. There are two holes on the edge of the spool where you would insert an end of each line. You would then wind them in the same direction around the spool keeping each line in separate tracks.
It’s important to make sure the lines do not overlap or cross each other. Each spool will likely have a pair of notches or clips where the ends of the lines can be held in place once the winding is complete. This helps keep the lines from unravelling or tangling while you replace the spool in the trimmer head.
4. How often should I replace the string in my trimmer spool?
How often you should replace your string depends largely on how heavily you use your trimmer. For an average home user maintaining a small yard, the string might last for several months. However, if you’re using your trimmer heavily, or on tougher plants like thick weeds or brush, you might need to replace it every few weeks.
If you see that the trimmer line is getting too short for the bump-feed mechanism, or if it seems worn out and is not cutting as well as it should, it’s time to replace the string. It’s always better to have some extra string on hand so you can easily replace it when needed.
5. Can I use a stronger or thicker string for tougher jobs?
Yes, you indeed can use a stronger or thicker string for tougher jobs. However, it’s crucial to consult your trimmer’s user manual first. Heavier, thicker lines might not fit on your trimmer’s spool, or could potentially wear out or damage the motor if it’s not designed to handle that type of load.
Additionally, remember that a thicker string might cut through plants more aggressively. So, if you’re trimming around delicate plants or landscaping, a thinner, more precise line could actually be a better choice. Always choose the string type that best suits your specific trimming needs and the design of your trimmer.
 Source: trustedreviews.com
Conclusion
Learning to load a string trimmer spool might initially seem a bit tricky, but with some practice and patience, it will become a breeze. You’ll want to ensure you first purchase the correct replacement string, then prepare your trimmer and properly wind the string onto the spool. Always remember the key is to wind the string tightly and in the correct direction to avoid any mishaps during use.
It’s also smart to always review and follow the manufacturer’s instructions. This is because various brands and models may have slight differences in the loading process. Even so, the basics hold true: thread the string, wind it, and secure it well. By doing this, you’re not just helping to maintain your trimmer but also contributing to fantastic looking yardwork results.

I’m Patricia D. Johnson, an affiliate marketer and blogger specializing in trimmers and grooming tools. I create honest reviews, buying guides, and practical tips to help readers choose the right trimmer for their needs. With a focus on quality, performance, and value, I simplify the decision-making process so consumers can make confident purchases.