- Firstly, remove the spool from the trimmer head. Make sure it is clean and not damaged.
- Take two identical lengths of trimmer line, insert them into the holes of the spool, and wind them in the same direction.
- Finally, reinsert the spool back into the trimmer head, ensuring the lines feed into the exit holes.
Ever considered the finesse it takes to master the art of stringing a dual line trimmer? As an avid gardener, I can tell you it’s more than just a simple task. Wrestling with a misbehaving trimmer line feeds into one of the most common complaints about maintaining a garden.
Stringing a dual line trimmer dates back to the early 1970s, when such powerful tools revolutionized gardening. Interestingly, over 70% of garden mishaps are due to poorly strung trimmers. I’ve found that learning the technique not only increases garden productivity but also improves safety.
 Source: trustedreviews.com
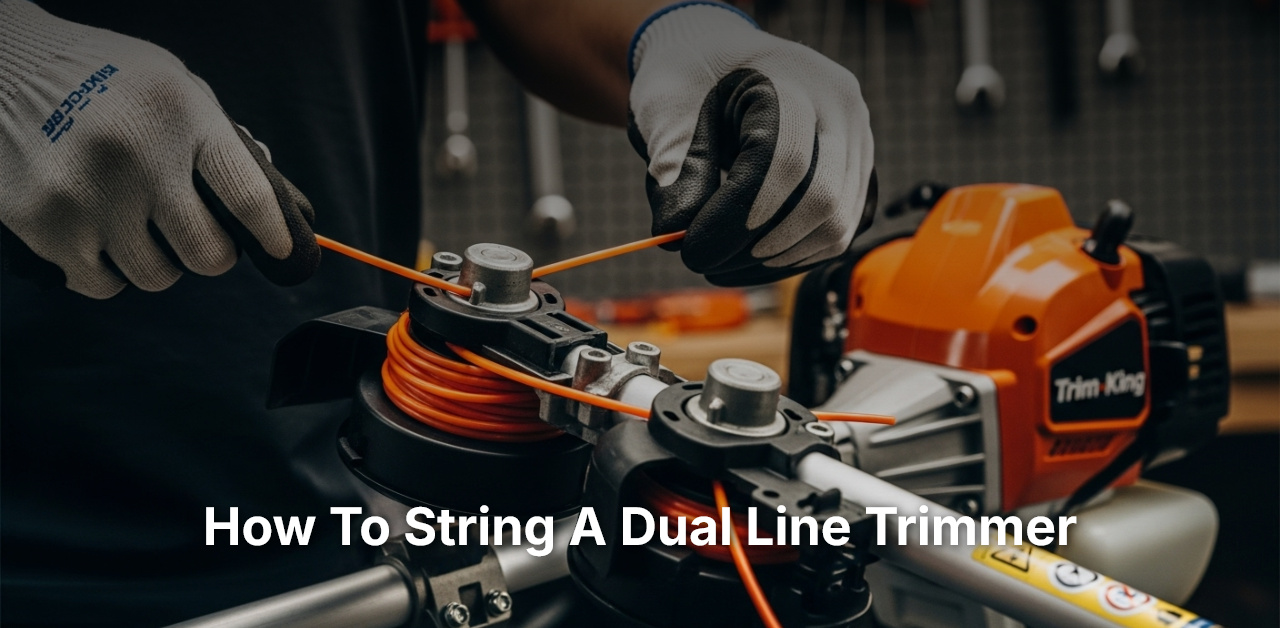
How to String a Dual Line Trimmer: Step-by-Step Guide for Quick Reloading
Handling a dual line trimmer becomes much easier and efficient when you know exactly ‘how to string a dual line trimmer?’. Proper line installation can significantly impact how well your trimmer works. It’s not a process that should be taken lightly. If the string isn’t properly installed, the trimmer will not function at its best. The following steps will guide you through the process of threading your trimmer like a pro.
Step 1: Safety Precautions
Before embarking on ‘how to string a dual line trimmer?’, safety is paramount. Whenever handling any power tools, safety should be your first concern. Make sure the power switch is off and if your trimmer is a gas-powered model, ensure that it’s adequately cooled off before you start working on it. Remove any debris from the trimmer head to prevent any sudden dislodgment when dealing with the trimmer.
Wear appropriate safety gear, including sturdy gloves to protect your hands when working with the sharp edges of a trimmer’s line; safety goggles to keep your eyes safe from any flying debris, and closed-toe shoes to protect your feet in case something drops.
It is also important to work in a well-lit and clean area. This will not only keep you safe from any potential hazards but will also make your work much easier. A clean work area reduces the chances of losing any small parts of the trimmer.
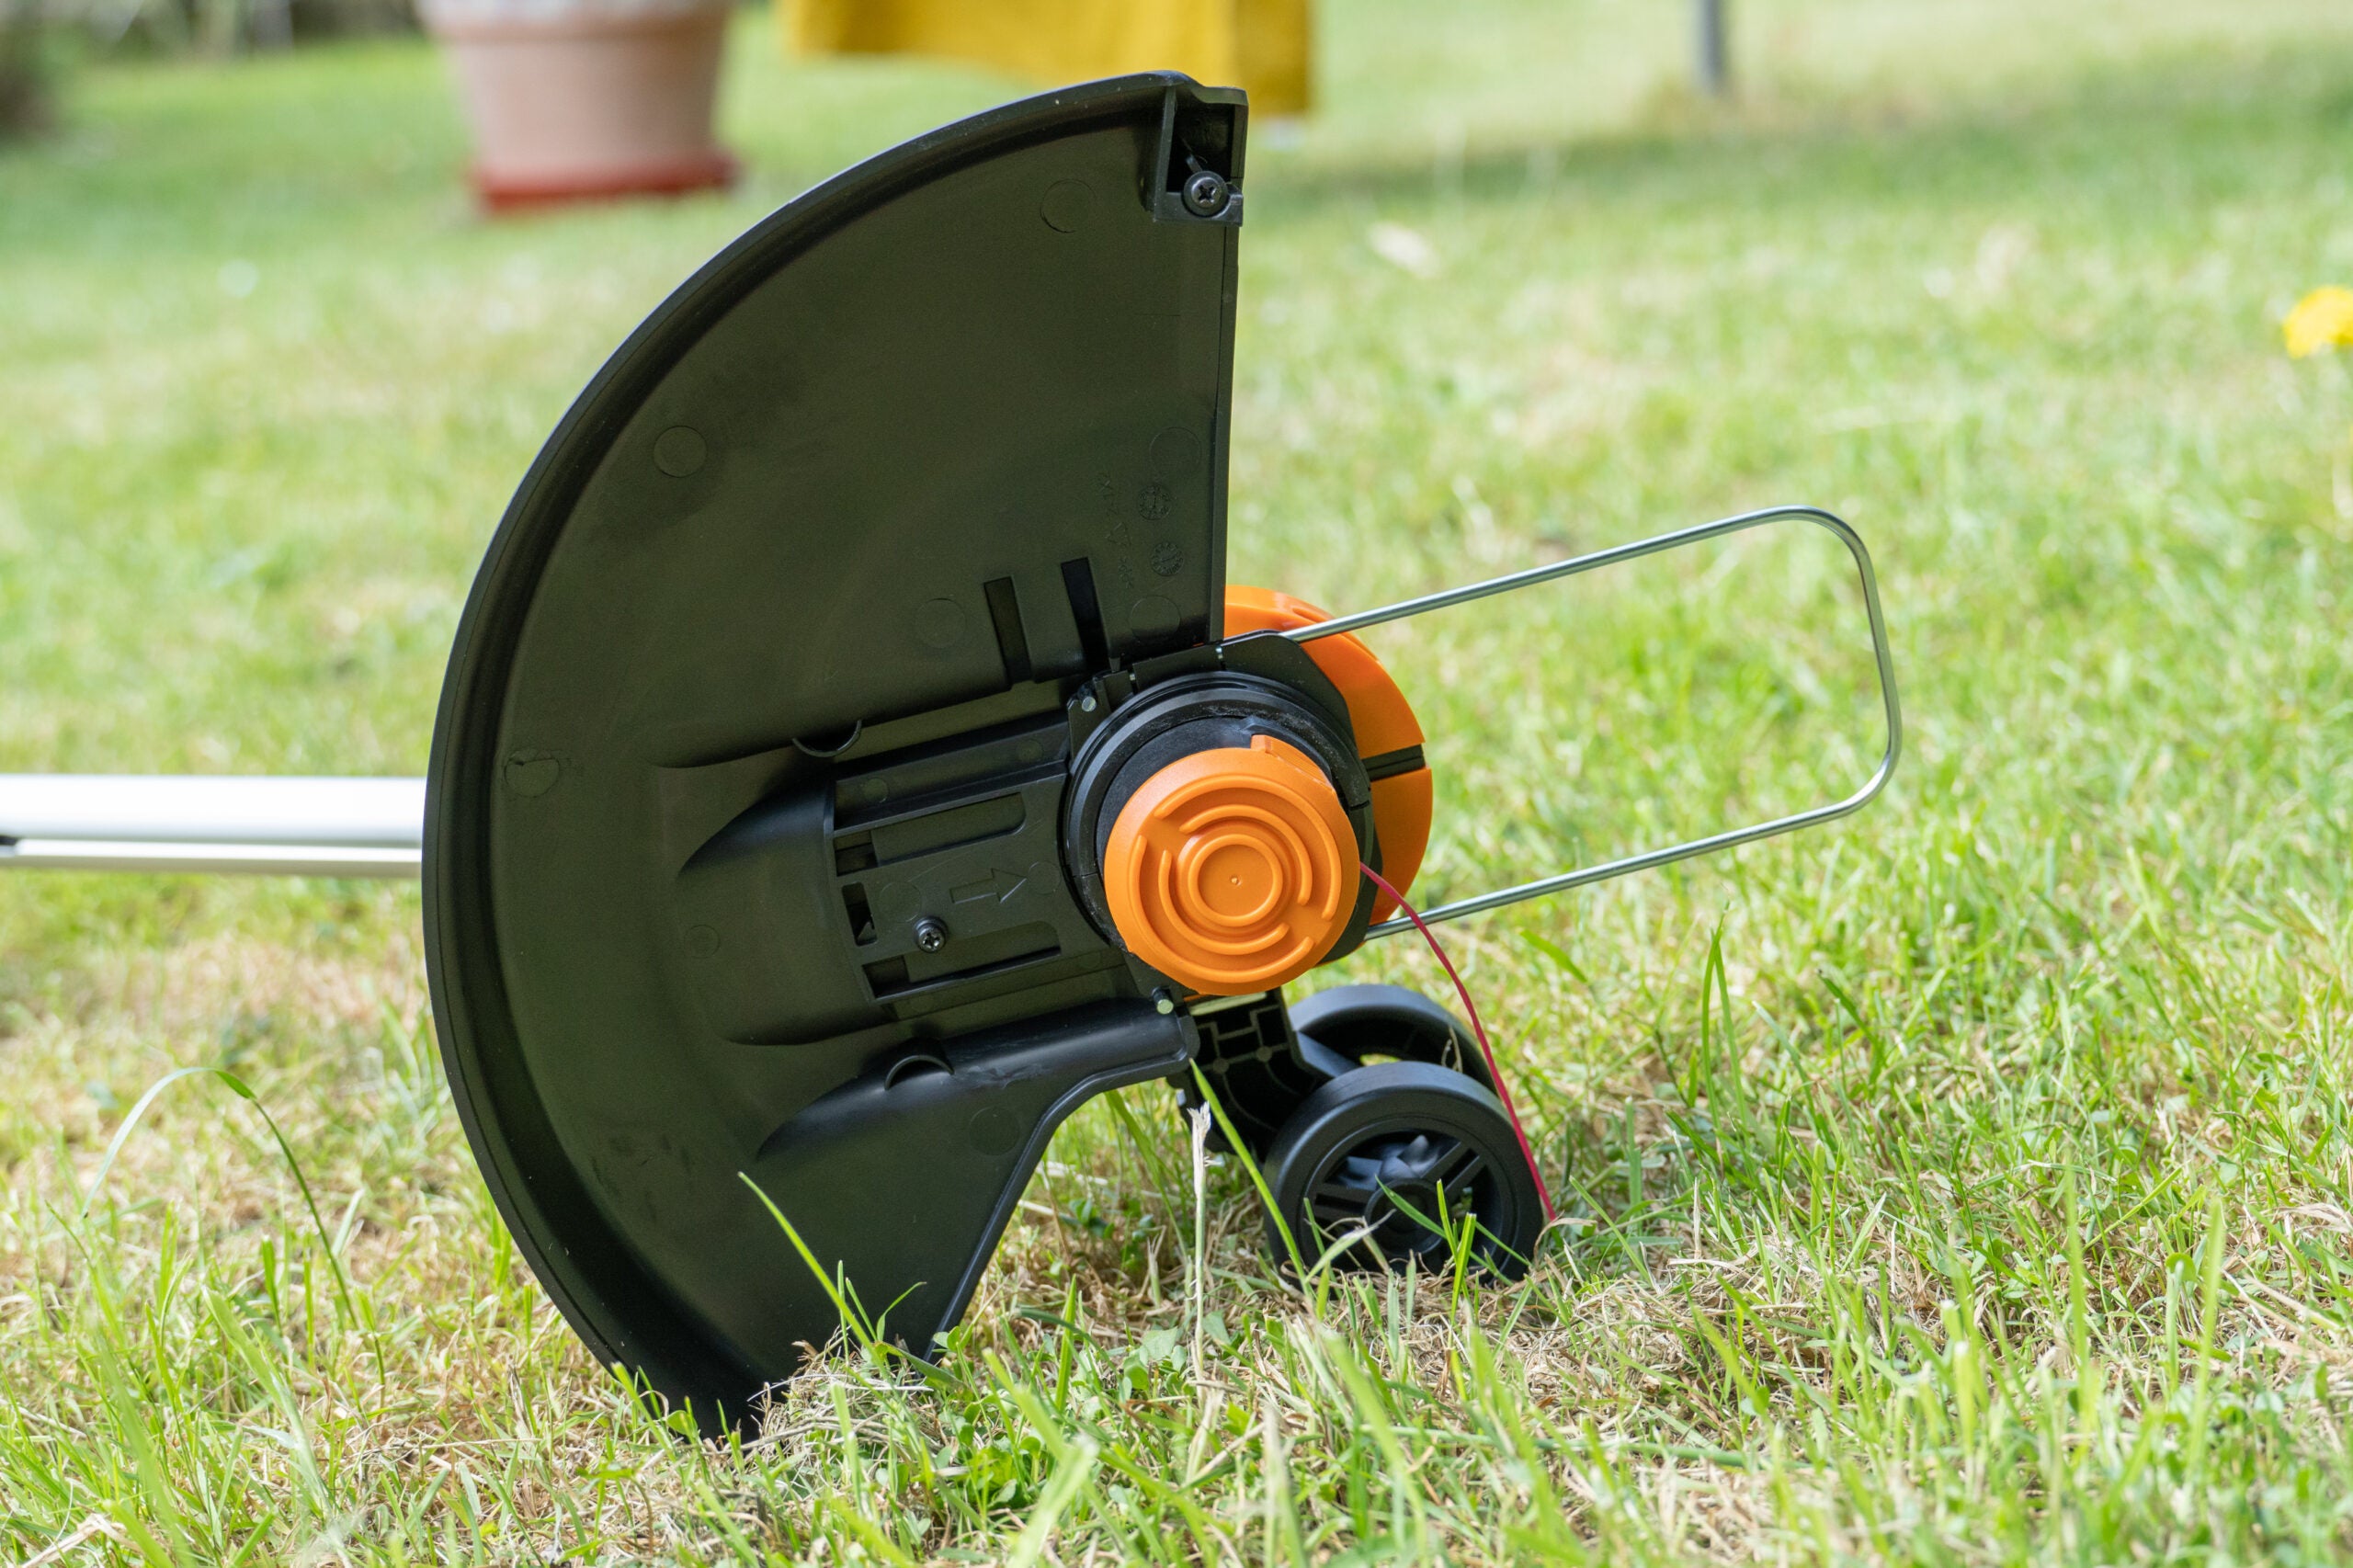
Step 2: Remove the Trimmer Head Cover
The trimmer head cover, also referred to as the spool retainer, keeps the string in place. Depending on the model of your trimmer, this could either involve using a screwdriver to unscrew it, pushing in tabs on the side of the cover, or twisting the cover to remove it. Be careful not to damage the cover as you’ll need it later to secure the string in place.
Once you’re done, set aside the cover in a safe spot where it won’t roll off and get lost. Remember, you’ll have to put it back after you’re done with the trimming line. Also, take out the empty spool from the trimmer head.
Step 3: Prepare the Trimmer Line
The next step in ‘how to string a dual line trimmer?’ is to prepare the trimmer line. Dual line trimmers require two identical lengths of string, typically between 10 to 25 feet each, depending on the cutting width of your trimmer. Measure them out and cut them. Try to use a string that is recommended by your manufacturer – too thin a string will snap quickly while a string that’s too thick may not fit into the trimmer head.
Ensure that the ends of both of the line pieces are cut at sharp angles. This ensures the ends are easier to install into the trimmer head and are already primed for good cutting action when you start using the trimmer.
Step 4: Load the Trimmer Lines
Now comes the crucial part in ‘how to string a dual line trimmer?’. Insert the end of one of the strings into one of the holes or eyelets on the trimmer head. Most trimmer heads will have arrows indicating the direction in which the line should be loaded. Also, ensure to insert the line into the lower compartment first if your trimmer head has split-level compartments.
Once that is done, wind the string around the spool in straight, neat rows. Avoid crossing or layering the line as this could lead to the trimmer line becoming stuck or jammed later. Leave about 6 inches of line unwound at the end. Repeat this same process with the second trimmer line in its respective hole or eyelet.
Step 5: Reassemble the Trimmer Head
Now you are at the final step of ‘how to string a dual line trimmer?’. Once you have successfully loaded the trimmer lines, re-thread them through their respective holes in the trimmer head. After that, carefully replace the spool, making sure that the ends of the string align with the eyelets on the head.
Finally, replace the cover. This may include lining up tabs or lugs, depending on the type of trimmer model. Click or screw the cover back into place, whichever method applies to your trimmer. Check if both lines freely pull out from their respective holes.
Understanding ‘how to string a dual line trimmer?’ is an important skill for any home gardener or professional landscaper. It saves the cost of hiring a professional each time the trimmer line needs changing and also saves time. The trimmer will also function more efficiently and serve you better when it’s properly strung with the right line, in the right way. So, keep practicing these steps and before long, threading your dual line trimmer will feel like second nature to you.
How To Replace String Trimmer Line With 2 Strings-Dual Feed Tutorial
Frequently Asked Questions
When tending to your yard, a dual line trimmer can be an incredibly helpful tool. But stringing it? That’s often easier said than done. Here are some common queries answered to guide you in this process.
1. What kind of line should I use for my dual line trimmer?
The type of line you should use typically depends on what type of work you’ll be doing with the trimmer. For light work such as cutting grass and small weeds, a line diameter of .065″ to .080″ should suffice. You can locate this information on the weed trimmer’s spool.
For heavier chores like chopping thick weeds and undergrowth, you might need a line of 0.085″ to 0.105″ diameter. Remember, a larger line diameter is more robust, but it can also consume more of your trimmer’s power.
2. Where should I start when restringing my dual line trimmer?
Before starting with the restringing process, it’s essential to turn off the trimmer and remove the spark plug for safety. Once this is done, you can remove the spool from the trimmer’s head were the line is wound.
Next, you must clean any remaining crumbs or debris from the last line. Now, you’re ready to restring. Always refer to the user’s manual to ensure you’re following the correct method for your specific trimmer model.
3. How much line should I put on my dual line trimmer?
The amount of line you should put on your trimmer depends largely on the capacity of the trimmer’s spool. Most homeowner-grade models can manage around 15 to 25 feet of line. Ensure not to overfill the spool, or it may jam during operation.
Excess in line could also lead your engine to overheat. So, stay within the spool limit to maintain your trimmer’s health and your yard’s clean visage, balancing both in perfect harmony.
4. Can I use a pre-wound spool for my trimmer?
Absolutely! Pre-wound spools can be an excellent time-saving option for those who prefer not to do this themselves. These spools come ready-to-use and are easily replaceable. Simply remove your old spool and insert the new one in its place.
Check the pre-wound spool’s specifications before purchasing to ensure compatibility with your model of trimmer. If it fits, it indeed makes the restringing process a breeze while offering equal effectiveness as traditionally wound spools.
5. How often should I replace the string on my dual line trimmer?
Line replacement frequency varies based on how often you use the trimmer and the type of vegetation you’re trimming. For light usage, you may only need to replace the string once a season. However, if you’re frequently tackling tough weeds and thickets, you may find yourself changing the line more frequently.
Your line should also be replaced if it becomes brittle or if it starts to unravel. Following these guidelines will help ensure that your dual line trimmer stays in good working order and continues to perform its job effectively.
How To Tips for Easy Restring of Weed Eater with 2 strings
Conclusion
So we’ve covered the basics of stringing a dual line trimmer. You’ve learned to find the correct replacement line for your particular trimmer, align the arrow on the spool with the eyelets on the line head, feed the line through the eyelets, and wind it neatly around the spool. Making sure your trimmer’s line is properly installed is vital for the tool’s performance and your yard’s appearance.
Remember that practicing safety while handling trimmers is equally important. Always unplug or switch off your trimmer before replacing the line, wear protective gear while using the trimmer, and make sure the area you’re working in is clear of any potential hazards. Take care of your trimmer so it can take care of your lawn.

I’m Patricia D. Johnson, an affiliate marketer and blogger specializing in trimmers and grooming tools. I create honest reviews, buying guides, and practical tips to help readers choose the right trimmer for their needs. With a focus on quality, performance, and value, I simplify the decision-making process so consumers can make confident purchases.