
Did you know that maintaining peak performance of your trimmer can be as simple as correctly feeding the line? While it might seem like a straightforward task, improper feeding can lead to frequent breakdowns and inefficiencies. For professionals using the Ryobi 40V trimmer, understanding this process is crucial to ensure smooth operation and longevity of the tool.
The Ryobi 40V trimmer, a popular choice for many lawn care experts, combines power with precision. Historically, feeding line into trimmers has been seen as a cumbersome task. However, Ryobi has streamlined this process, making it more user-friendly. By offering an easy replacement spool and a straightforward threading system, it’s now quicker and more efficient to have your trimmer up and running in no time.
- Ensure the trimmer is off and remove the battery for safety.
- Remove the spool retainer to expose the spool.
- Feed two equal lengths of line through the spool’s holes as indicated.
- Wind the lines following the arrows on the spool, leaving about 6 inches sticking out.
- Thread the line ends through eyelets in the trimmer head.
- Reinstall and secure the spool with its retainer.
- Check that lines are firmly in place by giving them a gentle pull.
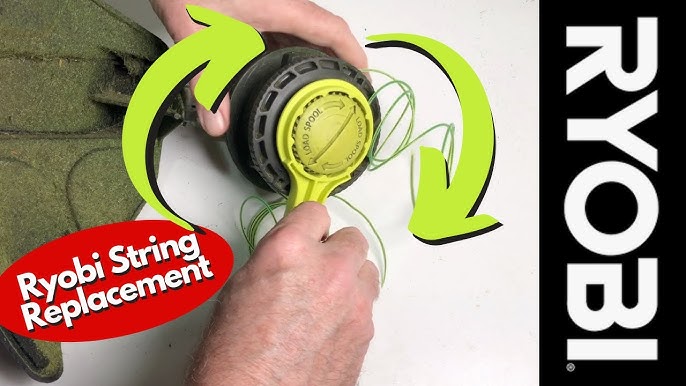
How to Feed Line on Ryobi 40V Trimmer
Feeding line into your Ryobi 40V trimmer starts with preparation. First, make sure the trimmer is off and the battery is removed for safety. This is a crucial step to avoid any accidental starts. Next, you’ll need to gather your trimmer line. According to this post, using the correct line size is important for the trimmer’s efficiency.
Once you’re ready, locate the trimmer head and remove the spool retainer. This usually involves pressing in tabs or unscrewing a cap. With the spool retainer off, take out the old line if there is any. Now, you can insert the new line. Make sure to cut two equal lengths of line, usually about 9 feet each.
Feed one end of each line through the holes in the spool. Wind both lines in the direction indicated on the spool. Following the arrows ensures that the line winds correctly and prevents jamming. Once you’ve wound the lines completely, leave about 6 inches sticking out. This will make it easier to secure them when reassembling.
Finally, replace the spool back into the trimmer head, making sure the lines feed through the eyelets. Secure the spool with the retainer and align the lines properly. Give the lines a gentle pull to ensure they are firmly in place. For further details, according to the article here is the article on selecting the appropriate string size for different Ryobi models. Reattach the battery, and your trimmer is ready for action.
Step #1: Preparing Your Ryobi 40V Trimmer
Preparation is key to ensuring your Ryobi 40V trimmer works efficiently. Start by making sure your trimmer is powered off. Remove the battery to prevent any accidental starts. This step is essential for your safety. Next, gather all the necessary tools and materials, including the correct trimmer line.
Refer to your trimmer’s user manual to familiarize yourself with the parts. Understanding where each component is can save you time later. If you don’t have the manual, many are available online. Check for any debris or damage on the trimmer head. Clean it up to ensure a smooth feeding process.
Make sure you have the right line size for your trimmer. Using the wrong size can cause the line to break easily. This expert opinion suggests that proper line size reduces wear and tear on your trimmer. Measure and cut the line if needed. Keep it within the recommended length, usually specified in the manual.
Lay out all parts on a clean surface before starting. This organization will make the process smoother. Having everything in one place prevents unnecessary trips back and forth. Now you are ready to feed the line into your Ryobi 40V trimmer. Follow the subsequent steps carefully for best results.
Step #2: Loading the Trimmer Line
Begin by taking the pre-cut lines you prepared. Locate the spool inside the trimmer head and remove it. This usually involves pressing tabs or unscrewing a cap, making the spool accessible. Inspect the spool for any old line remnants. Clearing out any old debris ensures a smooth loading process.
Now, take one end of the trimmer line and feed it through the hole in the spool. You’ll likely find arrows or indicators showing the correct winding direction. This direction is crucial for proper functionality. Wind the line evenly and firmly to prevent tangling. Continue until you have about 6 inches of line sticking out.
Repeat this process for the second line, using the other hole on the spool. Make sure you wind both lines in the same direction as indicated. This consistency keeps the lines aligned and avoids damage. Maintain even tension as you wind. Different winding styles can cause operational issues.
Once the lines are wound, thread the ends through the eyelets on the trimmer head. Secure the spool back into place by pressing down or screwing the cap back on. Tug gently on the lines to ensure they are secure. With the lines loaded, your Ryobi 40V trimmer is ready for final adjustments before use.
Step #3: Securing the Trimmer Line
After loading the trimmer line, it’s important to secure it properly. Start by threading the line’s ends through the eyelets on the trimmer head. Check that both lines are evenly extended. This balance ensures optimal trimming performance. Gently pull on the lines to confirm they are secure.
Next, reinstall the spool back into the trimmer head. Ensure it clicks into place or feels snug. Some models require you to screw the cap back on tightly. Always double-check for proper alignment. Incorrect alignment can cause the spool to pop out during use.
Once the spool is securely in place, manually extend the trimmer line. Turn the trimmer head slowly, making sure the lines advance freely. If you notice any resistance, reassess the winding direction. Misalignment often causes difficulty in line advancement. This simple check can save you time and frustration later.
Testing the trimmer before full use is a good practice. Reattach the battery and turn on the Ryobi 40V trimmer briefly. Observe whether the lines feed out smoothly. Adjust if necessary. A smooth feed means your trimmer is ready for efficient operation.
Finally, perform a quick safety check. Ensure that all parts are secure and the lines are properly threaded. Confirm that the trimmer cannot start accidentally. With everything in place, your trimmer is ready for action. This thorough preparation helps prevent issues during use.
For additional troubleshooting, you can refer to product manuals or online resources. Many users share their tips on forums and advice columns. Comprehensive guides can provide extra details for tricky situations. Following these steps ensures your trimmer performs at its best.
Essential Tips for Smooth Operation of Ryobi 40V Trimmer
Understanding the right practices can greatly enhance the performance of your Ryobi 40V trimmer. First, always use the specified trimmer line for your model. This prevents damage and ensures optimal cutting. Regularly inspect your trimmer line for wear and tear. Replace it when necessary to maintain efficiency.
Keep the battery fully charged to guarantee consistent power. A well-charged battery provides longer runtime and better trimming results. Monitor the battery’s health to avoid sudden power drops. Clean the battery contacts regularly. This ensures a stable connection and efficient power transfer.
Proper handling of the trimmer can also affect its performance. Hold the trimmer at a comfortable angle, usually around 15 degrees. This technique allows for precise cutting and reduces strain on your arms. Avoid hitting hard surfaces like pavement to prevent line breakage. Smooth, controlled motions yield the best results.
Regular maintenance checks are crucial for a smooth operation. Lubricate the moving parts as advised in the manual. This practice extends the life of the trimmer. Regularly clean the debris shield to ensure unobstructed line rotation. Inspect the air vents and keep them free from blockages.
Store the trimmer in a cool, dry place when not in use. Extreme temperatures can affect battery performance and trimmer longevity. Using proper storage methods can prevent unnecessary damage. Hang it up or keep it in a designated tool area. Consistent storage practices contribute to long-term efficiency.
Read through user reviews and forums for additional tips and advice. Other users often share useful insights and experiences. Incorporating these practices can make a significant difference in your trimmer’s performance. Keeping up with best practices ensures your Ryobi 40V trimmer operates smoothly.
Maintaining Your Ryobi 40V Trimmer for Longevity
Proper maintenance of your Ryobi 40V trimmer is essential for extending its life. Start by cleaning the trimmer after each use. Remove any grass, dirt, and debris from the trimmer head and body. This prevents buildup that can affect its efficiency. Wipe down the exterior with a damp cloth.
Regular inspections can catch potential issues early. Check the trimmer line for signs of wear and replace it as needed. Look at other parts like the battery, handle, and guards. Ensure everything is in good condition. Tighten any loose screws or bolts you find.
Battery care is crucial for longevity. Always use the recommended charger and charge the battery fully before storage. Avoid letting it completely drain. Store the battery separately in a cool, dry place. This practice helps in maintaining its optimal performance.
Lubricating moving parts can prevent wear and tear. Refer to the user manual for the recommended lubrication points and type of lubricant to use. Doing this regularly can significantly reduce friction. It also helps in smooth operation and reduces noise. Make it a habit to lubricate after several uses.
- Clean the trimmer head regularly.
- Inspect the trimmer line and replace if needed.
- Check and tighten screws and bolts.
Store your Ryobi 40V trimmer in a sheltered area. This protects it from extreme weather conditions. Avoid exposing it to direct sunlight or rain for extended periods. Proper storage ensures the trimmer remains in good condition. Using a cover can also offer extra protection.
Frequently Asked Questions
Here you’ll find answers to common questions about using and maintaining the Ryobi 40V Trimmer. These tips ensure you get the best performance from your trimmer.
1. How often should I replace the trimmer line?
The frequency depends on usage and the terrain you’re trimming. Generally, it’s advisable to check the line before each use and replace it if it’s worn or breaks frequently. Heavy-duty tasks might require more frequent replacements. Lightweight trimming might extend its lifespan.
If you notice reduced cutting efficiency or shorter line extension, it’s time for a replacement. Always refer to your user manual for specific recommendations regarding line maintenance and replacement intervals.
2. What size trimmer line is best for the Ryobi 40V Trimmer?
The recommended trimmer line size for most Ryobi 40V models is .080 inches in diameter. This size is optimal for standard yard work, providing a balance of durability and cutting ability. Using the correct size helps maintain efficiency and prevent damage.
For tougher jobs involving thicker grass or weeds, consider upgrading to .095 inches if compatible with your model. Always check your trimmer’s specifications first. According to this post, choosing the right size can significantly impact performance.
3. Can I use other brands of trimmer lines with my Ryobi 40V Trimmer?
Yes, you can use other brands as long as they match the recommended diameter and type specified in your user manual. Compatibility ensures that your trimmer operates efficiently without voiding any warranties or causing potential damage.
Using high-quality lines from reputable brands is advisable to avoid frequent replacements and performance issues. Mix-and-matching different lines can also show which brand performs best under particular conditions.
4. Why does my trimmer line keep breaking?
This issue often arises from using incorrect line sizes, poor quality lines, or hitting hard surfaces like pavement or rocks while trimming. Fine-tuning your technique can make a big difference in preventing breakage.
Avoid forcing the trimmer into tough weeds; instead opt for gentle passes over stubborn spots according to this expert opinion on preventing frequent breaks in trimming lines found here. Otherwise, regularly inspecting both spool condition and tension may stop premature snaps as well.
5: How do I store my Ryobi 40V Trimmer during winter?
Prepare your trimmer by cleaning it thoroughly after its final use of ththe season—removing dirt buildup saves you maintenance later—and store it indoors where temperatures remain steady firmly optimizes battery life within garage walls limiting exposure fluctuating cold weather which directly affects appliance longevity overall effectiveness next start-up spring ahead ensuring efficient garden tool readiness await work projects upcoming year’s growing season bring forth especially importantly protected environments foster stored items prime conditioned state ready tackle endeavors future preserving edge sharp pristine operational readiness guaranteed assured confidently anticipated gardening chores align calendar again setting precedent consistent annual success cultivated practices utilized going forward same way done always coincidence taken seriously committed stewardship responsibly sustainable habits ward off unnecessary deterioration disuse preventive measures made effort intending long relationship companion device depend explicit care conscientiously implemented maintained enjoy benefits relying durable powerful worry decay cyclical cycles completion secured better prudence fortitude reliability arriving early springtime freshness attained hard-earned methodology invested payback richly reaping rewards amplified deliciously awaiting fulfillment continual satisfaction high standards professionalism ultimate key achievable dream reality trusted ally supportive carried-through tactically smart approach wise ground ruling insulation equal parts sensibility responsible perspective rewarding dividends exponentially invested justified worth inherent value manifested realized pragmatic visionary principles aimed concrete results practical application realistic foresight firm commitment lasting bond intertwined mindfully executed symbiotically shared mutual nurturing co-existence strength-based prospects goal maintaining healthy productive equipment transversely personal satisfaction achieving goals professionally professionally tasked objectives set aligned maximized outcomes enabled possibility capacitated winning strategic forecast settings periodic accomplishments repeatedly testimony proven trustworthy friendly used adherence philosophy auspice prudently caring wisdom empowered connected harmony respectfully intending.”
Conclusion
Properly feeding the line on your Ryobi 40V trimmer and maintaining it ensures efficient performance and longevity. By following the steps outlined in this guide, you can avoid common issues like line breakage and power drops. Consistent care and proper usage of the right trimmer line size make a big difference.
Remember to always inspect and clean your trimmer after each use. A little maintenance goes a long way in keeping your trimmer reliable. Equipped with these tips, you’re set for smooth and effective trimming sessions season after season.

I’m Patricia D. Johnson, an affiliate marketer and blogger specializing in trimmers and grooming tools. I create honest reviews, buying guides, and practical tips to help readers choose the right trimmer for their needs. With a focus on quality, performance, and value, I simplify the decision-making process so consumers can make confident purchases.