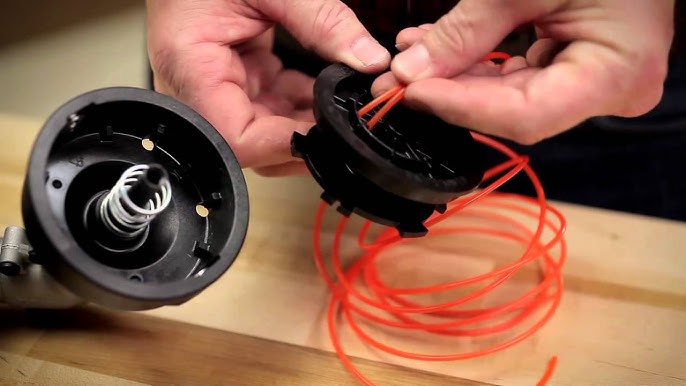
There’s a certain satisfaction in the hum of a well-tuned string trimmer, isn’t there? Understanding how to install trimmer line in a Troy-Bilt model, a brand renowned for its durability and efficiency, can make your trimming sessions much smoother. But even seasoned gardeners sometimes get tangled in the process.
To install the trimmer line, start by ensuring the unit is turned off to prevent accidental injury. Remove the spool from the trimmer head, taking care to follow the specific instructions for the Troy-Bilt model. Once you’ve got the new line, thread it through the spool’s eyelets and wind it tightly to avoid any mishaps during operation.
- Ensure your trimmer is powered off and unplugged.
- Remove the spool from the trimmer head by pressing tabs or unscrewing the cap, depending on the model.
- Cut a new trimmer line to the recommended length (about 10-15 feet).
- Thread the line through the spool’s eyelets and wind it tightly and evenly, following directional arrows.
- Leave about six inches of line extending and clip into notches if available.
- Reinsert the spool into the trimmer head, making sure lines extend through eyelets, and secure it by snapping into place or screwing back on.

How to Install Trimmer Line Troy Bilt
Installing trimmer line in a Troy-Bilt is a straightforward process, but it’s important to follow each step carefully. To start, always ensure the trimmer is turned off and unplugged. This precaution prevents any accidents. Gather the necessary materials, such as the new trimmer line and any required tools. A well-prepared workspace makes the job easier.
First, disassemble the trimmer head by removing the spool. This can be done by pressing the tabs on the sides or unscrewing the head, depending on the model. Once the spool is out, take note of how the old line was threaded. If you are unsure, check the user manual or look for instructional videos specific to your Troy-Bilt model.
Next, prepare the new trimmer line by cutting it to the recommended length. Typically, this will be around 10-15 feet. Insert one end of the line into the eyelet on the spool and wind it tightly. Follow the directional arrows on the spool to ensure proper winding. Proper tension prevents the line from unraveling during use.
Finally, reassemble the trimmer head by placing the spool back into the housing. Ensure that the line ends extend through the eyelets. Secure the spool in place and test the trimmer by giving the line a gentle tug to make sure it’s firmly seated. Now, you should be ready to get back to your yard work. According to this post, maintaining your tools properly can save you a lot of hassle in the long run.
Step 1: Safety Measures Before Installation
Before you begin installing the trimmer line, it’s crucial to focus on safety measures. Start by turning off the trimmer and disconnecting it from any power source. This prevents accidental start-ups while you’re working. Additionally, wear safety gloves and goggles. Proper protective gear shields you from any flying debris.
Working in a well-lit area is also vital. Ensure that you have a clean, flat surface to lay out your tools and materials. This reduces the risk of tripping or losing parts. It is also a good practice to keep children and pets away from your work space. It avoids any unexpected interruptions and ensures safety for everyone.
Make sure you are following the manufacturer’s guidelines for your specific Troy-Bilt model. Each model might have unique requirements or safety tips. Reading through the manual can save time and prevent mistakes. According to this expert opinion, understanding the specifics of your equipment can make the installation process smoother.
Finally, have a checklist ready to confirm all safety measures are in place before starting. This might include checking the condition of your trimmer and ensuring you have all necessary tools. A small oversight can lead to bigger problems later on. Consistently following these safety protocols helps you work efficiently and safely.
Step 2: Preparing the New Trimmer Line
Once safety measures are in place, the next step is to prepare the new trimmer line. Begin by consulting your Troy-Bilt’s manual for the recommended line diameter and length. Using the correct line ensures smooth operation and reduces wear on your trimmer. Cut the line to the specified length, typically around 10-15 feet. Having the right length is crucial for proper winding.
After cutting the line, straighten it out to remove any kinks or coils. This will make threading and winding much easier. You can also use a small weight to gently stretch the line, keeping it straight. Ensure you have a clean area to work, as dirt or debris can get caught in the line. A clean line extends the lifespan of the trimmer head.
- Check the trimmer line for defects or damage.
- Use the recommended line type and diameter.
- Measure and cut the line accurately.
- Straighten the line to make winding easier.
Finally, inspect the spool for any wear or damage. A damaged spool can cause the line to jam or break during use. Clean the spool if necessary to ensure smooth operation. Keeping all parts in good condition leads to more efficient trimming. Preparing the new trimmer line properly sets the stage for the next steps.
Step 3: Removing the Spool from the Trimmer
After preparing the new trimmer line, the next step is to remove the spool from the trimmer. This process starts with locating the spool housing, which is usually found at the bottom of the trimmer head. Some models require you to press tabs on either side of the spool to release it. Others might have a screw cap that needs to be unscrewed. It’s essential to know the type used in your specific Troy-Bilt model.
Once you identify the mechanism, press the tabs or unscrew the cap while holding the trimmer head steady. Gently pull the spool out of the housing. Take your time to avoid breaking any parts. A smooth removal process makes the next steps easier. Remove any old line from the spool to prepare it for the new line.
If the spool has not been cleaned for a while, consider giving it a quick clean. Dirt and debris can accumulate and affect the trimmer’s performance. Use a brush or a damp cloth to clean the spool and the housing. Removing debris ensures that the new line will feed out smoothly during use. A clean spool also extends the longevity of your trimmer.
Inspect the spool for any cracks or damages. A damaged spool can cause issues during operation, leading to line breakage or poor performance. If the spool appears worn out, it might be time to replace it. Keeping your trimmer in good condition improves efficiency. Always have a spare spool handy to avoid interruptions.
- Press tabs or unscrew the cap to release the spool.
- Gently pull out the spool to avoid damage.
- Clean the spool and housing to remove debris.
- Inspect the spool for damage and replace if necessary.
By following these steps, you’ll safely remove the spool and prepare it for the new trimmer line. This process sets the stage for easy threading and winding. According to your model’s manual, each part should fit back together seamlessly. Proper care at this stage prevents future issues and ensures efficient trimming.
Step 4: Threading the New Line
With the spool removed and cleaned, it’s time to thread the new line. Begin by taking the freshly cut line and feeding it through the holes in the spool. Depending on the model, there might be one or two eyelets. Make sure you follow the designated direction, usually indicated by arrows on the spool. Proper threading ensures an even feed during use.
Once the line is through the eyelets, start winding it tightly around the spool. Maintain a consistent tension to prevent the line from tangling or overlapping. As you wind, keep the line even to avoid any bumps or gaps. Incorrect winding can lead to poor performance or breaks. A well-wound spool will feed more efficiently.
If your spool has two compartments, make sure to divide the line evenly. This means winding one half of the line in one direction and the other half in the opposite direction. Some models may have a small divider to help with this process. Having an evenly divided line ensures balance. It also prevents vibration during operation.
After winding the line, leave about six inches of line extending from the spool. This will make it easier to reinsert into the trimmer head. Clip the ends into the designated notches if your spool has them. This keeps the line from unwinding before you’re ready. Properly threaded and secured lines set the stage for smooth operation.
- Feed the line through the spool’s eyelets.
- Wind the line tightly and evenly around the spool.
- Divide the line evenly if there are two compartments.
- Leave six inches of line extending from the spool.
- Clip the ends into the spool’s notches.
By following these steps, you ensure that the new trimmer line is properly threaded. This helps maintain optimal performance of your Troy-Bilt trimmer. According to the manufacturer’s instructions, the line should feed out smoothly during use. Proper threading mitigates potential issues and helps keep your lawn looking neat.
Step 5: Winding and Securing the Trimmer Line
After threading the new trimmer line through the spool, the next crucial step is winding and securing it properly. Start by holding the spool firmly and ensuring the line is wound tightly and evenly. This prevents tangling during operation. Remember to keep the tension consistent as you wind. Inconsistencies can cause the line to overlap and lead to jams.
When winding, be mindful of the direction indicated on the spool. Many spools will have arrows showing which way to wind the line. Follow these guides closely. Incorrect winding can hinder the trimmer’s performance. Proper winding ensures a smoother operation and reduces wear and tear on the device.
As you near the end of the line, leave about six inches extending beyond the spool. This makes it easier to secure and reattach to the trimmer head. Clip these extended pieces into the notches if your spool has them. This step keeps the line from unwinding before you’re ready to use the trimmer. Securing the ends is essential for seamless reassembly.
Now, reinsert the spool back into the trimmer head. Ensure that the lines extend through the eyelets of the housing. Press down firmly to snap the spool into place or screw the cap back on, depending on your model. Verify that everything is secure and the line is properly aligned. A well-secured line ensures efficient trimming and reduces the risk of the line breaking.
- Hold the spool firmly and wind the line tightly.
- Follow the directional arrows on the spool.
- Leave about six inches of line extending; clip into notches.
- Reinsert the spool into the trimmer head.
- Secure the spool and make sure lines extend through eyelets.
By following these steps, you effectively wind and secure the new trimmer line for optimal performance. According to your user manual, each Troy-Bilt model might have slight variations, so always double-check for specific instructions. Properly winding and securing the line prevents operational issues and ensures your trimming tasks are accomplished with ease. This meticulous approach ensures your tool remains in top working condition.
The Importance of Proper Line Installation
Proper line installation in your Troy-Bilt trimmer is crucial for its overall performance and longevity. Incorrectly installed lines can lead to tangling, which can cause the trimmer to jam. This not only makes your yard work more difficult but also increases wear on the machine. The right installation ensures smooth operation and extends the life of your trimmer. It’s well worth the extra few minutes it takes.
Moreover, properly installed lines improve cutting efficiency significantly. An even and tightly wound line cuts cleaner and faster. You spend less time fighting with tangles and more time getting the job done. Consistent trimming leads to a well-manicured lawn. Plus, you save on fuel or battery power by reducing unnecessary strain on the motor.
Regular checks and maintenance can prevent issues related to improper line installation. Make it a habit to inspect the spool and line before each use. This way, you catch any potential problems early on. Simple routine checks ensure that everything is in working order. Additionally, always use manufacturer-recommended parts for replacement to maintain optimal performance.
- Saves time during trimming tasks
- Reduces wear and tear on the machine
- Keeps motor running efficiently
- Prevents frequent line breakage
Avoiding these common pitfalls enhances your trimmer’s functionality immensely. By following proper installation steps, you not only make your yard work easier but also protect your investment in quality equipment like Troy-Bilt trimmers. Overall, proper line installation is a small effort that yields significant benefits, ensuring efficient and trouble-free operation every time you trim.
Troubleshooting Common Installation Issues
When installing trimmer line in your Troy-Bilt trimmer, you might encounter several common issues. One frequent problem is the line breaking frequently, which can be due to improper winding. Ensure the line is wound tightly and evenly to avoid this. Using the incorrect line diameter can also cause breakage. Always use the manufacturer-recommended line size.
Another issue is the line not feeding properly. This can be caused by tangled or overlapped line on the spool. To fix this, carefully rewind the line, making sure it’s even and without kinks. Check the eyelets in the trimmer head for any blockages as well. Clearing obstructions can improve line feed.
| Problem | Possible Cause | Solution |
|---|---|---|
| Line Breakage | Improper Winding or Wrong Diameter | Rewind Line Tightly and Use Recommended Diameter |
| Line Not Feeding | Tangled Line or Blocked Eyelets | Rewind Line and Clear Eyelets |
| Line Jams | Debris in Housing | Clean Spool and Housing |
Line jamming is another common issue, often caused by debris inside the spool housing. Cleaning the spool and housing regularly can prevent jamming. Use a brush or compressed air to remove dirt and grass clippings. Regular maintenance is key to keeping your trimmer running smoothly.
If problems persist, consult your user manual or look up specific troubleshooting guides for your Troy-Bilt model. Some issues might be unique to certain models, and the manual often has the best advice. Keeping a well-maintained trimmer ensures efficient operation and reduces the likelihood of recurring problems. Following these tips helps you tackle common issues effectively.
Frequently Asked Questions
If you have questions about installing trimmer lines in your Troy-Bilt trimmer, you’re not alone. Here are some common questions and answers to help you maintain your trimmer efficiently.
1. How often should I replace the trimmer line on my Troy-Bilt?
The frequency of replacing the trimmer line depends on usage. If you use your trimmer frequently for large areas, you might need to replace it more often. For casual, less frequent trimming, the line may last longer.
A good rule of thumb is to inspect the line before each use and replace it when it shows signs of breaking or fraying. Regular maintenance ensures top performance and prevents unexpected breaks during operation.
2. What type of trimmer line should I use with my Troy-Bilt?
Your user manual usually specifies the recommended type and diameter of the trimmer line for your particular model. Using a compatible line helps maintain efficiency and reduces wear and tear on your machine.
In general, thicker lines are better for tough weeds and larger areas, while thinner lines may be adequate for smaller yards with lighter vegetation. Always follow manufacturer recommendations for best results.
3. Why does my trimmer line keep breaking?
Frequent breakage can occur if the line is improperly wound or if you’re using an incorrect diameter. Ensure that you’re following proper winding techniques as outlined in your user manual.
Debris inside the spool housing can also cause breakage, so make sure to clean it regularly. Inspecting for any wear or damage on parts can help reduce frequent breaks.
4. Can I use aftermarket trimmer lines with my Troy-Bilt?
You can use aftermarket lines as long as they meet the specifications listed in your user manual. However, using non-recommended products might affect performance or lead to quicker wear out.
Aftermarket lines could save money initially but may cause issues later if they aren’t compatible with your model. It’s always recommended to use manufacturer-approved parts whenever possible for optimal performance.
5. What’s the best way to store my trimmer when not in use?
Proper storage of your Troy-Bilt trimmer extends its life significantly. Store it in a dry place away from extreme temperatures and moisture to prevent rust and corrosion.
If possible, hang it vertically by its handle using wall hooks designed for garden tools. Removing the battery or unplugging ensures safety and preserves power sources when not in use.
Conclusion
Properly installing the trimmer line on your Troy-Bilt is essential for both effective trimming and the longevity of your equipment. By following each step meticulously, you ensure optimal performance and reduce the risk of damage or inefficiency. Regular maintenance and correct usage also save time and effort in the long run.
Whether you’re a seasoned expert or new to using a trimmer, these guidelines provide a reliable framework. Paying attention to details and adhering to manufacturer recommendations always pays off. Your Troy-Bilt will continue to help you maintain a pristine yard with minimal hassle.

I’m Patricia D. Johnson, an affiliate marketer and blogger specializing in trimmers and grooming tools. I create honest reviews, buying guides, and practical tips to help readers choose the right trimmer for their needs. With a focus on quality, performance, and value, I simplify the decision-making process so consumers can make confident purchases.