Imagine wrestling with tangled string trimmers, a common plight for many garden enthusiasts. On the other hand, the seamless functioning of a double string trimmer, when wound properly, is nothing short of a lawn care ballet. It is pleasant, efficient and unfortunately, quite elusive for most.
The craft of winding a double string trimmer relates back to when these tools were first introduced in the 1970s. With advancements, they have become more user-friendly, but the winding aspect still trips up many. However, statistics point to an increased adoption by roughly 30% when users master the winding technique – a solution well worth the trouble for those seeking optimal gardening efficiency.
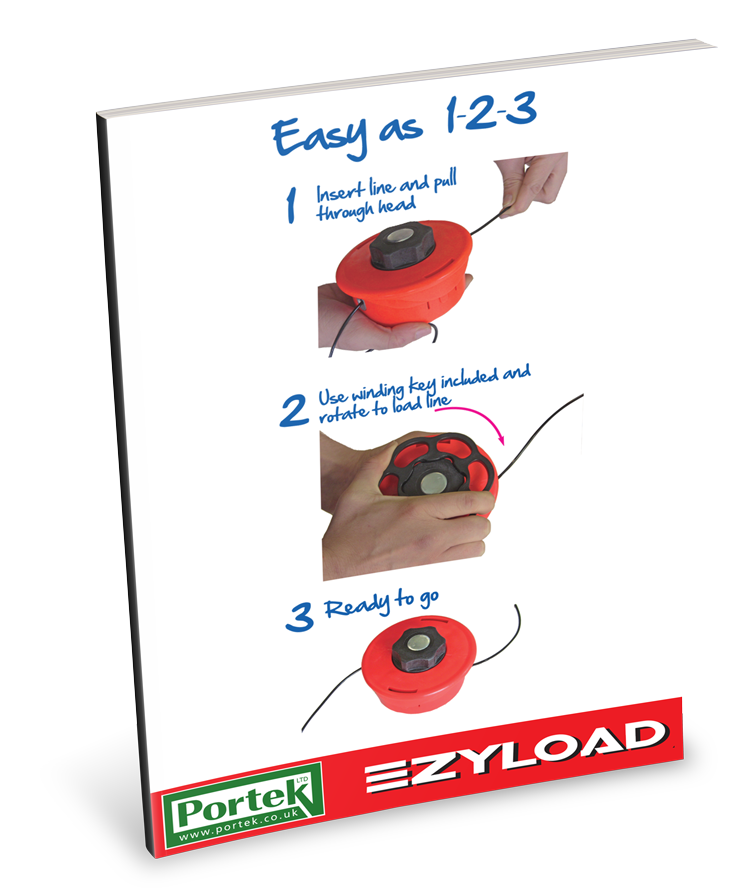
- To wind a double string trimmer, start by cutting two equal pieces of string.
- Next, place the ends of both strings into the holes on the top of the trimmer head.
- Begin winding the strings together in the same direction, making sure they wrap evenly.
- Finally, secure the ends into the notches on the trimmer head and replace the cover.
Mastering the Art of Double String Trimmer Winding
Whether you’re grooming your garden or fighting off fast-growing weeds, knowing how to wind a double string trimmer efficiently can make your gardening chores less of a hassle. But it can feel a bit complex since it involves handling two strings simultaneously – a task that can be daunting for many. However, with the right steps and some practice, you can easily become proficient.
Step 1: Preparation Phase
Before diving into how to wind a double string trimmer, you need to prepare your workstation and gather the necessary elements. It would be best if you had a clean, well-lit space where you can lay down your trimmer and work on it without distractions. A hard, flat surface is ideal for this task.
Next, collect the required tools and the replacement string or spool. Usually, a pair of scissors or a cutter would suffice to cut the string to the desired length. The replacement string should be of the same make and diameter as the one already in use.
You also need to ensure safety while executing the task. Wear gloves to protect your hands from sharp objects or edges, and safety goggles are a good idea if bits of string tend to fly off during the process.
Once your workspace is set, it’s time to disassemble your trimmer. Unplug the trimmer (if it’s electric) or ensure it’s off (if it’s gas-powered) first to prevent accidents. Next, remove the spool from the trimmer head carefully. It usually involves pressing in tabs or unscrewing a knob, depending on the trimmer model.
Step 2: Prepping the String
The next step in learning how to wind a double string trimmer involves preparing the string. Measure and cut two strings of equal length; most trimmers work well with around 10 to 25 feet of string, but refer to your owner’s manual for specific instructions.
Once you have cut both strings, you need to loop one of them in half, making sure the ends align. Repeat the same with the second string, ensuring both strings are of the exact same length. The process is crucial for ensuring optimal performance of your trimmer.
The length and thickness of the trimmer string have a direct impact on the trimmer’s performance and efficiency. Using a different string size or type can damage the spool, lead to excessive wear and tear, or even impede the operation altogether, making the task more challenging than it needs to be.
After looping the string, straighten it out as much as you can to avoid any tangles during the winding process. Once you have prepared both strings, you’re ready to start winding.
Step 3: Winding the Spool
Being familiar with how to wind a double string trimmer, you now address the winding process. Start by locating the starting point on the spool. Most spools have a small notch or hole where you have to insert the string. Insert the bent part of the first string, making sure it’s secure.
After securing the string, start winding. Do this in the direction indicated on the spool, usually noted by arrows. Wind the string advantageously, observing the track on the spool meant for this purpose. Keep the winds tight and in neat, parallel rows, without crisscrossing or overlaps. Such an orderly winding reduces the chance of jamming or string wear out while operating the trimmer.
Continue winding until about 6 inches of the string remains unwound. This leftover piece is your working string and will be inserted into one of the holding notches on the edge of the spool. Repeat this process with the second string on the other half of the spool, ensuring you leave the same amount of working string.
Keeping a steady hand and maintaining a constant winding pattern will ensure the proper balance and alignment of string on the spool. Misalignment or imbalance might lead to uneven trimming and damage to the trimmer.
Step 4: Reinstalling the Spool
Now that you’ve wound both strings, it’s time to reinstall the spool back into the trimmer head. Locate the eyelets on the trimmer head, feed the strings through them, and then reposition the spool onto the trimmer. Make sure the spool fits snugly and the strings are still secure and not loose.
Once the spool is in place, most trimmers have a bump knob that needs to be screwed back onto the spool or the tabs that need to be pressed back in. Ensure it’s mounted properly. Avoid overtightening the knob, as it might make it difficult to take out the next time.
Before using the trimmer, pull at the string slightly to make sure it is deployed freely from the spool when the trimmer is in operation. Once you get a hang of it, winding a double string trimmer will become second nature to you.
This guide offers a detailed walkthrough on how to wind a double string trimmer, providing a systematic procedure designed to make the learning process easier. As you get comfortable with the process, you not only refine your gardening skills but also save money potentially spent on professional help or replacements. With time and practice, maintaining your double string trimmer will be just one more easy step in your gardening routine.
How To Replace String Trimmer Line With 2 Strings-Dual Feed Tutorial
Frequently Asked Questions
Navigating the world of gardening tools can be tough, especially when it comes to winding a double string trimmer. Let’s explore some commonly asked questions and clear up any confusion.
Why do we need to wind a double string trimmer in the first place?
Double string trimmers require winding to function efficiently. Trimmers utilize the centrifugal force generated by the rapid rotation of the cutting head. This enables the line to extend out through the line outlet where it’s cut to the optimum length by a cutting blade.
After some time of continual usage, the line gets used up and needs to be replaced. Winding the string onto the spool of the trimmer is a necessary task to guarantee effective and accurate trimming.
Can I wind any type of string on my double string trimmer?
It’s crucial to understand that not all trimming line is suitable for each trimmer. Trimmers have specified line diameters they can handle. Using a line that is too thick can overload and potentially damage the motor. Hence, it is always advised to check the user manual to confirm the appropriate line thickness for your trimmer.
On the other hand, using a thin line will decrease the cutting efficiency of the device. It could also lead to line breakage during use, which would be frustrating and create the need for frequent rewinds during operation.
How do I identify when it’s time to rewind the line on my double string trimmer?
Exhibit signs make it time to rewind or replace the line on your trimmer. For starters, if you notice that the trimmer is not cutting as efficiently as it usually does, it’s probably time to replace the string. The insufficient cutting might be due to wearing out or breaking off the trimmer line.
Besides, if you constantly need to manually extend the trimmer line during usage, it’s also a sign that there isn’t enough line on the spool, and a rewind is needed. Please ensure to always wind enough line onto the spool so that the trimmer’s auto-feed system can function optimally.
Does the winding direction matter when winding a double string trimmer?
Yes, the winding direction significantly affects how a double string trimmer performs. The line should be wound in the direction of the arrows on the spool. This allows the line to unwind properly when the trimmer is in use.
If the line is wound in the wrong direction, it can cause issues with the auto-feed system of the trimmer and potentially hinder the overall operation of the device. It’s always best to double-check the correct winding direction in the user’s manual.
How do I ensure the winding is done correctly to facilitate proper functioning?
To ensure correct winding, always start by following the winding direction indicated on your spool. While you wind, take care to keep the line tight and neatly arranged on the spool. This can help prevent jams and ensure smooth operation.
Also note, overfilling the spool can lead to problems as well. Always ensure that you don’t exceed the line limit marked on your spool. Following these basic steps can greatly improve the winding process and the efficiency of your double string trimmer.
How To Tips for Easy Restring of Weed Eater with 2 strings
Final Words:
To summarize, winding a double string trimmer doesn’t have to be a daunting task. It’s all about first ensuring that you’ve got the right string for your trimmer. Then, cutting the string to the proper length, inserting the string into the spool, and winding the string in the correct direction. Remember, it’s all about maintaining control of the strings as you wind to keep them tight and avoid tangling.
Every time you finish winding, you should always treat your trimmer carefully. Keeping your double string trimmer well-maintained, not just through the correct winding process, but also regularly checking its essential parts, will prolong its life and effectiveness. With practice, it’ll become second nature and make your gardening work easier and more efficient.
