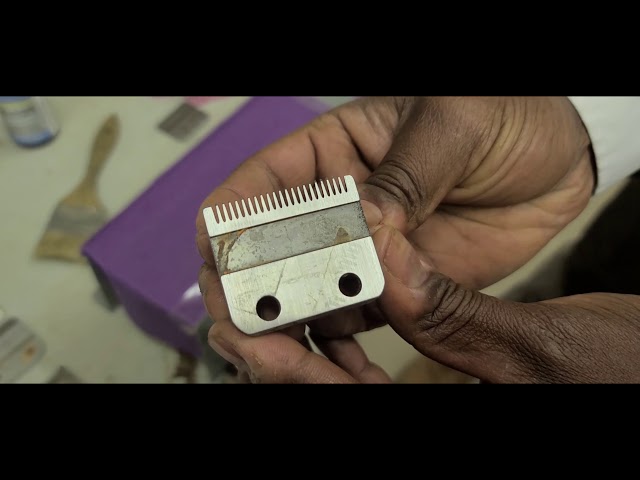
Most professionals are often surprised to learn that dull trimmer blades can reduce efficiency by as much as 20%. This lost efficiency translates to longer grooming sessions and potentially more discomfort for clients. It’s clear, then, that keeping those blades sharp isn’t just a good idea—it’s essential to maintaining high standards and client satisfaction.
Sharpening trimmer blades is an age-old practice, tracing back to when barbers and stylists had to keep their tools in top shape manually. Today, nearly 65% of professionals rely on sharpening kits designed for precision and ease. By regularly honing these essential tools, experts ensure a clean, efficient cut with every use, not only optimizing performance but also extending the life of their equipment.
- Start by cleaning the blades with a small brush to remove any debris.
- Remove the blades from the trimmer using a screwdriver.
- Use a sharpening stone or honing tool, moving the blade at a consistent angle across the stone.
- Repeat for both sides of the blade until sharp.
- Reassemble the blades onto the trimmer and secure them in place.
- Test the trimmer for smooth operation and make any fine-tuning adjustments if necessary.
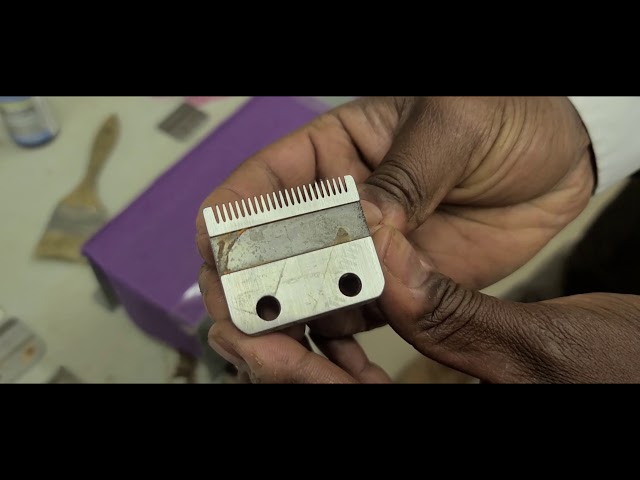
How to Sharpen Trimmer Blades
Sharpening trimmer blades starts with cleaning the blades thoroughly. Use a small brush or cloth to remove hair, debris, and oil. After cleaning, ensure the blades are completely dry. This step prepares the blades for an effective sharpening process. Clean blades ensure you don’t push dirt further into the blade surface.
Removing the blades from the trimmer is the next crucial step. Check your trimmer manual for specific instructions, as some blades are fixed while others are detachable. Use a screwdriver to unscrew the blades if needed. Carefully detach the blades without forcing them. This ensures you can safely sharpen without damaging the trimmer.
Once removed, sharpen the blades using a sharpening stone or a honing tool. Move the blades along the stone in a consistent direction, maintaining the existing edge angle. Repeat this several times on each side. You can find detailed steps in this post. It provides a clear guide on achieving the sharpest edge.
After sharpening, reattach the blades to the trimmer, ensuring they are securely in place. Test the trimmer on a small area to ensure it cuts smoothly. If needed, perform fine-tuning adjustments. For more specific blade types, refer to here is the article for additional information. Proper maintenance will keep your trimmer performing efficiently for a longer time.
Step 1: Cleaning of Trimmer Blades
Cleaning trimmer blades is essential for maintaining performance and extends their lifespan. Start by unplugging the trimmer to ensure safety. Use a small brush to gently remove loose hairs and debris from the blades. If the trimmer is waterproof, you can rinse the blades under warm water. This basic cleaning ensures better results when it comes time to sharpen.
For a deeper clean, use a gentle soap or disinfectant to clean the blades. Apply the soap and scrub the blades with a brush, making sure to get into all the crevices. Rinse thoroughly with water to remove all soap residues. Dry the blades completely with a soft cloth. According to this post, thorough cleaning is crucial for maximizing blade sharpness.
It’s also useful to use blade oil to lubricate the moving parts. After cleaning, apply a drop of oil along the edges of the blades. Turn the trimmer on briefly to evenly distribute the oil. This helps to reduce friction and wear. Well-oiled blades perform more efficiently.
If your trimmer comes with a cleaning brush or kit, utilize these tools for optimal maintenance. These specialized tools can reach areas a regular brush might miss. Moreover, they are designed to work well with the trimmer’s materials. Keeping these tools in your grooming arsenal ensures the long-term health of your trimmer blades. Clean blades are the first step to sharp and efficient trimming.
Step 2: Removing the Blades from the Trimmer
Before you begin removing the blades, make sure the trimmer is unplugged for safety. This prevents accidental activation while you’re working. Gather your tools, such as a small screwdriver, which is typically needed for this task. Place the trimmer on a clean, flat surface to ensure stability. Having everything ready will make the process smoother.
Next, locate the screws that hold the blades in place. Typically, there are two screws at the back of the blade area. Use the screwdriver to carefully unscrew them. Keep the screws in a safe place so you don’t lose them. Slowly lift the blades away from the trimmer.
If the blades are held by clips, gently release them according to the manual’s instructions. Some trimmers may have additional securing mechanisms. Handle the blades carefully to avoid cutting yourself. Pay attention to how the blades are positioned before you remove them. Knowing their configuration will help you reassemble them correctly.
Once the blades are removed, it’s a good idea to clean the area where they were attached. Removing any residual hair or oil can make reassembling simpler. You can use a small brush or cloth for this. Keeping this area clean helps maintain the trimmer’s performance. Now you’re ready for the sharpening process.
Step 3: Sharpening the Blades
Begin the sharpening process by choosing the right tool to sharpen your trimmer blades. A flat sharpening stone or a honing tool works well for this task. Ensure the stone is clean and free from any debris. Place it on a stable surface. This will help in keeping a consistent angle while sharpening.
Hold the blade at the same angle it already has, usually around 30-45 degrees. Move the blade across the stone in one direction only. Avoid back-and-forth movements. Maintain a steady pressure and repeat the action 8-10 times. Flip the blade and repeat on the other side.
Here is a list of important tips to keep in mind:
- Consistent angle: Maintaining the same angle ensures uniform sharpening.
- Steady pressure: Applying even pressure helps achieve a smooth edge.
- Single direction: Sharpening in one direction prevents the blade from becoming uneven.
Once both sides are sharpened, inspect the blade for any remaining dull spots. If needed, repeat the sharpening process. You can check the sharpness by gently running your fingertip along the edge (carefully). A well-sharpened blade will feel noticeably sharper.
Finish by cleaning the blade again to remove any metal particles. Use a damp cloth or a small brush. Dry the blade thoroughly before reassembling it. Properly sharpened and clean blades ensure a smooth, effective trim every time.
Step 4: Reassembling to the Trimmer
Start by placing the cleaned and sharpened blades back into their original positions. Make sure to align the holes with the screws properly. Carefully hold the blades in place while you start screwing them back in. Use the screws you previously set aside. Tighten them gently at first to ensure everything lines up correctly.
Once the blades are aligned, proceed to tighten the screws securely but avoid over-tightening. Over-tightening can damage the blades or the trimmer housing. If your trimmer has any clips or additional fasteners, make sure to reattach them as per the manufacturer’s instructions. Double-check that everything is securely attached and properly aligned. This helps prevent any operational issues later on.
Here are key steps to keep in mind during reassembly:
- Proper alignment: Ensure holes line up with screws for accurate reattaching.
- Secure screws: Tighten screws without over-tightening to avoid damage.
- Double-check: Verify all components are securely in place before reusing the trimmer.
After reassembling, turn the trimmer on briefly to ensure the blades move freely. Listen for any unusual noises which could indicate misalignment. If everything sounds and looks good, you’re ready for a test trim. Testing ensures the blades are functioning correctly and the sharpening was successful.
Regular reassembly practices not only ensure safety but also enhance the lifespan of your trimmer. Proper maintenance steps, like reassembling with care, keep your equipment in top shape. Always refer to the user manual for specific reassembly instructions tailored to your trimmer model. Following these steps guarantees optimal performance and prolonged usability.
Step 5: Testing and Fine Tuning
Now that the blades are cleaned, sharpened, and reassembled, it’s time for testing. Power on the trimmer and let it run for a few seconds. Listen for any unusual sounds that might indicate misalignment. If everything sounds smooth, proceed to a test trim. This ensures that the blades are cutting efficiently.
For the test trim, use a small section of hair or a piece of fabric. This will help you observe the sharpness and precision of the cut. If the trimmer cuts smoothly without tugging or pulling, the sharpening was successful. Otherwise, repeat the sharpening process if needed.
Fine-tuning might be necessary to get optimal performance. Adjust the blade alignment carefully using the screws or adjustment knobs. Make minor adjustments and test the trimmer each time. Fine-tuning involves small tweaks to achieve the best cutting experience.
Here are key points to consider during fine-tuning:
- Regular checks: After adjustments, test the trimmer to ensure proper alignment.
- Minor tweaks: Small adjustments can make a significant difference in performance.
- Observe results: Pay attention to how well the trimmer cuts after each change.
Regular testing and fine-tuning can greatly enhance the lifespan and performance of your trimmer. Proper maintenance ensures that your trimmer delivers consistent and efficient results. Always refer to the user manual for any specific fine-tuning instructions related to your model. This step ensures your grooming tool is in peak condition.
Importance of Regular Trimmer Blade Sharpening
Regular sharpening of trimmer blades is crucial for maintaining optimal performance. Over time, blades become dull and lose their effectiveness, requiring more effort to cut. This can lead to uneven trims and potentially damage the hair or skin. Sharp blades ensure clean, precise cuts every time. They also enhance the overall grooming experience.
Consistently sharp blades reduce the risk of pulling or tugging at hair, which can be uncomfortable and painful. Dull blades tend to snag hair instead of cutting it smoothly. This not only causes discomfort but can also lead to skin irritation or injury. Keeping your blades sharp protects both your skin and your grooming tool.
Here are some additional benefits of regular blade sharpening:
- Increased efficiency: Sharp blades require less effort to use.
- Extended lifespan: Regular maintenance prolongs the life of your trimmer.
- Cost savings: Reduces the need for frequent blade replacements.
Properly maintained blades contribute to a professional appearance, whether for personal grooming or in a salon setting. Clean-cut lines and smooth operations are hallmarks of skillful grooming practices. Clients appreciate a job well done, and it reflects positively on your expertise.
Using a trimmer with well-sharpened blades also minimizes strain on the motor, enhancing its longevity. The motor doesn’t have to work as hard when the blades are efficient, resulting in less wear over time. This means fewer repairs and replacements down the road. Therefore, investing time in regular blade sharpening is truly beneficial for managing costs and ensuring top-notch results.
Choosing the Right Sharpening Tools for Trimmer Blades
Selecting the proper tools for sharpening trimmer blades is essential for achieving the best results. Different tools suit different types of blades, so knowing your trimmer’s specifications helps. One commonly used tool is the flat sharpening stone. It provides a steady surface and ensures even sharpening. Additionally, it’s easy to handle for various blade sizes.
An alternative to the sharpening stone is a honing tool, which is ideal for finer adjustments. Honing tools are particularly effective for maintaining the blade’s edge and ensuring precision. If you prefer a quicker solution, electric sharpeners can be considered. These machines are designed to sharpen blades uniformly and efficiently. However, they may be more expensive than manual tools.
Here are key tools for sharpening trimmer blades:
- Flat sharpening stone: Offers a stable surface for even sharpening.
- Honing tool: Perfect for fine-tuning the blade’s edge.
- Electric sharpener: Provides quick and consistent sharpening.
Additionally, always have a small brush and blade oil on hand for cleaning and lubricating during the sharpening process. Clean blades are easier to sharpen and maintain their edge longer. Oil reduces friction and prevents rust. Using the right maintenance tools is just as crucial as the sharpening itself.
When choosing sharpening tools, consider the frequency and ease of use. For occasional sharpening, a basic stone or honing tool may suffice. Professional barbers might benefit from higher-investment tools like electric sharpeners. Tailor your choice to your specific needs and frequency of use. This ensures your trimmer blades remain in top condition, providing optimal performance every time.
Safety Precautions during Trimmer Blade Sharpening
When sharpening trimmer blades, safety should be your top priority. First, always wear protective gloves to avoid cuts or abrasions. Blades can be extremely sharp and handling them with care is essential. Make sure you have a clean, flat surface to work on. This helps keep the blades steady while you sharpen them.
Second, unplug your trimmer before beginning any maintenance. This prevents accidental start-ups, which could lead to serious injury. Keep all electrical components away from water or any other liquids. If the blades need to be rinsed or cleaned, do so away from any power sources. Ensure the blades are completely dry before proceeding.
It is also important to maintain a firm grip on the blade and the sharpening tool. A slipping blade can cause accidents. Use tools that are in good condition and appropriate for the blade type. Damaged or inappropriate tools can also cause injuries. Therefore, regular inspection of your tools is advisable.
Here are additional safety tips:
- Work in a well-lit area: Proper lighting helps you see what you are doing clearly.
- Keep a first-aid kit handy: Quick access to medical supplies can be crucial in case of minor injuries.
- Wear eye protection: This prevents any metal particles from getting into your eyes during sharpening.
After completing the sharpening process, carefully store all tools and blades. Proper storage prevents accidental cuts or damages when not in use. Additionally, keep your workspace clean and free from clutter. A tidy environment reduces the risk of accidents. Following these safety measures ensures a secure and efficient blade sharpening experience.
How to Maintain Trimmer Blades for Optimal Performance
Routine cleaning is the foundation for maintaining trimmer blades. After each use, remove excess hair and debris using a small brush or cloth. Ensuring the blades are clean prevents residue buildup, which can dull the blades. Occasionally, deep clean the blades with soap and water if your trimmer allows. Make sure they’re thoroughly dry before reassembling.
Next, regularly oil your trimmer blades to keep them running smoothly. A few drops of blade oil are usually enough. Run the trimmer for a few seconds to evenly distribute the oil. This reduces friction and wear on the blades. Proper lubrication extends the life of the blades.
Sharpen the blades at regular intervals depending on how frequently you use the trimmer. Consistent sharpening maintains the blade’s edge and ensures clean cuts. You can either use a sharpening stone or an electric sharpener for this. Regular sharpening keeps the blades effective and reduces the risk of tugging or pulling hair.
Here are key tips for maintaining trimmer blades:
- Clean after every use: Prevents debris buildup and reduces dulling.
- Regular lubrication: Keeps blades running smoothly and prevents damage.
- Sharpen consistently: Maintains edge sharpness and ensures efficient trimming.
Store your trimmer in a dry, safe place when not in use. Moisture can cause rust, which deteriorates the blade quality. Using a protective case can help safeguard the trimmer from accidental damage. Consistent maintenance practices ensure your trimmer blades deliver optimal performance over the long term. Taking these steps helps you get the most out of your grooming tool.
Frequently Asked Questions
Sharpening trimmer blades is essential for keeping your trimming tools in top shape. Below are answers to some common questions that experts often ask about maintaining their trimmer blades.
1. How often should I sharpen my trimmer blades?
The frequency of sharpening depends on how frequently you use the trimmer. Generally, experts recommend sharpening every three to six months. Frequent users may need to sharpen more often, while occasional users can wait longer. Observing the cutting performance will indicate when sharpening is required.
Dull blades will tug and pull hair rather than cut it cleanly. This discomfort is a clear sign that it’s time to sharpen the blades. Regular maintenance ensures efficient performance and extends the life of your trimmer.
2. What tools do I need for sharpening trimmer blades?
The essential tools include a flat sharpening stone or honing tool, a small brush for cleaning, blade oil, and a screwdriver for removing the blades if necessary. These basic items are sufficient for most types of trimming equipment.
Some professionals also prefer using electric sharpeners for quicker results. However, manual sharpening gives more control over the process. Having these tools handy ensures you’re always ready for regular blade maintenance.
3. Can I use household items to clean my trimmer blades?
Yes, you can use household items like mild soap and water for initial cleaning of the blades. A soft toothbrush can help reach tighter spots and remove residue effectively.
Blade oil or light machine oil is recommended for lubrication after cleaning with soap and water. Avoid using harsh chemicals as they might damage the blade’s surface or reduce its effectiveness.
4. What are common signs that indicate my trimmer needs maintenance?
Common signs include uneven cuts, pulling or snagging hair, unusual noises during operation, and visible dullness on the blade’s edge. These symptoms suggest it’s time for some maintenance work.
If you encounter any of these issues frequently, immediate action is needed to prevent further damage to both your equipment and your client’s hair or skin. Regular checks ensure optimal performance and prolong tool life.
5. Are there any safety tips I should follow while sharpening my trimmer blades?
Always unplug your trimmer before starting any maintenance work to avoid accidental activation.
Wear protective gloves to prevent cuts while handling sharp objects
Additionally:
- Work in a well-lit area
- Avoid distractions
- A hand first-aid kit handy..just in case!
.
Following these precautions ensures a safer working environment.
Conclusion
Maintaining sharp trimmer blades is essential for delivering precise cuts and ensuring client satisfaction. Regular cleaning, timely sharpening, and the proper use of appropriate tools all contribute to the longevity and performance of your trimmer. By following these steps, you not only enhance the effectiveness of your equipment but also ensure a seamless and comfortable grooming experience for your clients.
Incorporating these practices into your routine can prevent unnecessary wear and tear on your trimmer. Routine maintenance not only saves you money in the long run but also upholds the professional standards expected in the grooming industry. Keep your tools in top shape, and they will serve you well for years to come.

I’m Patricia D. Johnson, an affiliate marketer and blogger specializing in trimmers and grooming tools. I create honest reviews, buying guides, and practical tips to help readers choose the right trimmer for their needs. With a focus on quality, performance, and value, I simplify the decision-making process so consumers can make confident purchases.