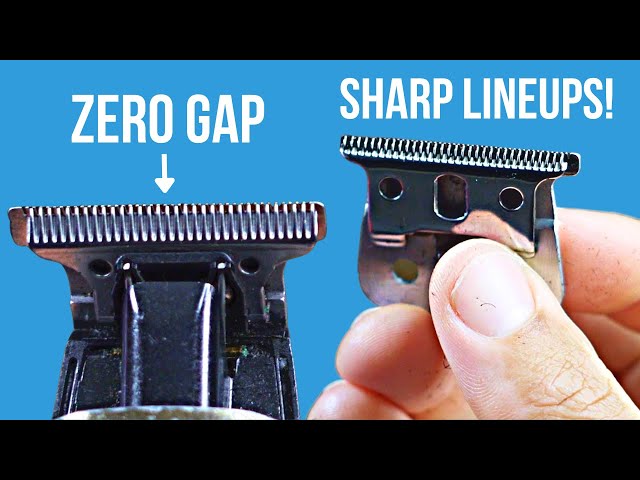
Ever wondered why a perfectly good trimmer suddenly causes skin irritation or uneven cuts? It’s often because the blades are misaligned, a surprisingly common issue even among high-end models. Fine-tuning your trimmer’s blades can significantly enhance its performance and longevity.
Adjusting trimmer blades involves both precision and a good understanding of the tool. Historically, barbers would manually realign blades with a keen eye for detail, a practice still vital today. Studies have shown that regularly adjusted blades can extend the life of a trimmer by up to 50%, making this a critical skill for any professional groomer.
- Gather necessary tools like a screwdriver and a small brush.
- Turn off and unplug the trimmer for safety.
- Remove the blade guard and clean any debris from the blades.
- Loosen the screws to adjust the blade alignment.
- Ensure the blades are parallel and not overlapping.
- Tighten the screws incrementally, checking alignment as you go.
- Test the trimmer on a small section of hair to ensure smooth cutting.

How To Adjust Trimmer Blades
First, gather all necessary tools, such as a screwdriver and a small brush for cleaning. Make sure your trimmer is unplugged or turned off for safety. To begin, remove the blade guard and clean any hair or debris off the blades. This will ensure a clean adjustment process. According to this post, having the right tools and a clean workspace is key for precision.
Next, focus on understanding the alignment of the trimmer blades. The top and bottom blades should be set parallel to each other. If they are misaligned, your trimmer may pull hair or not cut properly. To check the alignment, hold the trimmer at eye level and look closely at the blades. Adjust them until they are perfectly parallel.
Now, it’s time to adjust the blades themselves. Loosen the screws that hold the blades in place, but do not remove them completely. Gently shift the blades until they are symmetrically aligned. Then, tighten the screws to secure the blades in their new position. Ensure the blades are not too tight, which can cause friction.
Once adjusted, test the trimmer on a small section of hair. Check for any signs of pulling or uneven cutting. If necessary, fine-tune the blades by repeating the alignment process. Regular maintenance is crucial; always clean the blades after use. For more detailed instructions, here is the article on proper trimmer blade care.
Step 1: Gather Necessary Tools and Prepare Trimmer
To start, gather all the necessary tools for adjusting your trimmer blades. You’ll need a screwdriver, a small brush for cleaning, and oil for lubrication. It’s essential to have everything ready before you begin. According to this expert opinion, having the right tools on hand can make the process smoother and more efficient. A clean workspace is also key to avoiding any mishaps.
Once your tools are ready, turn off and unplug the trimmer to ensure safety. Safety should always come first. Next, remove the blade guard, if your trimmer has one. This will give you better access to the blades for cleaning and adjustment. A clean blade ensures a precise alignment later on.
Use the small brush to clean off any hair or debris from the blades. Even the tiniest particle can affect blade alignment and performance. Take your time to ensure the blades are spotless. This step might seem minor, but it’s crucial for a smooth adjustment process. Remember, clean blades work better and last longer.
Finally, lay out all your tools in an organized manner. Having everything in its place helps you focus on the task without constantly searching for tools. This simple step can save you time and frustration. Follow these preparatory steps, and you’re well on your way to perfectly aligned trimmer blades. Proper preparation is half the job done.
Step 2: Understanding Trimmer Blade Alignment
Proper blade alignment is crucial for your trimmer’s performance. Misaligned blades can cause pulling, uneven cuts, and skin irritation. To check the alignment, hold the trimmer at eye level. Look closely to see if the top and bottom blades are parallel. If not, you will need to adjust them.
When examining the blades, ensure they are not overlapping each other. Overlapping blades can damage hair and even the trimmer itself. Make sure the cutting edge of the top blade is slightly above the bottom blade. This setup ensures a smooth trim. Use a small ruler for precision if needed.
A quick test will help confirm proper alignment. Turn on the trimmer and gently touch it against a piece of paper. The paper should cut smoothly without tearing. If it does, your blades are aligned correctly. If not, more adjustment is needed.
Refer to the user manual for specific instructions on your trimmer model. Different brands may have varied methods for alignment. Check out resources or forums if you’re having trouble. Proper blade alignment ensures your trimmer works efficiently and lasts longer.
Step 3: Executing Blade Adjustment
To begin adjusting the blades, start by loosening the screws that secure them in place. Use a small screwdriver suitable for the screws on your trimmer. It’s crucial not to remove the screws completely. Simply loosen them enough to allow slight movement of the blades. This approach ensures you maintain control over the alignment.
Now, adjust the top blade to align perfectly with the bottom blade. The blades should be parallel and not overlapping each other. Move the top blade gently until it is positioned correctly. Tighten the screws incrementally while keeping the blades aligned. Go slow to ensure accuracy.
After the initial adjustment, turn on the trimmer to test its functionality. Listen for any unusual sounds, like grinding, which indicates misalignment. If everything sounds normal, test the trimmer on a small section of hair. This real-world test helps confirm the effectiveness of your adjustments. Be ready to make minor tweaks if needed.
If you encounter issues during testing, slightly loosen the screws again. Make very small adjustments to the blade alignment. Re-tighten the screws and test the trimmer once more. Repeat this process until the trimmer cuts smoothly and evenly. Fine-tuning is often necessary for perfect results.
Regular maintenance is essential after adjusting the blades. Clean, oil, and recheck the alignment periodically. This practice ensures long-lasting performance. Proper care minimizes the need for frequent adjustments, saving you time and effort in the long run.
Step 4: Testing and Fine Tuning
Once you’ve adjusted the blades, the next step is to test the trimmer. Turn it on and listen for any unusual noises. A well-aligned blade should run smoothly and quietly. If you hear grinding or rattling, stop immediately. This is a sign that further adjustment is needed.
Use the trimmer on a small section of hair to see how well it cuts. The cut should be clean and even without pulling or snagging. If the trimmer is pulling hair, the blades might still be misaligned. Adjust the blades slightly and test again. Repeat this process until the cut is satisfactory.
Fine-tuning the blades can significantly improve performance. Make minor adjustments to the blade screws if necessary. This might involve loosening them just a bit more or tightening them slightly. Always test after each adjustment to ensure you are moving in the right direction. Small changes can make a big difference.
Once the trimmer is performing well, secure the screws tightly. Make sure nothing shifts during use. At this point, you can feel confident in the alignment. Regularly check the blades during use to maintain their optimal condition. Proper fine-tuning ensures a smooth and efficient trimming experience.
Regular testing and fine-tuning are part of good trimmer maintenance. Keep your tools clean and well-adjusted for the best results. Consistent care helps extend the life of your trimmer. With these steps, you’ll enjoy a device that performs like new for years. Don’t skip this critical step if you want optimal performance.
Step 5: Regular Maintenance and Precautions for Trimmer Blades
Regular maintenance is essential for keeping your trimmer blades in top condition. Clean the blades after each use to remove hair and debris. Use a small brush and some blade oil to keep them lubricated. This prevents rust and ensures smooth operation. Regular cleaning also extends the life of your trimmer.
Make sure to check the blade alignment periodically. Even minor bumps can misalign the blades. A quick check before each use can save you from potential issues. Adjust the blades if you notice anything off. This simple precaution can make a big difference in performance.
Store your trimmer properly to avoid damage. Keep it in a protective case or a safe place. Avoid leaving it in humid environments, as moisture can cause rust. Proper storage ensures your trimmer stays in good working order. Taking these steps can significantly prolong the life of your trimmer.
Keep an eye out for signs that your blades need replacing. Dull blades can pull hair and cause discomfort. If cleaning and aligning no longer improve performance, it might be time for new blades. Regularly replacing the blades ensures the best cutting experience. Don’t hesitate to invest in replacements when necessary.
Precautions are also important to remember. Always unplug or turn off the trimmer before making any adjustments. This prevents accidental cuts and electric shocks. Use the right tools for adjustments to avoid damaging the trimmer. Following these precautions keeps both you and your trimmer safe.
Alias of Trimmer Blade Adjustment
The term “trimmer blade adjustment” can have various aliases, depending on the industry or tool manufacturer. Some people might refer to it simply as “blade tuning.” Mechanics and tool enthusiasts often use this term. It emphasizes making small changes for optimal performance. This is essentially what you’re doing when adjusting trimmer blades.
Another common alias is “blade alignment.” Barbers often use this term because it highlights keeping the blades straight and parallel. Proper alignment ensures a smooth cut without pulling hair. This term is technically accurate and easily understood. It focuses on the exact placement of the blades in relation to each other.
“Blade calibration” is another way to refer to this process, especially in technical manuals. Calibration involves setting tools to their most efficient state. In trimmers, it means fine-tuning the blades for precise cutting action. The goal is a device that cuts cleanly and efficiently every time.
In some professional grooming settings, you may hear the term “blade leveling.” Leveling typically refers to making both blades even with each other. This ensures an even cut across all areas being trimmed. Whether called aligning or leveling, the objective remains consistent: achieving peak performance.
Benefits of Properly Adjusted Trimmer Blades
Properly adjusted trimmer blades make a significant difference in grooming quality. They ensure a smooth, even cut, preventing any tugging or pulling of hair. This enhances comfort during the trimming process. Smooth cuts also reduce the risk of skin irritation and cuts. Overall, a well-adjusted trimmer provides a better grooming experience.
Another major benefit is the extended life of the trimmer itself. Misaligned blades can cause additional wear and tear on the motor and other components. When the blades are properly aligned, the trimmer performs more efficiently. This reduces strain on internal parts, making the device last longer. Regular adjustments can be seen as an investment in your trimmer’s longevity.
Consistent performance is also a key benefit. Properly aligned blades deliver the same high-quality results every time. This reliability is crucial, especially for professional barbers and groomers. Clients will appreciate consistent, excellent results. High-performing trimmers also speed up the grooming process, saving time.
Beyond performance, aligned blades contribute to energy efficiency. When the blades work efficiently, the trimmer consumes less power. This can be particularly beneficial for battery-operated trimmers. Using less energy translates to longer battery life and fewer charges. It’s a win-win for both the user and the environment.
Lastly, keeping the blades adjusted can save you money in the long run. Poor performance and frequent replacements can get expensive. Regular maintenance and proper alignment prevent these issues. You’ll get more value out of your trimmer, lowering your overall grooming costs.
Common Issues encountered during Trimmer Blade Adjustment
One common issue is difficulty in loosening the screws. Over time, screws may become tight or rusted, making them hard to turn. Using the wrong size screwdriver can also strip the screws. Always have the correct tools and consider using a lubricant to loosen them. This can make the process much smoother.
Another problem is misalignment even after adjustments. This happens when the blades continue to shift back to their original position. Double-checking the tightness of the screws can often solve this issue. Ensure the screws are not overly loose or too tight. Finding the right balance is key to maintaining alignment.
Blades that are too tight can lead to friction, causing overheating. Overheating can damage both the blades and the trimmer motor. If you notice the trimmer heating up quickly, stop and recheck the blade tension. Proper lubrication is also essential to reduce friction. Adjust the tightness gradually to find the optimal setting.
Uneven cutting is another challenge many face during blade adjustment. This can result from blades being misaligned vertically or horizontally. Use a small ruler or measuring tool to verify even spacing. Inconsistent cuts can be frustrating and time-consuming. Regular adjustments can help maintain even cutting performance.
Lastly, improper cleaning can cause debris to get stuck between the blades. Debris affects blade movement and overall performance. Always clean the blades thoroughly before making any adjustments. Taking these preemptive measures will help prevent most common issues. Proper care and attention to detail are essential for effective blade adjustment.
Professional Tips for Trimmer Blade Adjustment
Professional barbers emphasize the importance of maintaining a clean trimmer. Clean the blades before and after each adjustment. Use a small brush and rubbing alcohol to remove any hair or debris. This ensures a smooth adjustment process and enhances trimmer performance. Clean blades also reduce the risk of pulling hair.
Use high-quality blade oil to lubricate the trimmer blades. Proper lubrication reduces friction and prevents overheating. Apply a few drops of oil to the blades and run the trimmer for a few seconds. This helps distribute the oil evenly across the blades. Well-lubricated blades work more efficiently and last longer.
Check blade alignment frequently, especially if the trimmer is used daily. Misalignment can occur even with regular use. A quick visual inspection can save time and prevent issues. Adjust the blades slightly if needed. Consistent checks ensure optimal performance and durability of the trimmer.
Make small, incremental adjustments when aligning the blades. Large movements can cause misalignment and damage the trimmer. Loosen the screws just enough to allow slight movement. Tighten the screws incrementally while checking alignment. This method provides better control and precision.
Invest in quality tools for blade adjustment. Using the right screwdriver and brush can make a significant difference. High-quality tools provide better grip and precision. They also last longer, making them a worthwhile investment. Professional barbers often recommend investing in good tools for the best results.
Consider taking a trimmer maintenance course if you’re serious about grooming. Many professional grooming schools offer short courses. These courses cover various techniques and tips for maintaining trimmers. Learning from experts can provide valuable insights. It’s a great way to enhance your grooming skills and extend the life of your tools.
Frequently Asked Questions
If you’re looking to keep your trimmer in top shape, understanding the basics of blade adjustment and maintenance is crucial. Below are some common questions and answers that will guide you through the essentials.
1. What tools do I need to adjust trimmer blades?
You will need a screwdriver, a small brush, and blade oil for this task. The screwdriver is for loosening and tightening screws, while the brush helps to clean debris from the blades.
Blade oil ensures the blades remain well-lubricated during operation. Having these tools ready will make the process smoother and more efficient.
2. How often should I check my trimmer blade alignment?
It’s advisable to check blade alignment before each use if you’re a professional barber. Regular users should inspect alignment at least once a month.
The frequency helps in ensuring high-quality cuts every time, minimizing issues like hair pulling or uneven performance.
3. Why are my trimmer blades overheating?
Overheating typically occurs due to friction between misaligned or unlubricated blades. Proper lubrication reduces friction and extends blade life.
If overheating continues despite proper lubrication, it might indicate another issue like motor strain, requiring professional maintenance.
4. Can poorly adjusted trimmer blades cause skin irritation?
Yes, poorly adjusted blades can cause skin irritation by pulling rather than cutting hair smoothly. Misalignment leads to an uneven trim causing discomfort or even nicks.
This makes regular checks and adjustments essential to ensure user comfort and effective trimming results.
5. How can I extend the life of my trimmer blades?
Regular cleaning, proper blade alignment, and consistent lubrication are key practices for extending blade life. Avoid exposing your trimmer to moisture and store it in a dry place when not in use.
Avoid using your trimmer on surfaces other than hair, as this can dull the blades quickly. Following these steps helps maintain optimal performance over time.
Conclusion
Properly adjusting trimmer blades is essential for both performance and longevity. With the right tools and techniques, you can ensure your trimmer delivers a smooth, comfortable cut every time. Regular maintenance and checks will keep your trimmer in top condition, reducing the risk of issues.
Understanding and addressing common problems can save you time and money. Following these professional tips will enhance your grooming experience, whether you’re a novice or expert. Keep your trimmer well-maintained and it will serve you well for years to come.

I’m Patricia D. Johnson, an affiliate marketer and blogger specializing in trimmers and grooming tools. I create honest reviews, buying guides, and practical tips to help readers choose the right trimmer for their needs. With a focus on quality, performance, and value, I simplify the decision-making process so consumers can make confident purchases.