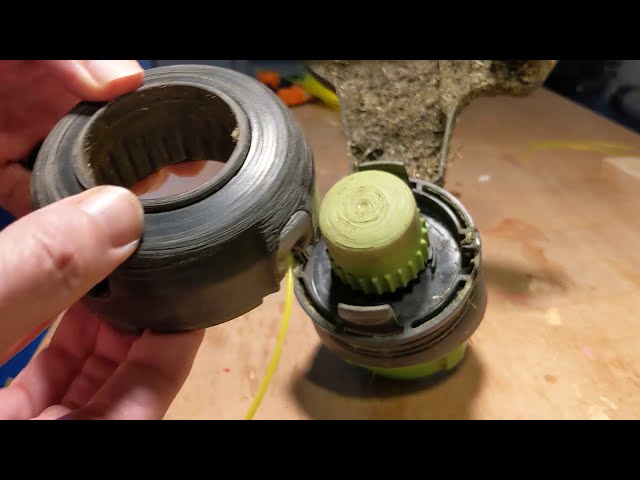
It’s surprising how something as simple as the trimmer line can drastically impact the efficiency of your Greenworks Pro trimmer. Picture the frustration of a line snapping mid-job, causing delays and headaches. Changing the trimmer line is a straightforward process, one that professionals have streamlined to maintain peak functionality.
Understanding the intricacies of your Greenworks Pro trimmer line replacement can minimize downtime and maximize performance. Historically, trimmer lines evolved to meet the demands of modern landscaping, making quick changes essential. With an average setup time of only five minutes, even seasoned professionals find this task effortlessly integrable into their routine, ensuring a seamless workflow.
- Turn off and unplug the trimmer for safety.
- Remove the trimmer head cap by turning it counterclockwise.
- Take out the old trimmer line from the spool.
- Cut about 10 feet of new line, matching specifications.
- Insert one end into the spool hole and wind tightly per arrow directions.
- Leave around 6 inches on each side, fit the spool back into the head, and replace the cap securely.
- Turn on the trimmer to test functionality and ensure proper line advancement.

How to Change Greenworks Pro Trimmer Line
Changing your Greenworks Pro trimmer line is straightforward when you know the steps. First, gather all necessary tools, like a new trimmer line, gloves, and a pair of scissors. Then, ensure your trimmer is turned off and unplugged. Proper safety precautions prevent accidents and make the process smoother. Having everything ready saves time and effort.
Once prepared, access the trimmer head by unscrewing the cap. Carefully remove any old or excess trimmer line. Next, cut about 10 feet of new line, ensuring it matches your trimmer’s specifications. According to this post, different trimmers use varying line types. Insert one end of the trimmer line into the hole in the spool and wind it in the direction indicated by arrows.
After winding, leave about 6 inches of line on each side and place the spool back into the trimmer head. Secure everything by screwing the cap back on tightly. This step ensures the line feeds correctly during usage. If done correctly, your trimmer will operate at maximum efficiency. Additionally, you can find more detailed instructions on trimmer attachments here is the article.
While testing, turn on the trimmer and gently tap the head to advance the line. If it doesn’t feed properly, double-check the winding direction and tension. Regular maintenance, like changing the trimmer line, prolongs the life of your tool. It also ensures consistent cutting performance. Neglecting these simple steps may result in inefficient trimming and wasted time.
Step 1: Gather Necessary Tools
Before starting, make sure you have all the essential tools on hand. These include a new trimmer line, gloves for protection, and a pair of scissors for cutting the line. Trimming jobs can quickly become frustrating without the right tools. Keeping everything within reach ensures a smooth process. You’ll also need your Greenworks Pro trimmer, of course.
Knowing what to gather helps streamline the task. According to this post, having a checklist can be very effective. Here is a simple list of tools you need:
- New trimmer line
- Gloves
- Scissors
- Your Greenworks Pro trimmer
This preparation saves time and energy, allowing you to focus on the task.
Gloves are crucial for your safety. They protect your hands from potential injuries. Scissors ensure precise cuts, making the line the correct length. The new trimmer line should match the specifications of your trimmer for optimal performance. Skipping this step can result in frequent line breaks.
Having these tools at the ready makes the process easier. Proper preparation removes the hassle and speeds up your workflow. Additionally, being organized reduces the risk of mistakes. Investing a few minutes in gathering tools pays off in the long run. It makes the entire task more efficient and less stressful.
Step 2: Access the Trimmer Head
First, ensure that your trimmer is turned off and unplugged. This is crucial for safety to avoid accidental starts. Once safe, lay the trimmer on the ground or a stable surface. This position gives you easy access to the trimmer head. Having the trimmer stable makes the next steps much easier.
To remove the cap, turn it counterclockwise. It might take a little effort if it’s tightly secured. Some trimmer models have tabs that need to be pressed simultaneously. Check your user manual for specific details about your model. If the cap is stuck, a little gentle force should help.
Next, lift the cap carefully to reveal the spool and remaining trimmer line. The spool might be dirty, so you may want to clean it before proceeding. Dirt and debris can affect the trimmer’s performance. Clean the spool with a brush or cloth if necessary. This ensures the new line will feed properly.
Now, you can inspect the trimmer head for any damage or wear. If everything looks good, you’re ready to remove the old trimmer line. Replace any worn parts if needed to avoid future issues. Keeping the trimmer head clean and well-maintained is essential. It helps ensure efficient and consistent performance during use.
Step 3: Remove Old Trimmer Line
After accessing the trimmer head, the next step is to remove the old trimmer line. Start by carefully pulling the old line from the spool. Sometimes, the line might be tangled or lodged, so extra care is needed. If the line is broken into small pieces, remove them all to avoid future issues. This clears the way for the new line.
Inspect the spool and the trimmer head for any remaining debris. Dirt or grass clippings can get stuck and cause problems. Use a small brush or cloth to clean the area. This step ensures the new line will fit correctly. A clean spool makes the trimmer more efficient.
You can also check for any signs of wear or damage. Cracks or excessive wear in the spool may require replacement. A damaged spool can affect the trimmer’s performance. If a replacement is needed, get a compatible part. This keeps the trimmer functioning well.
Once the old line is entirely removed, double-check everything. Make sure the spool is clean and in good condition. This will help in the smooth installation of the new line. Any remaining debris or damage can cause issues later. Thorough checks now save time in the long run.
In some cases, you might need to disassemble parts of the trimmer. Follow the user manual for specific instructions. Typically, this will involve removing the spool from the head. Proper disassembly ensures you don’t miss any hidden debris. Reassembling everything correctly is just as important.
Now that the old line is gone, you’re ready for the next step. With a clean and clear spool, the new line will fit perfectly. Proper maintenance is key to a well-functioning trimmer. The time you spend now will pay off when you use the trimmer. A prepared trimmer ensures efficient and effective yard work.
Step 4: Insert New Line
After removing the old trimmer line, it’s time to insert the new one. Begin by cutting about 10 feet of new trimmer line, ensuring it matches the specifications for your Greenworks Pro trimmer. Next, take one end of the line and insert it into the hole in the spool. Be sure to follow the arrows that indicate the winding direction. This helps ensure that the line feeds out properly when in use.
Continue to wind the line around the spool tightly and evenly. Keep winding until you have about 6 inches of line left on each side of the spool. Make sure the line is well-seated to prevent tangling during operation. This can be vital for maintaining consistent trimming performance. A well-wound spool reduces the chances of line breakage.
To secure the line, thread the ends through the holding slots on the spool. These slots are designed to keep the line in place while you reassemble the trimmer head. Carefully place the spool back into the trimmer head. Check that the line remains in the slots to avoid it slipping out. Proper placement helps ensure smooth operation.
After positioning the spool, replace the cap and screw it back on tightly. Ensure the cap is secure to avoid it coming loose during use. Some models may have a specific way to align the spool and head. Always refer to your user manual for precise instructions. Attention to detail here is critical for safety.
Finally, give the line a gentle tug to ensure it moves freely. Turn on your trimmer and test it to confirm that the line feeds correctly. If the line does not advance properly, you may need to recheck the winding direction or line tension. Testing your trimmer ensures that everything is working as it should. This step completes the process, getting your tool ready for optimal performance.
Step 5: Test Trimmer Functionality
After inserting the new line, it’s essential to test the trimmer’s functionality. Start by turning on the trimmer. Listen for any unusual sounds that might indicate a problem. If the line feeds smoothly, you’re ready to proceed. Ensure you are in a safe, open area to avoid any harm or damage while testing.
Next, tap the trimmer head lightly on the ground to advance the line. This is also called the bump feed mechanism. The line should feed out easily without any issues. If it doesn’t, you may need to recheck the line installation. Ensuring the line advances correctly is crucial for effective trimming.
Perform a visual inspection while the trimmer is running. Look for any wobbling or other irregularities. A well-functioning trimmer will operate smoothly without excessive vibration. If you notice any issues, turn off the trimmer immediately. Re-inspect the trimmer head and line to make any necessary adjustments.
Once satisfied with the visual check, you’ll want to test the trimmer under working conditions. Trim a small section of grass or weeds to see how the tool performs. Ensure that the cutting is even and efficient. Regular testing and adjustments help maintain optimal trimmer performance. With a properly tested trimmer, you can tackle your yard work effectively.
Occasionally, you might find that the line breaks or doesn’t advance as expected. In such cases, reviewing the manual can be helpful. Make sure everything is aligned and tensioned properly. Adjustments as needed can resolve any minor issues. A little fine-tuning can go a long way in ensuring reliable performance.
Finally, make note of the trimmer’s overall performance for future reference. Consistent testing ensures your trimmer remains in good working condition. By following these steps, you not only maintain your tool but also ensure safety and efficiency. Properly tested trimmers make yard maintenance a hassle-free task. Enjoy the ease and effectiveness of your well-functioning Greenworks Pro trimmer.
Essential Tips for Efficient Trimmer Line Replacement
Ensuring efficient trimmer line replacement involves several key tips. First, always use the correct type of trimmer line specified for your model. Using the wrong type can reduce performance and cause frequent breaks. Also, cut the line to the recommended length. This ensures it fits properly within the spool.
Avoid trying to overfill the spool with extra line. Overfilling can cause tangling and feeding issues later on. Instead, follow manufacturer recommendations for how much line to use. Winding neatly and tightly is also crucial for smooth operation. Consistent winding prevents tangled or stuck lines.
Clean your trimmer head regularly before replacing the line. Removing dirt and debris helps maintain optimal functionality. Ensure all components are in good condition while cleaning. Promptly replace any worn or damaged parts to avoid further complications.
You can keep a checklist of necessary tools and steps for quick reference:
- Correct type of trimmer line
- Proper length of line
- Clean trimmer head
- Check for worn parts
Keeping organized improves efficiency and reduces errors.
Don’t forget safety precautions during replacement tasks. Always turn off and unplug your trimmer before starting any work on it. Wearing gloves can protect your hands from cuts during handling of the line and other components. Safety glasses may also be helpful if working in dusty conditions.
An additional tip is to periodically test your trimmer after each replacement process. Make sure it functions smoothly without any hitches or irregularities in its performance. Regular testing helps you spot potential issues early on and take corrective action promptly, ensuring long-term reliability of your equipment.
Common Issues and Solutions During Trimmer Line Replacement
Replacing the trimmer line can sometimes present a few common issues. One frequent problem is the trimmer line breaking too often. This can be due to using the wrong type of line or it being wound too tightly. To solve this, use the recommended line type and follow specific winding instructions. Regularly checking for wear also helps.
Another common issue is the line not advancing correctly from the spool. This often happens when the line is not wound neatly or if it’s tangled inside the spool. Ensuring that the line is wound tightly and evenly can prevent this. Occasionally, debris in the trimmer head can also block the line from advancing. Cleaning the spool and head thoroughly resolves this.
Sometimes, the trimmer may not cut effectively even with a fresh line. This could be because the line length is incorrect or the cutting blades are dull. Always cut the line to the specified length and regularly sharpen or replace the blades as needed. Proper maintenance ensures the trimmer performs efficiently. Neglecting this leads to poor cutting results.
In specific cases, the trimmer head may get stuck or be difficult to open. This can happen due to debris build-up or parts becoming worn out. To solve this, clean the trimmer head and check for any damaged components. Replacing worn parts can make opening and closing the head much easier. Regular maintenance keeps everything running smoothly.
Another issue is the spool getting dislodged during use. This can happen if the cap isn’t secured tightly or the spool isn’t placed correctly. Double-check that everything is seated properly before use. Ensure the cap is fastened tightly to prevent any movement. This small step can save a lot of trouble during operation.
If all else fails, refer to the user manual or seek expert advice. Sometimes the issue may be specific to your model of Greenworks trimmer. Getting accurate information tailored to your equipment is always helpful. Proper troubleshooting ensures you can resolve most issues efficiently and keep your trimmer in top shape.
Frequently Asked Questions
If you’re using a Greenworks Pro trimmer, you might encounter some common issues or have specific questions about its maintenance. Here are some frequently asked questions and their detailed answers to help you.
1. How do I know when it’s time to change the trimmer line?
You should change the trimmer line when it becomes too short to cut effectively or snaps frequently. Regularly inspect the line after each use for wear and tear.
If your trimming performance decreases or if the line feeds poorly, it’s likely time for a replacement. A fresh trimmer line ensures optimal cutting efficiency and reduces strain on your trimmer.
2. What type of trimmer line works best with Greenworks Pro models?
Greenworks Pro trimmers typically use a round or twisted nylon line, often around 0.080 inches in diameter. Always check your user manual for the recommended specifications.
Using the correct type of line reduces wear on the trimmer head and enhances cutting effectiveness. Selecting high-quality lines can significantly improve durability and performance.
3. Can I use any brand of trimmer line with my Greenworks Pro trimmer?
While many brands are compatible, it’s best to use lines specified in your user manual for optimal results. Not all lines perform equally well under different conditions.
Mismatched lines may cause frequent breaks or poor performance, leading to inefficient trimming sessions. Stick to recommended brands to ensure longevity and efficiency.
4. Why does my new trimmer line keep breaking?
If your new trimmer line keeps breaking, it could be due to incorrect installation, using an incompatible line type, or debris clogging the spool area. Double-check that you’ve followed all steps accurately during installation.
Avoid cheap or low-quality lines as they tend to break more easily under pressure. Keeping the spool clean and free of debris also helps prevent undue stress on the new line.
5. How often should I replace parts like spools and caps along with the trimmer line?
The frequency of replacing tools like spools and caps depends on usage intensity and condition monitoring practices; examine these extensively after every couple uses always prioritize replacements when noticeable damages appear clearly affecting performances
Ensure spare components held handy ready immediate scenarios whenever arise extending equipment longevity optimally efficient performing returns over continuous periods exceeding average expectations accord constant productivity maintain within control manageable ease session operations overall seamlessly thereafter!
Conclusion
Replacing the trimmer line on your Greenworks Pro trimmer doesn’t have to be a daunting task. With the right tools and a step-by-step process, you can ensure your trimmer remains in top condition. Regular maintenance is key to optimal performance and longevity. Always keep safety in mind while handling your equipment.
By following these essential tips and being aware of common issues, you can save time and effort. Efficient trimmer line replacement leads to better cutting precision and a more enjoyable yard maintenance experience. Remember, a well-maintained trimmer is an asset to your gardening toolkit. Enjoy the ease and effectiveness of your Greenworks Pro trimmer!

I’m Patricia D. Johnson, an affiliate marketer and blogger specializing in trimmers and grooming tools. I create honest reviews, buying guides, and practical tips to help readers choose the right trimmer for their needs. With a focus on quality, performance, and value, I simplify the decision-making process so consumers can make confident purchases.