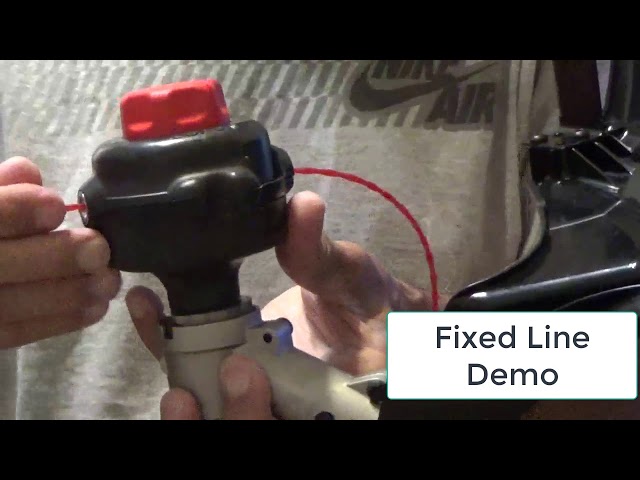
It’s surprising how regular maintenance of a Craftsman trimmer can extend its longevity and efficiency. Consider this – replacing the line instead of the entire head can save both time and money. This minor, yet essential upkeep keeps your lawn looking pristine and your tool functioning optimally.
The Craftsman brand has long been a staple in American households since the 1920s, known for its durability and reliability. To replace the trimmer line, begin by disconnecting the power source to ensure safety. Next, remove the cap to expose the spool, then meticulously wrap the new line following the directional arrows imprinted on the spool.
- Disconnect the power source to ensure safety.
- Remove the trimmer head cap to expose the spool.
- Pull out any remaining old trimmer line from the spool.
- Insert new trimmer line following directional arrows on the spool.
- Reattach the cap and test the trimmer for proper functionality.

How to Replace Craftsman Trimmer Line
Replacing the trimmer line on a Craftsman trimmer is essential for keeping your yard looking neat. Firstly, gather the necessary tools including the new trimmer line, gloves, and safety goggles. When you’re ready, disconnect the power to avoid any accidents. According to this post, understanding the parts of your trimmer helps in its maintenance. Lay everything out for easy access before beginning the process.
Next, remove the trimmer head cap to expose the old line spool. Gently pull out any remaining pieces of the old line; this might require a bit of wiggling. Once removed, check for any debris that needs cleaning. Ensuring a clean spool will make the new line installation smooth. According to the article on this site, keeping your trimmer clean can extend its lifespan.
Now, take your new line and cut it to the length specified by your trimmer’s manual. Insert one end into the hole on the spool, keeping the direction in mind. Wind the line evenly and tightly around the spool, ensuring there are no overlaps. Secure the end of the line in the notch provided and leave a few inches hanging out.
Finally, reattach the cap and make sure it snaps into place securely. Reconnect the power and give the trimmer a quick test to ensure everything functions correctly. If the line feeds out and cuts properly, you’ve done it right. Regularly checking and replacing your trimmer line will help maintain its efficiency and your lawn’s appearance.
Step 1: Gather Necessary Tools and Materials
To replace the Craftsman trimmer line, the first step is to gather all the necessary tools and materials. You’ll need a new trimmer line, safety goggles, and gloves. These items ensure both safety and efficiency while working. It’s also a good idea to have the trimmer’s manual on hand for reference. According to this post, having all tools ready beforehand can save you a lot of time.
When choosing the new trimmer line, make sure it matches the specifications mentioned in your manual. Using the wrong type or size can cause performance issues or even damage the trimmer. Check the packaging to confirm it’s compatible with your Craftsman model. Additionally, make sure it is of good quality for longer durability. This ensures smooth operation during trimming tasks.
Safety goggles and gloves are essential for protecting yourself during the replacement process. Goggles shield your eyes from flying debris. Gloves offer protection from cuts or scrapes. Always prioritize your safety when handling gardening tools. Keep these protective items within reach throughout the task.
Having a clean workspace is also important. Ensure you have a flat surface where you can lay out your tools and parts. This helps keep small items organized and prevents them from getting lost. A clutter-free area minimizes distractions and allows you to focus. A well-prepared workspace leads to a smoother replacement process.
Step 2: Prepare Your Craftsman Trimmer
Before you begin replacing the trimmer line, ensure your Craftsman trimmer is fully prepared. First, disconnect the power source to prevent any accidents. Whether your trimmer is electric or gas-powered, this is a crucial step. Next, lay the trimmer on a flat surface for stability. This setup will make accessing critical parts easier.
Take a moment to inspect the trimmer head where the line is housed. Look for any obstructions or wear and tear that might affect the replacement process. Clean any debris or dirt that has accumulated around the head. This will make the line replacement smoother and more effective. A clean trimmer head ensures better performance.
If you’ve been using your trimmer for a while, it’s a good idea to check for any loose parts or screws. Tighten them as needed to ensure safe operation. A stable trimmer head will make the new line fit properly. This ensures you get an even trim every time. Regularly checking these components can also extend the lifespan of your trimmer.
Finally, gather your tools and materials within easy reach. Having everything close by will save time and make the process more efficient. Lay out the new trimmer line, gloves, and safety goggles. Organizing your workspace can lead to a smoother replacement process. Proper preparation keeps you focused and on track.
Step 3: Remove the Old Trimmer Line
Before you remove the old trimmer line, make sure the trimmer is securely placed on a flat surface. This positioning ensures you can work without any disruptions. Begin by locating the release mechanism on the trimmer head. Depending on your model, you may need to depress tabs or unscrew a cap. Follow the guidelines in your trimmer’s manual for accuracy.
Once the cap is removed, you’ll see the spool containing the old line. Carefully pull out any remaining line from the spool. Be cautious of any tangled or knotted areas, which can be a bit tricky to remove. Sometimes, the old line may be brittle and break into pieces. Taking your time minimizes frustration and potential damage to the spool.
With the old line removed, inspect the spool for any signs of wear or leftover debris. Clean the spool and surrounding area using a soft brush or cloth. If you notice any cracks or damages on the spool, it may be wise to replace it. A clean, intact spool ensures that the new trimmer line will work efficiently. This small step can save you hassle later on.
Next, examine the interior of the trimmer head to ensure there are no obstructions. Dirt and grass can accumulate and affect the spool’s placement. Cleaning out these areas can improve the new line’s functionality. A well-maintained trimmer head helps achieve an even cut. Always check these areas during maintenance.
Once you’ve cleaned and inspected everything, set the parts aside in an organized manner. Having a clutter-free workspace makes the process smoother. This organization also prevents any small parts from getting lost. Ensure all components are in good condition before proceeding to the next step. Proper preparation lays the groundwork for a successful replacement.
Step 4: Insert the New Trimmer Line
After removing the old trimmer line, it’s time to insert the new line. Start by cutting a length of trimmer line according to your trimmer’s manual. Generally, around 15-20 feet should be enough. Check the spool for directional arrows that indicate how to wind the new line. Following these arrows prevents tangling and ensures smooth operation.
Insert one end of the new line into the hole in the trimmer spool. Make sure to push it through a few inches to hold it securely. Begin winding the line tightly and evenly around the spool. As you wind, maintain even tension to avoid overlapping. When you reach the end, secure the line in the designated notch.
Next, guide the ends of the line through the eyelets on the trimmer head. These eyelets direct the line outward from the spool. Make sure the line is evenly balanced to avoid vibrations. Then, carefully place the spool back into the trimmer head. You’ll hear a click or feel it settle into place when secured properly.
Reattach the trimmer head cap, ensuring it snaps or screws back into place securely. Give the line a gentle tug to make sure it’s locked in position. Check that the lines are of equal length. This step ensures an even cut and balanced operation. If everything looks correct, your new trimmer line is ready for use.
Finally, reconnect the power source and turn on the trimmer to test the new line. Make sure the line feeds out and cuts evenly. Adjust if necessary. Regularly replacing the trimmer line guarantees optimal performance. By following these steps, you keep your Craftsman trimmer running efficiently.
Step 5: Test the Trimmer for Functionality
After inserting the new trimmer line, it’s crucial to test the trimmer for functionality. First, reconnect the power source or refuel if you’re using a gas-powered trimmer. Turn on the trimmer and listen for any unusual noises. If the trimmer sounds smooth, proceed to the next step. This preliminary check helps identify any immediate issues.
Next, observe the movement of the new trimmer line. It should rotate smoothly and without any wobbling. Hold the trimmer slightly above the ground and gradually lower it to the grass. Begin trimming to see if the line cuts efficiently. If you notice uneven cutting, it might be due to improper installation of the line.
Adjust the line length if necessary. Make sure both ends are of equal length. An unbalanced line can cause vibrations and affect trimming performance. If the line feeds out too quickly or too slowly, revisit the spool to ensure it’s wound correctly. Proper adjustment ensures optimal performance during use.
If everything seems to be working well, try trimming a patch of your lawn. Observe how the trimmer handles different types of grass and small plants. The new line should cut cleanly without snagging. Consistent performance across various conditions indicates a successful replacement. This thorough test ensures your trimmer is ready for regular use.
Finally, turn off the trimmer and inspect the line for any signs of wear. Make sure it’s still firmly in place and hasn’t moved. Regularly checking the line during use can prevent any issues. Testing the trimmer after every maintenance ensures it’s always in top condition. Your Craftsman trimmer is now ready for effective yard work.
Maintaining Your Craftsman Trimmer for Optimal Performance
Regular maintenance of your Craftsman trimmer ensures it runs smoothly all season long. One crucial task is to clean the trimmer after each use. Wipe down the exterior to remove any dirt and grass clippings. Make sure to also clear out any debris from the head and around the spool area. This simple step prevents build-up that can hinder performance.
Another essential maintenance task is checking the air filter if you have a gas-powered trimmer. A clean air filter allows proper airflow, ensuring efficient engine performance. Replace or clean the filter as specified in your manual. Regular inspection avoids clogging issues. It keeps your trimmer running at its best.
It’s also important to regularly inspect and tighten screws, nuts, and bolts on the trimmer. Vibrations from regular use can sometimes loosen these parts. Tightening them ensures stability and safety during operation. This practice helps avoid unexpected breakdowns while using the tool.
The cutting blade or string line requires attention as well. For blade-equipped models, sharpen the blade periodically to maintain its efficiency. If you’re using a string trimmer, replace worn lines as needed. Always have extra spools or lines on hand for quick replacements. Ensuring sharp blades or new lines leads to cleaner cuts.
Your Craftsman trimmer’s engine oil should also be checked frequently for gas-powered models. Fresh oil lubricates moving parts and reduces wear and tear. Follow your manual’s guidelines on when to change or refill it. Keeping up with oil changes extends your trimmer’s lifespan considerably.
Finally, store your trimmer properly during off-seasons or long periods of inactivity. Drain fuel from gas models to prevent stale gasoline issues, and keep electric models in a dry location away from moisture exposure. Proper storage can significantly enhance durability and readiness for the next use.
Troubleshooting Common Craftsman Trimmer Problems
Even well-maintained Craftsman trimmers can encounter issues. One common problem is the trimmer line not feeding properly. This can be due to tangled or improperly wound line on the spool. To resolve this, remove the cap and check if the line is wound following the directional arrows. Ensuring the correct winding can often fix this issue.
Another frequent problem is the trimmer not starting. For electric trimmers, check the power cord and outlet for any issues. Gas trimmer users should inspect the spark plug and air filter. Replacing a dirty filter or a worn spark plug can often get your trimmer running again. Regular maintenance helps prevent these starting problems.
If your trimmer vibrates excessively, the problem might be an unbalanced line. Uneven line lengths can cause the trimmer to wobble. Check if both ends of the line are equal and properly installed. Adjust as necessary to bring balance. This simple step reduces vibrations and improves performance.
The trimmer may also overheat during prolonged use. This is often caused by a clogged air filter or debris around the engine. Clean these areas thoroughly to ensure proper airflow. Regularly checking and cleaning can prevent overheating. It also extends the life of your trimmer.
Finally, difficulty in cutting could signal a dull blade or worn trimmer line. For models with blades, sharpening them can restore cutting efficiency. For string trimmers, always keep an extra spool on hand for quick replacements. Addressing these issues promptly ensures you maintain an efficient cutting tool.
If these steps don’t resolve your problem, consult your trimmer’s manual or seek professional help. Some issues might require expert attention, especially if they involve internal components. Keeping your trimmer in top shape minimizes downtime and ensures a well-kept lawn.
Frequently Asked Questions
Here are some common questions and answers about maintaining your Craftsman trimmer. These will help you keep your trimmer in excellent working condition.
1. What should I do if my Craftsman trimmer won’t start?
If your Craftsman trimmer won’t start, check the power source first. For electric models, ensure the cord is plugged in properly and there are no issues with the outlet. For gas models, inspect the spark plug and replace it if needed.
Additionally, make sure to examine the air filter; a clogged filter can prevent the engine from running smoothly. Replacing or cleaning the air filter could resolve starting problems quickly. Routine maintenance checks can help avoid such issues in the future.
2. How often should I replace the trimmer line?
The frequency of replacing the trimmer line depends on usage and cutting conditions. Generally, it’s advisable to check your line every few uses. If you notice it becoming frayed or too short, it’s time for a replacement.
Using high-quality line can also extend its lifespan, but always monitor its condition regularly. Ensuring that you never run out of fresh line contributes to effective trimming every time you use your tool.
3. Can I use any brand of trimmer line on my Craftsman trimmer?
While many brands offer compatible lines, it’s best to use lines recommended by Craftsman for optimal performance. Different lines may vary in thickness and material quality, affecting efficiency.
Your user manual will provide specifications on which types of lines work best with your model. Sticking to these recommendations ensures smoother operation and prolongs tool life.
4. What type of maintenance does a gas-powered Craftsman trimmer require?
A gas-powered Craftsman trimmer requires regular oil changes and spark plug inspections for smooth operation. Additionally, cleaning or replacing air filters periodically helps maintain airflow and engine performance.
You should also inspect fuel lines for cracks or damages over time since they can affect fuel delivery to the engine This proactive approach keeps your gas-powered trimmer efficient and extends its service life.
Troubleshooting Common Issues
| Issue | Possible Solution |
|---|---|
| The line doesn’t advance | Check if it’s tangled or jammed inside the spool housing |
Maintaining and replacing the trimmer line on your Craftsman trimmer is crucial for its optimal performance. Regular inspections and following the correct steps ensure a longer lifespan for your tool. Always use high-quality line and adhere to the manufacturer’s guidelines for the best results.
Whether dealing with starting issues, line replacement, or basic maintenance, understanding your trimmer’s needs is key. This proactive approach ensures efficient and smooth operation. Keeping your Craftsman trimmer in top shape guarantees a well-manicured lawn.

I’m Patricia D. Johnson, an affiliate marketer and blogger specializing in trimmers and grooming tools. I create honest reviews, buying guides, and practical tips to help readers choose the right trimmer for their needs. With a focus on quality, performance, and value, I simplify the decision-making process so consumers can make confident purchases.