Weedeaters are the unsung heroes of lawn maintenance, empowering homeowners to maintain a sharp, professional look. Yet, the task of replacing the trimmer line can be daunting even for seasoned gardeners. Knowing the ins and outs of this process not only saves time but also enhances the efficiency of the tool.
Understanding the history and evolution of the weedeater reveals its continuous improvement to ease our chores. Since its inception in 1971, significant innovations have focused on user-friendly designs. Today, it’s crucial to use the correct trimmer line size and spool direction, aligning with manufacturer recommendations, for optimal performance and minimized wear.
- Select the correct trimmer line for your weedeater model.
- Turn off and disconnect the weedeater from its power source.
- Remove the spool cap by pressing the tabs on the side.
- Cut a length of new trimmer line, typically around 15 feet.
- Insert one end of the line into the hole on the spool and wind it evenly following directional arrows.
- Thread the loose ends through the eyelets on the trimmer head.
- Snap the spool cap back into place securely.
- Reconnect your weedeater to its power source and test for proper line deployment.

How to Put Trimmer Line on Weedeater
Trimming your lawn becomes a breeze once you know how to load your weedeater correctly. First, you need to select the right type of trimmer line. This varies depending on your weedeater model and the kind of grass or weeds you want to cut. Make sure to check the manufacturer’s instructions for the recommended line size. Once you have the right line, you can start preparing your weedeater for the new line.
Begin by turning off your weedeater and disconnecting it from any power source. This ensures your safety while changing the line. Next, remove the spool cap by pressing the tabs on the side of the weedeater. Carefully pull out any remaining old line from the spool. According to this post, storing your weedeater properly can help avoid common issues like tangled lines.
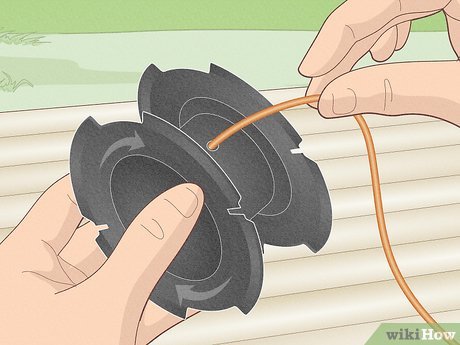
Now, cut a length of the new trimmer line, typically about 15 feet long. Insert one end of the line into the hole in the spool and wrap it around evenly. Be sure to follow the directional arrows printed on the spool to avoid tangling. Leave about six inches of line free at the end to feed through the eyelets when reassembling.
Reattach the spool to the weedeater by threading the loose ends through the eyelets on the trimmer head. Snap the spool cap back into place, ensuring it’s securely in place. Finally, reconnect your weedeater to its power source and test it to ensure the line is feeding correctly. Regular maintenance, including replacing the trimmer line, keeps your yard equipment in top shape and extends its lifespan.
Step 1: Selecting the Right Trimmer Line
Selecting the appropriate trimmer line is crucial for optimal weedeater performance. The line comes in several shapes, such as round, square, and star-shaped. Each shape suits different types of trimming tasks. Round lines are best for general use, while square lines cut through tough weeds more efficiently. Understanding these options can help you make an informed choice.
Trimmer lines also vary in thickness, typically ranging from 0.065 to 0.105 inches. Thicker lines are ideal for heavy-duty jobs, but they consume more power. Thinner lines are better for light trimming tasks. Consult your weedeater’s manual to determine the maximum line thickness your tool can handle. Using the right thickness will prolong the life of your equipment.
Material composition is another important factor. Most trimmer lines are made from nylon, which is durable and effective for most tasks. Some lines are reinforced with other materials for extra strength. According to this expert opinion, selecting a reinforced line can help when dealing with particularly dense vegetation.
Consider the length of the line as well, which usually depends on the size of your yard and the intensity of the work. Bulk packages are available for those who do a lot of trimming. If you have a smaller yard, pre-cut lines might be more convenient. Evaluating your needs ensures you choose the most cost-effective and efficient option.
Step 2: Preparing Your Weedeater
Properly preparing your weedeater is essential for safe and efficient operation. Initially, ensure that the power source is disconnected. For electric models, unplug the cord or remove the battery. Gas models should be switched off and allowed to cool down to avoid burns. This precaution prevents accidental starts during maintenance.
Next, gather all the necessary tools and replacement parts. Essential items include the new trimmer line, gloves, and safety glasses. Having everything within reach simplifies the process and reduces downtime. If your model has a detachable head, bring out the tools needed to remove it. Keeping your workspace organized also helps avoid losing small components.
Inspect your weedeater for any visible damage or wear before starting the reloading process. Check the spool and trimmer head for cracks. Look for signs of excessive wear that could affect performance. Cleaning the head area and removing any built-up debris is crucial. Routine inspections can prevent future issues and prolong the life of your equipment.
Also, make sure to read through the manufacturer’s manual for specific instructions related to your weedeater model. Some models have unique features or steps for reloading the line. Familiarizing yourself with these instructions can make the process smoother. Following the manual ensures you’re using the correct procedure, thereby ensuring optimal performance.
Step 3: Installing the Trimmer Line
With your weedeater safely prepped, it’s time to install the new trimmer line. Begin by cutting the appropriate length of line, usually about 15 feet, but this can vary depending on your model. Thread one end of the line into the hole or slot in the spool. Ensure it’s securely fastened. Wind the line evenly around the spool, following the directional arrows to prevent tangles.
Different models may have single or dual line systems. If yours has a dual line system, repeat the winding process with a second length of line. Keep each line separated as you wind to avoid overlap. Leave about six inches of loose line at the end of each wind. This will make it easier to thread through the eyelets when reassembling the spool.
Once the line is wound onto the spool, carefully thread the loose ends through the eyelets on the trimmer head. Reattach the spool to the weedeater, making sure the lines stay in place. Snap the spool cap back on securely. Check that the lines are free and not tangled before moving on.
For some weedeater models, you may need to manually feed the line through the eyelets, while others have an automatic feed mechanism. Follow your manufacturer’s instructions for the specific method. Ensure the lines are of equal length to maintain balance during operation. Tighten any necessary screws to keep the spool firmly attached.
After reinstalling the spool, perform a quick test run. Reconnect your weedeater to its power source and activate it briefly to check for proper line deployment. If the line doesn’t feed correctly, revisit your work to identify any errors. Adjust as needed to ensure smooth operation. Regularly check and replace the line to keep your weedeater in optimal condition.
Remember, keeping the lines in good shape not only makes trimming easier but also prolongs the lifespan of your weedeater. Following these steps systematically ensures you’re ready for efficient yard work. Happy trimming!
The Importance of Regular Trimmer Line Replacement
Regularly replacing your trimmer line is vital for maintaining the efficiency of your weedeater. Over time, the line naturally wears down, becoming less effective. This worn-out line can fray and break more easily, making your yard work take longer. A fresh line cuts cleaner and faster, saving you time and effort. Therefore, keeping an eye on the condition of your trimmer line ensures you’re always ready for efficient trimming.
Another reason for regular replacement is to prevent damage to your weedeater. A worn or improperly loaded line can cause stress on the motor and other components. This unnecessary strain might lead to more frequent repairs. Moreover, using a fresh line reduces vibration and ensures balanced operation. This results in a smoother trimming experience and extends the life of your tool.
Different types of vegetation and yard conditions can also impact how quickly the trimmer line wears out. For instance, cutting through thick or tough weeds will wear the line faster than trimming grass. Regular assessment helps you adjust your replacement schedule accordingly. Keeping spare line on hand means you can replace it whenever necessary without any downtime. This proactive approach keeps your yard looking neat and well-maintained.
In addition to improving performance, using the correct type and size of trimmer line is essential. Manufacturer recommendations exist for a reason—they ensure the best results for your specific weedeater model. Ignoring these guidelines might lead to ineffective trimming and potential equipment damage. By adhering to these recommendations, you get the most out of your weedeater with fewer issues. Regular replacement following these guidelines is a small step that makes a big difference.
Lastly, regular replacement contributes to a safer yard work environment. Worn-out lines can unpredictably snap or break, posing a risk. New lines reduce this risk significantly. Staying on top of replacement schedules ensures you’re working safely. This small effort enhances your overall trimming experience and keeps you safe.
Top Mistakes to Avoid When Loading a Trimmer Line
One common mistake when loading a trimmer line is using the wrong size of line for your weedeater. Each model has specific requirements, and using a line that’s too thick or too thin can cause operational issues. The wrong size can affect the cutting performance and even damage the weedeater’s motor. Always refer to the manufacturer’s guidelines before purchasing replacement line. This simple step can save you time and trouble.
Another frequent error is winding the line unevenly on the spool. Proper winding is essential for smooth operation. An unevenly wound line can cause tangles and jams during use, making the weedeater less effective. Follow the directional arrows on the spool, ensuring that the line is evenly distributed. This practice enhances performance and reduces the risk of line breakage.
Many people forget to leave enough line extended from the spool before reattaching it. Without enough length, the line might not reach the trimmer head, leading to immediate breaks or inefficient trimming. Typically, you should leave about six inches of line extending from the spool. This helps you avoid interruptions and ensures seamless operation. Regularly checking this length can prevent unnecessary hassles.
Overloading the spool is another mistake that can cause complications. Some users try to fit as much line as possible, thinking it will last longer. However, overloading can lead to jamming and poor performance. Check your weedeater’s manual for the recommended line length or capacity. Sticking to these recommendations ensures the trimmer operates smoothly.
Failure to clean the trimmer head before reloading new line can also be problematic. Dirt and debris buildup can affect the line’s movement, reducing efficiency. Clean the spool and trimmer head before inserting new line. This practice keeps your weedeater in optimal condition. A clean trimmer head helps maintain a long-lasting, effective tool.
Frequently Asked Questions
Learn how to optimize your weedeater performance with these commonly asked questions and their answers. Get insights into best practices for maintenance and usage.
1. How often should I replace my trimmer line?
The frequency of replacing your trimmer line depends on its usage and the type of vegetation you cut. For average home use, replacing the line every few months is common if trimming light grass. However, if you cut through dense weeds or use your weedeater frequently, consider changing the line more often, perhaps monthly.
Regularly inspect the trimmer line for signs of wear and damage. A worn-out or frayed line reduces cutting efficiency and can stress the motor of your weedeater. Consistent replacement ensures optimal performance and extends the life of your equipment.
2. What are the different types of trimmer lines available?
Trimmer lines come in various shapes such as round, square, twisted, and star-shaped. Each shape offers unique advantages: Round lines are general-purpose while square and star-shaped lines provide sharper cuts, ideal for tougher jobs. Twisted lines reduce noise levels during operation.
The material composition also varies; most are made from nylon but some high-strength versions incorporate additional materials like Kevlar for durability. Make your choice based on what kind of trimming tasks you’ll tackle regularly—for instance, lawns versus overgrown weeds.
3. Can I use any brand of trimmer line with my weedeater?
No, it is important to use a trimmer line that matches your weedeater’s specifications as recommended by the manufacturer. Using an incompatible brand or size may lead to poor performance or even damage to your tool.
Check the user manual or manufacturer’s guidelines for compatible brands and sizes before purchasing any replacement trimmer line. Sticking to these recommendations will ensure efficient cutting operations while reducing wear on your equipment.
4. Why is my new trimmer line breaking so quickly?
If you’re experiencing frequent breaks with a new trimmer line, it might be due to improper installation or using the wrong type or size of line for your specific needs. Ensure that you’re following manufacturer instructions carefully when loading the new line onto the spool.
Another factor could be environmental conditions; sharp objects like rocks can cause premature breakage when contacted during operation. Using a stronger material such as reinforced nylon can help mitigate issues related to frequent breaks in demanding environments.
5. How do I store my string trimmer when not in use?
Proper storage of your string trimmer involves cleaning it first by removing grass clippings and dirt from both the spool area and housing unit after each use then storing in a dry place away from direct sunlight which prevents rusting battery degradation electric models battery detached avoid moisture exposure gas-powered drained fuel completely prevent carburetor damage spark plug another component deterioration safely store read detailed guide here this post.
## Conclusion
Mastering the process of replacing the trimmer line on your weedeater ensures efficient yard work and extends the lifespan of your equipment. Regular maintenance, such as using the correct line type and following manufacturer instructions, prevents common issues and enhances performance.
By staying vigilant about the condition of your trimmer line and avoiding common mistakes, you can maintain a well-manicured lawn with minimal effort. Ultimately, proper care and attention to detail lead to a more satisfying and effective trimming experience.

I’m Patricia D. Johnson, an affiliate marketer and blogger specializing in trimmers and grooming tools. I create honest reviews, buying guides, and practical tips to help readers choose the right trimmer for their needs. With a focus on quality, performance, and value, I simplify the decision-making process so consumers can make confident purchases.