
If you’re tired of struggling with a dull or broken string trimmer head, it’s time to learn how to change it like a pro. Whether you’re a seasoned landscaper or a weekend warrior, knowing how to replace your trimmer head can save you time and frustration.
In this blog post, we’ll share some expert tips and tricks to help you easily swap out your trimmer head and get back to tackling those unruly weeds and grass. So grab your tools and let’s dive in!
Source: tmbi.com
How to Change a String Trimmer Head: Step-by-Step Guide
In this step-by-step guide, we will walk you through the process of changing a string trimmer head. Whether you are a seasoned gardener or a beginner, this informative article will provide you with all the information you need to successfully replace your trimmer head. Follow these easy steps to ensure a smooth and hassle-free experience.
Step 1: Gather the Necessary Tools and Materials
Before you begin, make sure you have all the required tools and materials. This will save you time and prevent any interruptions during the process. Here’s what you’ll need:
- A new trimmer head
- A wrench or pliers (depending on your trimmer model)
- A screwdriver (if necessary)
- Protective gloves
- Safety goggles
Having these items ready will ensure that you can complete the task efficiently and safely.
Step 2: Prepare the Trimmer
Before you start replacing the trimmer head, it is essential to prepare the trimmer properly. Follow these steps:
- Turn off the trimmer and disconnect it from the power source.
- If your trimmer uses a gas-powered engine, remove the spark plug wire to prevent accidental starting.
- Clean the area around the trimmer head to remove any dirt, debris, or grass clippings. This will provide better visibility and make the process easier.
Once you have completed these steps, you are ready to proceed to the next phase of the replacement process.
Step 3: Remove the Old Trimmer Head
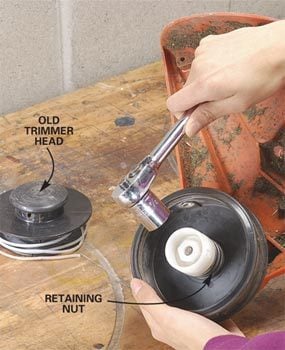
Now it’s time to remove the old trimmer head. Follow these instructions:
- Locate the retaining knob or bolt that holds the trimmer head in place.
- Using a wrench or pliers, turn the retaining knob counterclockwise to loosen it.
- Once the knob is loose, remove it completely.
- Take out the old trimmer head carefully, ensuring not to damage any surrounding parts.
At this point, you have successfully removed the old trimmer head and are ready to install the new one.
Step 4: Install the New Trimmer Head
Now that the old trimmer head has been removed, it’s time to install the new one. Follow these steps:
- Take the new trimmer head and align it with the trimmer’s drive shaft.
- Insert the trimmer head onto the drive shaft, making sure it fits securely.
- Tighten the retaining knob or bolt by turning it clockwise with a wrench or pliers. Ensure it is snug, but be careful not to overtighten.
- If necessary, follow any specific instructions provided by the trimmer manufacturer for securing the new trimmer head.
With these steps completed, you have successfully installed the new trimmer head.
Step 5: Test and Adjust
Before you resume trimming, it is vital to ensure that the new trimmer head is working correctly. Follow these final steps:
- Reconnect the power source or spark plug wire, depending on your trimmer model.
- Turn on the trimmer and test the new trimmer head by engaging the cutting mechanism.
- If necessary, adjust the trimmer head according to your desired cutting height or angle. Refer to your trimmer’s manual for specific instructions on adjusting the cutting settings.
Once you have completed these steps, your trimmer is ready to be used with its new trimmer head.
Frequently Asked Questions
Here are some commonly asked questions about how to change a string trimmer head:
How do I remove the old trimmer head?
To remove the old trimmer head, first, make sure the trimmer is turned off and disconnected from any power source. Then, locate the retaining nut or bolt that holds the trimmer head in place. Use a wrench or pliers to loosen and remove this nut or bolt. Once it is loose, you should be able to pull the old trimmer head straight off the trimmer shaft.
It’s a good idea to consult your trimmer’s user manual for specific instructions and safety precautions before attempting to remove the trimmer head.
How do I install a new trimmer head?
Installing a new trimmer head is a fairly simple process. Start by aligning the drive shaft of the trimmer with the hole in the center of the new trimmer head. Push the head onto the shaft until it is secure and in the proper position. Then, tighten the retaining nut or bolt by hand, and use a wrench or pliers to securely tighten it further.
Again, it’s important to consult your trimmer’s user manual for any specific instructions or considerations when installing a new trimmer head.
What type of trimmer head should I choose?
There are several types of trimmer heads available, each with its own advantages and disadvantages. The most common types include bump-feed heads, automatic-feed heads, and fixed-line heads. The right choice for you depends on your specific needs and preferences.
If you prefer convenience and ease of use, an automatic-feed head may be the best option. If you want more control over the length of the trimmer line, a bump-feed head allows you to manually advance the line as needed. Fixed-line heads are typically used for heavy-duty trimming and require manual line replacement.
How often should I change the trimmer head?
The frequency of changing the trimmer head depends on several factors, such as the frequency of use, the type of vegetation being trimmed, and the overall condition of the trimmer head. As a general guideline, it is recommended to inspect the trimmer head regularly for any signs of wear or damage. If the trimmer line is worn down or breaks frequently, it may be time to replace the trimmer head.
It’s also a good idea to refer to your trimmer’s user manual for any specific maintenance recommendations or guidelines regarding trimmer head replacement.
Can I replace the trimmer head myself, or do I need professional assistance?
Replacing the trimmer head is typically a task that can be done by most individuals without professional assistance. As long as you follow the proper safety precautions and consult your trimmer’s user manual for specific instructions, you should be able to change the trimmer head yourself.
However, if you are unsure or uncomfortable performing the task, it is always best to seek professional assistance to ensure the job is done correctly and safely.

Source: ytimg.com
Final Words:
In conclusion, mastering the art of changing a string trimmer head can greatly enhance your gardening experience. By following the step-by-step instructions discussed above, you can effortlessly replace the worn-out head and keep your trimmer functioning at its optimal level. Remember to prioritize safety by disconnecting the power source and wearing protective gear throughout the process.
Furthermore, familiarizing yourself with the different types of trimmer heads and their respective benefits can provide you with the flexibility to choose the most suitable option for your needs.
Whether it’s a manual or a bump feed head, understanding how they work and how to install them correctly will save you time and frustration in the long run. With the knowledge and confidence gained from this guide, you can confidently tackle any string trimmer head replacement and maintain a well-groomed yard.
So, don’t shy away from the challenge, and get ready to level up your landscaping game!
