Ever found yourself staring at a stubborn patch of weeds and wondering how to tackle it efficiently? That’s where a string trimmer becomes indispensable. These lightweight, versatile tools have been a gardening staple since the late 1970s, and today it’s hard to picture a well-maintained yard without one.
But even the most reliable string trimmer is only as good as its line—and a worn, tangled, or broken trimmer line is something nearly every user encounters. In fact, gardening forums note that almost 30% of new users struggle with winding their trimmer head correctly during their first few tries. The good news? Learning to wind a string trimmer head is simple once you understand the basic steps.
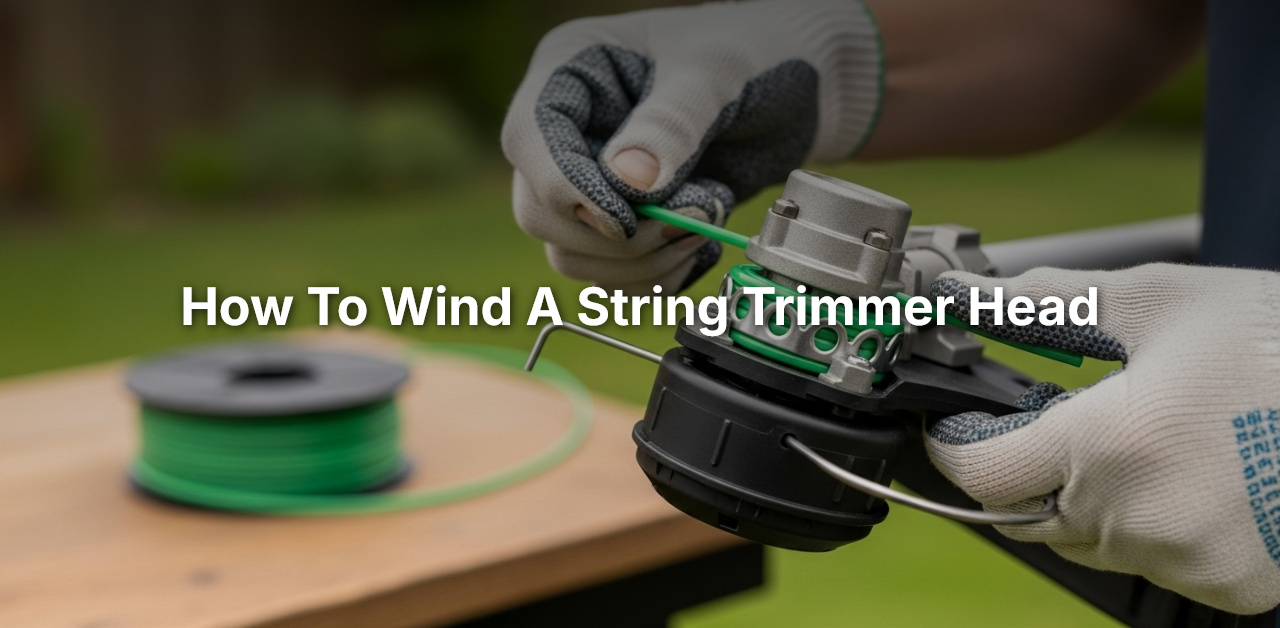
First, detach the spool from the head and clean it thoroughly. Cut 15–25 feet of trimmer line, then locate the starter hole on the spool and thread the line through, leaving a short length sticking out. Wind the line neatly and tightly, avoiding overlaps, until only about six inches remain. Hook the remaining line into a retainer on the spool, and finally, reinstall the spool onto the trimmer head.
With a bit of practice, this quick routine becomes second nature—and your string trimmer will be ready to tackle any overgrown corner of your yard.
How to Wind a String Trimmer Head (Step-by-Step Guide for Beginners)
Every gardener knows that nothing matches the clean, precise edges achieved with a well-maintained string trimmer. The core mechanism of this remarkable tool is its head, where a tightly wound, durable string spins at high speeds to cut grass and weeds. Understanding how to wind a string trimmer head properly is crucial, as it directly impacts the tool’s efficiency and the quality of your work.
Step-1: Uncovering the Trimmer Head
The first step towards learning how to wind a string trimmer head is to uncover the trimmer head. Begin by pushing the tabs located on the sides of your trimmer’s head. Apply gentle pressure until you hear a click, which confirms that the cover is free for removal. Pull the cover upwards to reveal the spool inside.
Should your model lack side tabs, look for a knob or bump at the bottom of your trimmer head. Screw it clockwise to detach it in this case. Always remember to consult your model’s manual if you have difficulty locating these features.
Maintaining the trimmer head’s hygiene is crucial once it is open. Inspect the spool and its surrounding area for grass cuttings or any other debris. Clean it carefully to prevent blockages in the future.
Once you have a clean, open trimmer head, you’re ready for the next step in mastering how to wind a string trimmer head.
Step-2: Preparing the Trimmer Line
The next step involves preparing the trimmer line for winding. Start by estimating the required length of the line. Most trimmers function efficiently with a line that is about 15 to 25 feet long, but you should always consult your trimmer manual for precise measurements. Once you have the correct length measurement, cut the line using a pair of sharp scissors or a utility knife.
Although it might be tempting to use a longer line, remember that this could overload your trimmer’s motor. Moreover, it could extend too far while trimming, causing unwanted damage to plants or objects around your trimming zone.
Another crucial aspect to consider at this point is the diameter of the trimmer line. Ensure that the line’s diameter matches the specifications mentioned in the user manual of your trimmer. Using an incompatible line could cause your device to malfunction or break.
Once you have prepared the trimmer line, you can proceed to understand the next step on how to wind a string trimmer head.
Step-3: Loading the Trimmer Line
Loading the trimmer line may seem challenging, but it’s simple once you get the hang of it. Look for a small notch or hole on the spool’s inside cover. Thread one end of your line through it. This process will anchor your line as you wind it around the spool.
Keep a tight hold on your line, ensuring that it stays taut. Slowly, start wrapping the line around your spool in neat, consecutive rows. Stick to the direction as indicated by the arrow marking on the spool. Consistency is vital to prevent tangling or overlapping of the lines.
If you’re using a twin line model, load the two lines simultaneously, making sure they don’t cross paths or overlap. However, they should stay within their respective sections.
With this, you’re all set to take on the final steps in the process of learning how to wind a string trimmer head.
Step-4: Securing the Trimmer Line
With the trimmer line wound around the spools, look for a second holding notch on the edge of the spool. Thread your line through this notch. This will keep your line anchored while you replace the spool into the head of the trimmer.
If you’re using a twin line trimmer, follow the same process on the opposite side of the spool. This will secure the second line as well.
Lastly, ensure that about five to six inches of each line extends beyond the spool. Leave some extra length for the next step.
Now you’re ready to master the final step in the guide on how to wind a string trimmer head.
Step-5: Replacing the Trimmer Head
Take the spool, carefully guiding the end(s) of the string through the exit hole(s) in the trimmer head. Ensure your line doesn’t escape from the holding notch.
Insert the spool back into the head, checking that it fits snugly, with the line still extending out of the head through the designated slots.
Take the cover or cap, align it with the trimmer head, and gently press or twist it, depending upon your model, until it clicks into place. Now, check the line that’s protruding out of the head. Pull it a little. If your line comes out a bit more, that means your spool is correctly installed.
With this, you’ve mastered how to wind a string trimmer head, preparing you for an efficient grass trimming session.
You now know how to load and wind a string trimmer head like an expert. This crucial step ensures safer and more efficient use of this versatile garden tool. With regular practice, winding the trimmer head will soon become an easy and efficient part of your gardening routine, leaving you with more time to admire and enjoy the fruits of your labor.
The BEST TRIMMER HEAD ever made! How to install a Universal Speed Feed on most any trimmer.
Frequently Asked Questions
Working with a string trimmer head can sometimes be a bit challenging, especially if you’re new to using such equipment. We’ve compiled a list of commonly asked questions that address key aspects of winding a string trimmer head.
What type of string do I need for my string trimmer head?
There are different types of trimmer strings available and the choice varies depending on the type of your string trimmer and the kind of work you’re doing. For light duties such as trimming grass around flower beds, a thin round-line string would be ideal. On the other hand, a twisted or serrated string would serve you better with tougher grass and weed.
You can easily find this information in your trimmer’s instruction manual. Also, it’s important to ensure that the diameter of the string matches that recommended in the manual. If you can’t find your manual, check the manufacturer’s website or consult with experts at your local hardware store.
How long should the string be for winding?
This largely depends on the specific model of your string trimmer. Most trimmers take a string that’s about 15 to 25 feet long. This might vary, though, so you should refer to your owner’s manual for precise information. Having a string that’s too long can cause your trimmer to overheat, and a string that’s too short may not perform effectively.
A rule of thumb is to always cut an ample length of string and then wind it onto the head. If the string protrudes too far out of the head, it can always be cut down to size using the trimmer’s built-in cutter.
How often should I replace the string on my trimmer head?
The frequency of replacing the string on your trimmer head depends on the amount and type of work you are doing. If you’re trimming tough grass, the string might wear out faster compared to trimming soft grass. Regular maintenance and inspection are essential in ensuring that your trimmer head always has enough string length for efficient operation.
If the string becomes too short during operation, you definitely need to replace it. This could happen in the middle of a trimming task, so it’s advisable to always keep some extra string in hand while working.
Can I use a different string material than what is recommended?
You might be tempted to use heavier or lighter string materials for your trimmer head, but it’s best to stick with the manufacturer’s recommendations. Using the wrong string material can cause your trimmer to underperform and could even damage the engine. Heavier string can overtax the engine, while lighter string might not be able to tackle the trimming effectively.
Therefore, always use the recommended string material and diameter for your specific trimmer model. This not only ensures the efficiency of your trimmer but also prolongs its life.
What is the correct process of winding a string trimmer head?
The process can generally be broken down into a few steps: Preparing the string, winding the string, and reassembling the head. The first step is to measure and cut the appropriate length of string. Then, locate the starter hole and wind the string neatly in the direction of the arrows. Always ensure the string is tightly wound and does not overlap.
Afterwards, slowly push the ends of the string through the eyelets, ensuring it extends evenly from both sides of the head. Finally, reassemble the head of the trimmer. Remember that different trimmer models may have slight variations in this process, so always refer to your user manual.
How to Wind a STIHL Trimmer Head | How To
Final Words
Winding a string trimmer head has its own set of steps that we need to follow for smooth operation. It begins with buying a suitable, good quality trimmer string. After we secure the spool and remove its cap, we should thread our trimmer string through the hole provided and wind it around the spool neatly.
Remember to follow the arrow’s direction on the spool during this process. Lastly, we need to take the string through the eyelets and reassemble the cap. Don’t forget, safety gear is key while doing this type of task!
Practicing this process will make it easier. It’s a vital maintenance task to keep our string trimmer in top notch condition. By knowing how to wind a string trimmer head, we are conveniently equipped to keep our tools at their best and our garden looking sharp.
If we ever face difficulties, taking help from an expert or referring to the instruction manual can be beneficial. Remember, quality trimming tools and a well-kept string make the difference for beautiful garden maintenance.
