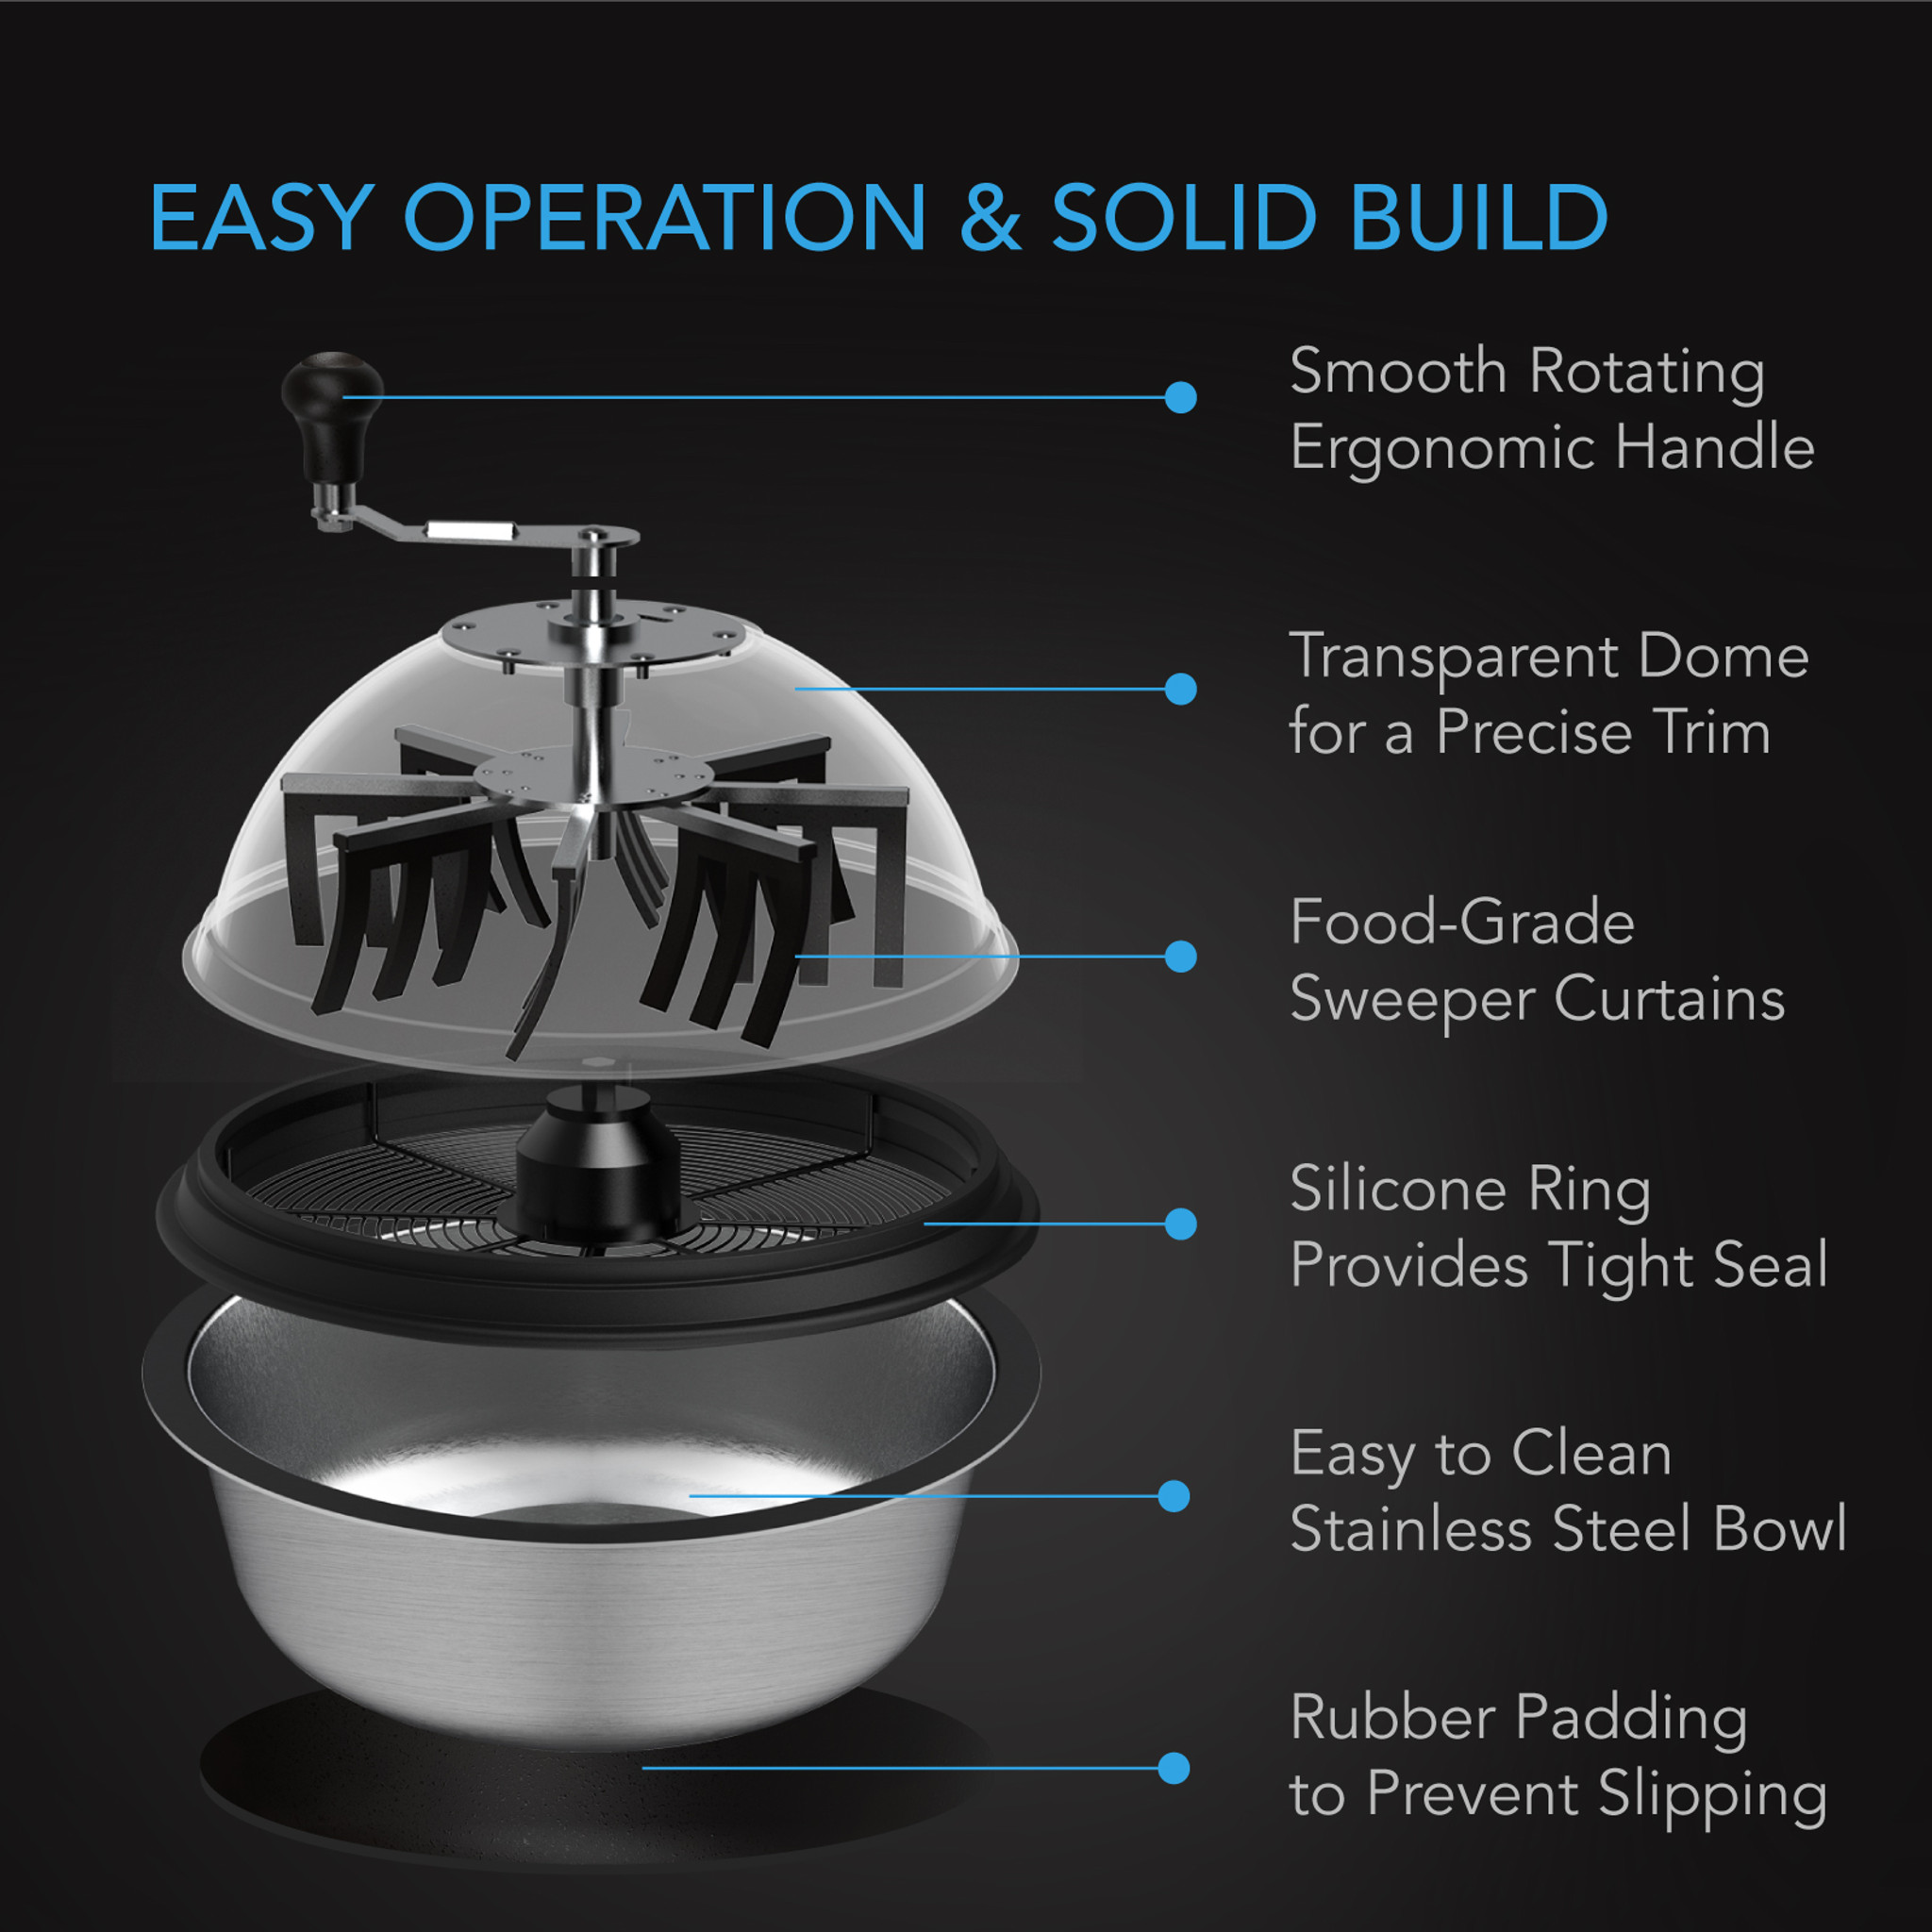
Keeping your bowl trimmer clean is essential for achieving optimal performance and maintaining the longevity of your equipment. Whether you are a professional cultivator or a passionate hobbyist, understanding how to properly clean a bowl trimmer is a skill that will greatly benefit you in the long run. In this guide, we will walk you through the step-by-step process of cleaning your bowl trimmer, ensuring that it remains in pristine condition for years to come. So grab your cleaning supplies and let’s dive into the world of bowl trimmer maintenance!
Cleaning a bowl trimmer may seem like a daunting task, but with the right techniques and a little bit of patience, it can be a simple and rewarding process. A clean bowl trimmer not only enhances its performance but also prevents the buildup of residue, ensuring that your trimmer consistently delivers high-quality results. From disassembling the trimmer to cleaning each component meticulously, we will cover it all. So whether you’re a seasoned trimmer owner looking for some helpful tips or a beginner searching for guidance, this guide will equip you with the knowledge and skills to effectively clean your bowl trimmer. Let’s get started on this journey to a spotless and efficient trimming experience!
How to clean a bowl trimmer:
- Remove any plant matter and debris from the trimmer.
- Fill a container with warm water and add a mild detergent.
- Place the trimmer parts into the soapy water and let them soak for a few minutes.
- Use a soft brush or cloth to scrub away any residue or buildup on the parts.
- Rinse the parts thoroughly with clean water.
- Allow the parts to air dry completely before reassembling the trimmer.
How to Clean a Bowl Trimmer for Precision? Clean Cut Mastery
In this article, we will provide you with a step-by-step guide on how to clean a bowl trimmer. Bowl trimmers are essential tools for trimming and manicuring plant material, but they can quickly become dirty and clogged with residue. Regular cleaning is crucial to maintain the trimmer’s efficiency and prolong its lifespan. Follow the instructions below to ensure your bowl trimmer remains in optimal condition.
Gather the Necessary Supplies
Before you begin cleaning your bowl trimmer, gather all the necessary supplies. You will need:
- Warm water
- Mild dish soap or specialized trimmer cleaner
- Clean, lint-free towels
- Small brush or toothbrush
- Rubbing alcohol or isopropyl alcohol
- Disposable gloves
Having these supplies ready will ensure a smooth and efficient cleaning process.
Step 1: Disassemble the Bowl Trimmer
Start by carefully disassembling the bowl trimmer. Follow the manufacturer’s instructions or refer to the user manual if you are unsure about the disassembly process. Typically, you will need to remove the top lid, blades, and any other removable parts. Place all the disassembled parts on a clean surface or in a sink lined with a towel to prevent damage.
It is essential to wear disposable gloves during the disassembly process to protect your hands from any residue or sharp edges.
Step 2: Remove Debris and Residue
Using a small brush or toothbrush, gently remove any visible debris or residue from the disassembled parts. Pay close attention to the blades and crevices where plant material may have accumulated. Take care not to apply excessive force that could damage the trimmer.
For stubborn residue, you can soak the parts in warm water with mild dish soap or specialized trimmer cleaner. Allow them to sit for a few minutes to loosen the residue before gently scrubbing with the brush.
Step 3: Clean with Rubbing Alcohol
After removing the visible debris, it is crucial to sanitize the disassembled parts to eliminate any potential bacteria or pathogens. Dampen a clean towel or cloth with rubbing alcohol or isopropyl alcohol and wipe down all the surfaces thoroughly. The alcohol will help disinfect the trimmer and prevent the growth of harmful microorganisms.
Ensure that you clean both the inner and outer surfaces of the bowl trimmer, including the blades and any hard-to-reach areas.
Step 4: Dry and Reassemble
Once you have completed the cleaning and sanitizing process, use clean, lint-free towels to dry all the disassembled parts thoroughly. Make sure there is no moisture remaining, as it can lead to rust or damage to the trimmer over time.
Once the parts are completely dry, reassemble the bowl trimmer according to the manufacturer’s instructions. Ensure that all the components fit securely and are aligned correctly to avoid any potential safety hazards.
Step 5: Regular Maintenance
Regular maintenance is key to keeping your bowl trimmer clean and functioning optimally. After each use, remove any visible debris and wipe down the trimmer with a clean cloth. This will prevent build-up and make the cleaning process easier in the future.
Additionally, it is recommended to deep clean the bowl trimmer periodically, especially if it is used frequently. Follow the steps outlined above to ensure a thorough cleaning.
Conclusion
By following these step-by-step instructions, you can effectively clean your bowl trimmer and maintain its performance. Regular cleaning and maintenance will not only prolong the lifespan of the trimmer but also ensure that your trimming process remains efficient and produces high-quality results. Remember to prioritize safety by wearing gloves and following the manufacturer’s guidelines throughout the cleaning process.
Frequently Asked Questions
Below are some commonly asked questions about how to clean a bowl trimmer.
1. How often should I clean my bowl trimmer?
It is recommended to clean your bowl trimmer after each use to ensure optimal performance and longevity. Regular cleaning prevents the build-up of plant residue and debris, which can affect the trimmer’s efficiency. Additionally, regular cleaning helps maintain hygiene and reduces the risk of contamination.
Start by removing any remaining plant material from the trimmer’s blades and surfaces. Then, use a mild cleaning solution or a mixture of water and isopropyl alcohol to clean the trimmer. Gently scrub the blades and surfaces with a soft brush or cloth, paying attention to hard-to-reach areas. Rinse thoroughly with water and allow the trimmer to dry completely before storing or using again.
2. What cleaning solution should I use for my bowl trimmer?
For cleaning your bowl trimmer, it is best to use a mild cleaning solution or a mixture of water and isopropyl alcohol. Avoid using harsh chemicals or abrasive cleaners as they can damage the trimmer’s components. Isopropyl alcohol is an effective cleaning agent that helps dissolve plant residue and sanitize the trimmer.
To make a cleaning solution, mix one part isopropyl alcohol with three parts water. Alternatively, you can use a mild dish soap diluted with water. Apply the solution to the trimmer’s blades and surfaces and gently scrub with a soft brush or cloth. Rinse thoroughly with water to remove any cleaning residue before drying.
3. Can I clean the blades of my bowl trimmer in the dishwasher?
No, it is not recommended to clean the blades of your bowl trimmer in the dishwasher. The high heat and water pressure in a dishwasher can potentially damage the trimmer’s blades, affecting their cutting performance. Additionally, the dishwasher’s detergent may not be suitable for cleaning the trimmer and can leave behind residue.
It is best to clean the blades manually using a mild cleaning solution or a mixture of water and isopropyl alcohol. Gently scrub the blades with a soft brush or cloth, paying attention to any built-up residue. Rinse thoroughly with water and allow the blades to dry completely before reassembling the trimmer.
4. How do I clean hard-to-reach areas of my bowl trimmer?
Cleaning hard-to-reach areas of your bowl trimmer requires some attention to detail. To clean these areas effectively, you can use a small brush with soft bristles or a cotton swab dipped in a cleaning solution. Carefully scrub or wipe the hard-to-reach areas, ensuring that you remove any residue or debris.
If the trimmer has removable parts, such as screens or filters, you can take them out and clean them separately. Soak these parts in a cleaning solution and gently scrub them to remove any trapped residue. Rinse thoroughly with water and allow them to dry before reassembling the trimmer.
5. How should I store my bowl trimmer after cleaning?
After cleaning your bowl trimmer, it is important to store it properly to maintain its condition and prevent any damage. Ensure that the trimmer is completely dry before storing to avoid moisture buildup, which can lead to rust or corrosion.
If your trimmer has removable parts, store them separately in a clean and dry container to prevent them from getting lost or damaged. Store the trimmer in a cool, dry place away from direct sunlight or extreme temperatures. It is also advisable to cover the trimmer to protect it from dust or debris when not in use.

Source: media-amazon.com
Bowl Trimmers! Tips & Tricks!
Final Words:
In conclusion, learning how to clean a bowl trimmer is an essential skill for any cannabis enthusiast or cultivator. It not only ensures the longevity and optimal performance of the equipment but also plays a crucial role in maintaining the quality and potency of your harvested buds. By following the step-by-step process outlined above, you can efficiently clean your bowl trimmer, removing any residue or debris that may hinder its functionality.
Remember, regular cleaning and maintenance of your bowl trimmer is key to its longevity and effectiveness. By establishing a routine cleaning schedule and using proper cleaning agents, you can keep your trimmer in top-notch condition, ensuring it remains a reliable tool for years to come. So, don’t neglect this important aspect of cannabis cultivation; take the time to clean your bowl trimmer properly and enjoy the benefits of a well-maintained trimming equipment. Happy trimming!
