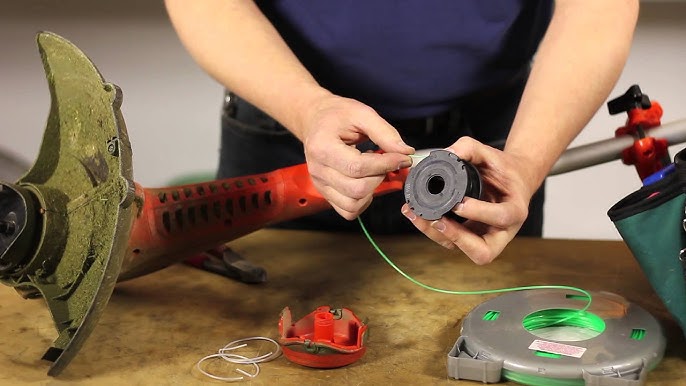
Many homeowners are unaware that a well-maintained electric trimmer can make lawn care a breeze. One often underestimated aspect is the simple task of replacing the trimmer line, which, when done correctly, can save significant time and ensure a neat cut. This seemingly mundane task can transform your trimming efficiency dramatically.
To replace the line on a Black and Decker electric trimmer, first, turn off and unplug the device to ensure safety. Then, locate the spool cover; typically, it can be removed by pressing the two tabs on each side. Once the cover is off, simply remove the old line and thread a new one, following the direction indicated on the spool. With over 80% of Americans owning some form of lawn care equipment, mastering this simple maintenance task is invaluable.
- Unplug the trimmer and ensure it is turned off for safety.
- Press the tabs on either side of the spool cover to remove it.
- Remove any remaining old line from the spool.
- Thread a new line through the spool, following the directional arrows.
- Reattach the spool cover by pressing until it clicks into place.
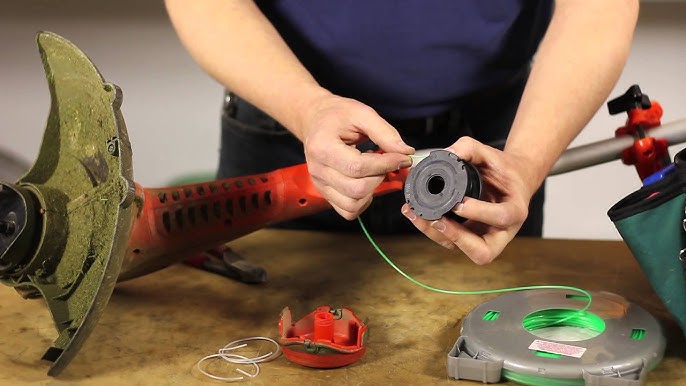
Steps to Replace Line on Black and Decker Electric Trimmer
Before starting, ensure your trimmer is turned off and unplugged. Safety first! You don’t want any accidental starts. Unplugging the trimmer prevents any mishaps. Wear gloves to protect your hands during this process.
Next, locate the spool cover on the base of the trimmer. Press the tabs on either side to remove the cover. This might require a bit of force. Once the cover is off, you’ll see the spool where the line is wound. Remove the old line carefully.
Threading a new line can be tricky but following the direction indicated on the spool makes it easier. Ensure the line is wound evenly to avoid tangles. Cut the line at the right length, usually specified in the trimmer’s manual. Replace the spool and press it firmly into position. According to this post, using the correct type of trimmer line can also improve efficiency.
Finally, reattach the spool cover, make sure it clicks securely into place. Test the trimmer to ensure it’s working correctly. This simple maintenance can extend the life of your trimmer. For more troubleshooting tips if your trimmer stops working, check here is the article. Happy trimming!
Step 1: Safety Precautions
Safety precautions are essential when replacing the line on your Black and Decker electric trimmer. Always ensure the device is switched off and unplugged to avoid accidental starts. Use sturdy gloves to protect your hands from sharp edges or abrasive materials. Clear the workspace of any obstacles to maintain a safe environment. This ensures you can focus on the task without distractions.
Wearing safety goggles is another crucial step to protect your eyes from debris. Flying bits of old lines can cause serious injury if they hit your eyes. Consider using long sleeves and pants to shield your skin. This extra layer can prevent cuts and scratches. According to this expert opinion, extra protection is always a good idea.
Keep children and pets away from the work area during this process. They might accidentally knock over the trimmer or distract you. Store any removed parts in a secure place to avoid misplacing them. It keeps the work organized and ensures nothing gets lost. Safety isn’t just about immediate actions but also about maintaining an orderly workspace.
Inspect your trimmer for any damage before starting the replacement. Cracks or frayed wires can be hazardous. If you find any issues, consult the manual or a professional for advice. Attention to these details can prevent accidents. Implementing these safety measures ensures a smooth and safe line replacement process.
Step 2: Removing the Spool Cover
To begin, locate the spool cover on your Black and Decker trimmer. This cover is usually found at the base of the trimmer head. Press the tabs on either side of the cover to release it. You might need to exert a bit of force. Make sure to keep a firm grip on the trimmer during this process.
Once the tabs are pressed, gently pull the cover away from the trimmer. It should come off without much resistance. Be careful not to lose any small parts like springs or clips. Place the spool cover in a safe spot. This keeps all parts organized and easy to find.
Removing the old line spool is your next step. Lift the spool straight out of the trimmer head. Check for any debris inside the housing. Cleaning it out can prevent issues later. Keeping your trimmer clean extends its lifespan.
Now, examine the spool cover for any cracks or damage. If damaged, it might need replacement. Look at the inside of the cover for alignment markers. These will help when reassembling. Following these steps ensures your trimmer remains in good working condition.
Step 3: Removing the Old Line
With the spool cover off, it’s time to remove the old line. Carefully unwind any remaining line from the spool. Some fragments may be tangled, requiring a bit of patience to untangle. Be gentle to avoid damaging the spool. Once all the old line is removed, dispose of it properly.
Pay attention to how the old line was wound to help with threading the new line later. Examine the spool for dirt or debris that may have accumulated over time. A quick wipe with a dry cloth can clean it up. Ensuring a clean spool ensures better performance. Dirt can impact the line’s smooth release during use.
Check the spool for wear and tear. If the notches that hold the line are worn out, consider replacing the spool. Worn-out notches can cause the line to slip or break. This will affect the efficiency of your trimming. Keeping the spool in good condition is crucial for effective trimming.
Some models may have a dual-line system. If your trimmer does, make sure to remove both lines. It’s essential to follow the manufacturer’s guidelines for your specific model. This ensures you re-thread it correctly later. Referring to the manual helps avoid common mistakes.
If the spool is still in good shape, put it back in place for now. This will help protect the spring and other internal components. Label the spool if you think you might confuse it with a new one later. Proper maintenance can save you time. Planning ahead when it comes to tool care goes a long way.
Step 4: Threading the New Line
First, cut a length of new line, usually between 15 to 20 feet, based on your trimmer’s manual. This length ensures you have enough line for efficient trimming. Always use the recommended type of line for your Black and Decker trimmer. It’s important to match the line diameter specified. Incorrect line size can lead to functionality issues.
Begin threading by inserting one end of the line into the hole in the spool. Pull it through half the length, ensuring both ends are equal. Follow the arrows on the spool indicating the winding direction. Wind the line tightly and evenly to avoid any tangles. This step is crucial for smooth operation.
If your trimmer has a dual-line system, repeat the process for the second line. Make sure both lines are wound in the correct direction. The lines should lie neatly side by side. This setup prevents line crossing and breakage. Reassemble the spool carefully once the lines are wound.
Leave about six inches of line extending from the spool for both single and dual-line systems. These extended lengths will be fed out automatically during use. Ensure the lines are correctly positioned in the notches. Securely place the spool back into the trimmer head. Reattach the spool cover firmly by pressing the tabs until they click.
Double-check the lines are feeding smoothly before powering on the trimmer. A quick pull on the lines can confirm this. For more tips on effective trimming, consult the user manual regularly. Keeping these steps in mind ensures a hassle-free replacement process. Happy trimming!
Step 5: Replacing the Spool Cover
Begin by ensuring the new lines are neatly wound and secured in the spool. Hold the lines to prevent them from unwinding. Carefully align the spool with the trimmer head. The spool should fit snugly in place. Make sure the lines extend through the designated grooves.
Next, position the spool cover over the spool. Align it properly with the base of the trimmer head. Press down firmly until you hear a click. The tabs should snap into place, securing the cover. Check that the cover is tightly fixed.
Once the cover is reattached, gently pull on the lines to ensure they are feeding correctly. They should move smoothly without resistance. If the lines are stuck, reposition the cover. A proper fit is essential for efficient trimming. This prevents the lines from jamming during use.
Test the trimmer by turning it on briefly. Listen for any unusual sounds indicating the cover isn’t secure. The trimmer should operate smoothly and the lines should advance properly. If everything seems fine, you’re ready to start trimming. Following these steps helps maintain your trimmer’s performance.
For any ongoing issues, refer to the user manual. It contains specific instructions tailored to your model. Consulting the manual can resolve common problems. Proper maintenance ensures the longevity of your trimmer. With the spool cover securely in place, you’re all set for your next trimming session.
Necessary Tools for Line Replacement
Having the right tools makes replacing the line on your Black and Decker electric trimmer a breeze. The basics include safety gloves, protective goggles, and a pair of scissors. You’ll also need the correct type of trimmer line for your model. Consult your trimmer’s manual for specifications. This ensures compatibility and efficiency.
Keeping a clean workspace is essential as well. A small brush can help remove dirt from the spool area before inserting new line. Using a cloth to wipe any debris off the trimmer head can prevent future issues. These simple cleaning tools can extend your trimmer’s life. Ensuring cleanliness is critical.
A flathead screwdriver might come in handy for prying off stubborn spool covers. Although most models have easy-release tabs, some may require additional leverage. Keep this tool nearby just in case. It adds an extra layer of convenience during maintenance tasks. Always use caution when handling tools.
- Safety Gloves
- Protective Goggles
- Scissors
- Flathead Screwdriver (optional)
- Small Brush and Cloth for Cleaning
Some newer models come with auto-feed systems that simplify the process even further. These systems automatically advance the cutting line without manual intervention, making maintenance simpler according to experts like those in this resource: this post. Knowing how to utilize these features saves time. Make sure you’re familiar with your specific model’s capabilities.
Investing in quality replacement lines can make all the difference in performance. Cheap lines may break easily or wear out quickly, leading to more frequent replacements. Stick to recommended brands for reliability and durability. This helps maintain consistent trimming quality over time.
Tips for Efficient Trimming with Black and Decker Electric Trimmer
Effective trimming starts with proper preparation. Ensure your trimmer line is correctly installed and of the right diameter for your model. Double-check that the spool cover is securely in place. A loose cover can lead to line tangling or uneven trimming. Regularly inspect your trimmer for any signs of wear and tear.
Operate your trimmer with a steady hand, keeping the head parallel to the ground. This technique helps maintain an even cut and avoids scalping the lawn. Move in slow, controlled motions for the best results. Speeding through the task can cause missed spots and uneven edges. Controlled movements are key.
When dealing with tough weeds or thicker grass, use a back-and-forth sweeping motion. This method allows the line to cut through dense growth more effectively. Remember to keep the trimmer head close to the ground but not touching it. This prevents damaging the blades. A bit of practice can perfect this technique.
To extend the life of your trimmer line, avoid hitting hard surfaces like concrete or stone. Constant contact with such surfaces can wear down the line quickly. Whenever possible, trim close to these areas with caution. Replace the line as soon as it shows signs of wear. Consistent maintenance keeps your trimmer in top shape.
- Keep an eye on the line’s length and replace it when necessary.
- Use recommended line types and diameters.
- Regularly clean the trimmer head to prevent debris buildup.
Store your trimmer in a cool, dry place when not in use to prolong its lifespan. Extreme temperatures can affect its components. If you notice any performance issues, refer to the user manual for troubleshooting tips. For persistent problems, consulting a professional might be necessary. Keeping these tips in mind will make your trimming experience much more efficient and enjoyable.
Frequently Asked Questions
Maintaining a Black and Decker electric trimmer can be straightforward if you know what to do. Here are some frequently asked questions to guide you through common concerns and tasks.
1. How often should I replace the trimmer line?
The frequency of replacing the trimmer line depends on how often you use your trimmer. For frequent users, it might be necessary to replace the line every month or so. Occasional users might only need to do this a few times a year.
Always check the line before starting any trimming session. If it looks worn out or is breaking frequently, it’s time for a replacement. Regular checks can help maintain your trimmer’s performance.
2. Can I use any type of trimmer line with my Black and Decker trimmer?
No, it’s important to use the type and thickness of the line recommended by Black and Decker for your specific model. Using an incorrect line can cause performance issues or even damage the trimmer.
Consult your user manual to find out which type of trimmer line is best suited for your model. There are different lines designed for various tasks, such as light trimming versus heavy-duty weed cutting.
3. What safety precautions should I take while using an electric trimmer?
Always wear protective gear, such as safety glasses and gloves, when operating an electric trimmer. Ensure that children and pets are kept at a safe distance from your work area.
Before starting, inspect your equipment for any signs of damage or wear and tear. Unplug the device when not in use to avoid accidental starts. Safety measures are crucial for effective usage without accidents.
4. Why is my Black and Decker electric trimmer not cutting efficiently?
If your trimmer isn’t cutting efficiently, it might be due to a worn-out or improperly installed line. Make sure the spool cover is secure and that you’re using the correct thickness of the line.
Another reason could be debris blocking parts of the unit or dulling its cutting edges. Regular maintenance checks can identify these issues early on, ensuring consistent performance from your tools.
5. How do I maintain my electric trimmer during off-season storage?
To properly store your electric trimmer during off-season months, clean all dirt and debris from its surface first using a damp cloth or brush if needed . Next , wind up any remaining trimming lines neatly onto their spools ,and then remove those altogether if keeping them intact while unused isn’t preferred .
Finally unplug completely (if corded) & keep stored indoors avoiding extremely hot/rainy locations where outer body wears down quicker than anticipated . Timely regularity practiced equals long-lasting durability alongside no added future replacements combined seamlessly overall!
Conclusion
Replacing the line on your Black and Decker electric trimmer is a straightforward process with the right tools and guidelines. Regular maintenance can significantly extend the lifespan of your equipment. Always prioritize safety to ensure smooth and hassle-free operation.
Understanding the steps involved in line replacement helps maintain efficiency and performance. Proper preparation and ongoing care make a world of difference. With these tips, you’re well-equipped to keep your lawn in pristine condition.

I’m Patricia D. Johnson, an affiliate marketer and blogger specializing in trimmers and grooming tools. I create honest reviews, buying guides, and practical tips to help readers choose the right trimmer for their needs. With a focus on quality, performance, and value, I simplify the decision-making process so consumers can make confident purchases.