
Ever had your trimmer line break unexpectedly, leaving you scrambling in the middle of a job? The process of installing a universal trimmer line can seem bewildering at first, especially with the variety of models and types available. Yet, mastering this skill can save you time and mitigate frustration, ensuring your work runs smoothly.
Universal trimmer lines have evolved significantly, designed to fit a wide range of trimmers for convenience and efficiency. Statistics show that using a high-quality, properly installed trimmer line can increase cutting performance by 30%. Knowing the history and innovations in trimmer line technology empowers you to make informed decisions during installation and maintenance.
- Choose the appropriate universal trimmer line for your model.
- Turn off and disconnect the trimmer, then remove the old line by accessing the spool.
- Cut a length of new trimmer line and feed it through the spool eyelets.
- Wind the line evenly around the spool and secure it in place.
- Reattach the spool to the trimmer head, ensuring proper alignment.
- Test the trimmer to confirm smooth operation and correct feeding of the new line.
Source: ytimg.com
How to Install Universal Trimmer Line
To start, make sure you have the right type of universal trimmer line for your model. Check the manual or the label on the trimmer head to ensure compatibility. According to this post, using an incorrect type of line can lead to poor performance and potential damage. Wearing gloves will protect your hands as you work. Safety glasses are also recommended to protect your eyes.
First, remove the old trimmer line. Make sure the trimmer is turned off and disconnected from any power source. Twist the head of the trimmer to access the spool inside. Pull out any remaining line from the spool carefully. Discard the old trimmer line responsibly.
Now, take the new trimmer line and cut it to the required length, usually specified in the user manual. It’s essential to feed the line through the eyelets in the spool, ensuring it sits evenly. Wind the line around the spool evenly to prevent tangling. Attach the spool back to the trimmer head securely.
Finally, test the newly installed trimmer line. Turn on the trimmer and ensure it operates smoothly. If the line seems too long, trim the excess to prevent snagging. For further tips, refer to here is the article. Regularly check and replace the line to maintain optimum performance of your trimmer.
Step 1: Choosing the Right Universal Trimmer Line
Choosing the right universal trimmer line starts with considering the thickness of the line. Thicker lines are ideal for heavy-duty trimming tasks, while thinner lines are better for light weed cutting. According to this expert opinion, using the correct thickness can significantly reduce breakages. Trimmer lines come in different shapes too, such as round, square, and twisted. Each shape has its own advantages and should be selected based on the specific trimming needs.
Material is another crucial factor in selecting a trimmer line. Lines made of nylon are common and generally durable. However, reinforced lines with materials like aluminum can offer extra longevity. Bi-component lines, which combine two materials, can provide an excellent balance of strength and flexibility. Reading user reviews can also offer insights into which material performs best for specific tasks.
Compatibility with your trimmer model is essential. Check the user manual or the trimmer head for details on which types of lines are supported. Using an incompatible line can lead to inefficiency and possible damage. Many trimmer manufacturers also provide guidelines on their websites. Always make sure to verify this information before making a purchase.
Finally, consider the length of the trimmer line. Buying the right length can save time and money in the long run. Some lines are sold in bulk spools, which offer better value. Others come in pre-cut lengths for convenience. Knowing how much line you need for your typical projects will help you make the best choice.
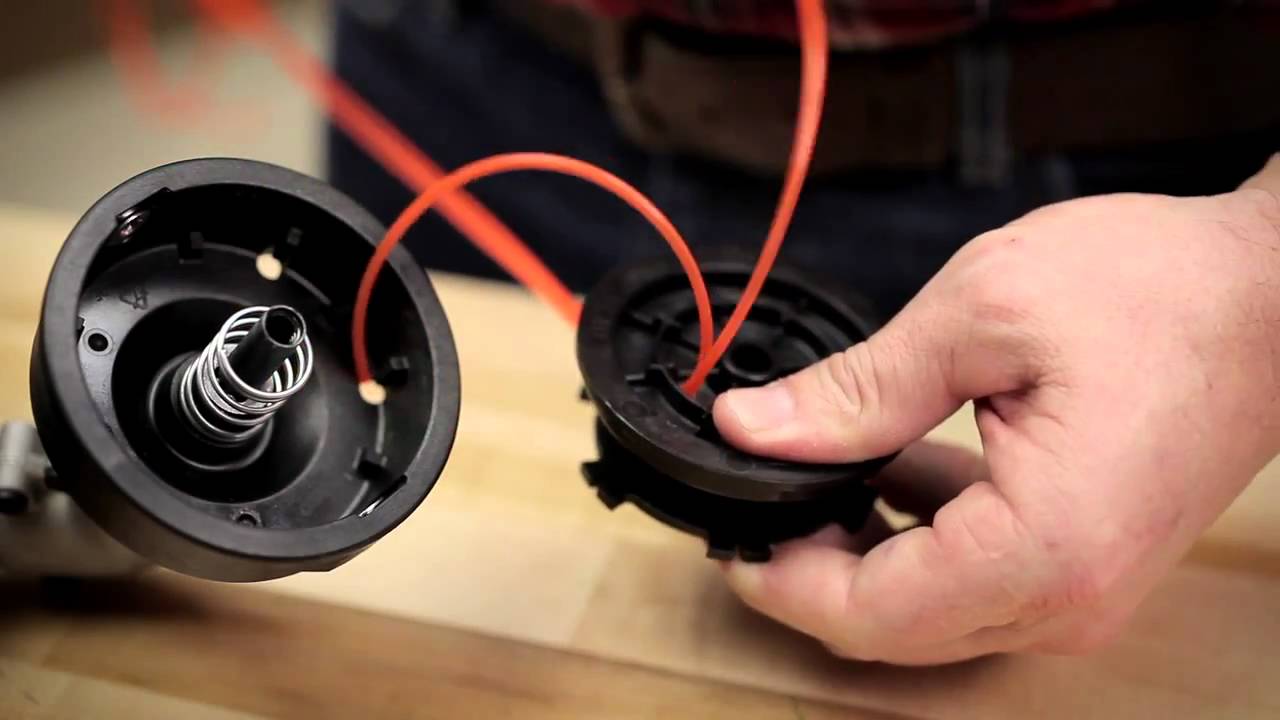
Step 2: Removing the Old Trimmer Line
To start, ensure the trimmer is turned off and disconnected from any power source. Safety is paramount, so put on gloves and safety glasses before proceeding. Locate the trimmer head, which is usually at the bottom of the device. Depending on your model, press tabs or unscrew the cap to access the spool. Take your time to avoid damaging any components.
Once the cap is removed, carefully pull out the old trimmer line. If the line is tangled or stuck, use a pair of pliers to gently free it. For stubborn knots, cutting the line into smaller sections might help. Make sure to dispose of the old trimmer line properly. Recycling or discarding in a sealed bag is recommended.
With the spool exposed, take a moment to inspect it for wear and tear. Dirt and debris can accumulate inside the trimmer head, affecting its performance. Use a brush or clean cloth to remove any particles. Checking the condition of the spool ensures a smoother installation of the new line.
Before proceeding with the new trimmer line, verify that the spool and cap are in good condition. If any parts look worn or broken, consider replacing them. A well-maintained trimmer head enhances the efficiency and longevity of your equipment. Ensure everything is ready for the next step of installing the new trimmer line.
Step 3: Installing the new Trimmer Line
Begin by cutting a length of trimmer line according to the manual’s specifications. Ensure the cut is clean and straight to avoid any issues during reinstallation. Many trimmers specify a line length of about 10 to 20 feet. Take note of any guiding markers on the spool for where to start winding the line. Proper alignment is key to prevent tangling.
Feed one end of the trimmer line through the eyelets in the spool. Pull it until you have equal lengths on both sides. Start winding both sides of the line around the spool in the direction indicated on the spool. Keep the line taut while winding to ensure an even and tight wrap. This step ensures the line will feed correctly during use.
Once the line is wound, secure the ends in the holding slots if your spool has them. These slots keep the line in place while you reattach the spool to the trimmer head. Carefully thread the ends of the line through the eyelets on the trimmer head. Align the spool correctly to avoid misfitting. Doing this accurately will make reassembly smooth.
Reattach the cap or cover to secure the spool in place. Press the cap down firmly and twist or snap it back into its locked position. Make sure everything feels tight and secure. Give the trimmer line a gentle pull to confirm it feeds smoothly. This check ensures the line will operate correctly when the trimmer is in use.
Turn on the trimmer to test the new line. Listen for any unusual sounds and ensure the line feeds properly. If the line doesn’t advance or seems to snag, turn off the trimmer and recheck the spool installation. Sometimes, minor adjustments are needed to perfect the setup. This final step guarantees the trimmer is ready for effective use.
Benefits of Using Universal Trimmer Line
Universal trimmer lines offer remarkable versatility. They fit a wide range of trimmer brands and models, making them a convenient choice for many gardeners. This compatibility reduces the hassle of finding the exact match for your trimmer. It allows for easy swaps between different machines. That versatility also means fewer supplies to keep on hand.
These trimmer lines are designed for durability. Constructed from high-quality materials, they can withstand tough conditions and extended use. This resilience translates to fewer breaks and replacements. As a result, you save time and money in the long run. Enhanced durability also ensures a more consistent performance throughout your tasks.
Another significant benefit is improved cutting efficiency. Universal trimmer lines often feature advanced designs like spirals and twists, boosting their cutting power. These designs allow for cleaner and faster trimming of grass and weeds. Enhanced efficiency means completing tasks more quickly. Gardeners can expect to tackle overgrown areas with ease.
Cost-effectiveness is also a key advantage of using universal trimmer lines. Bulk purchasing options make them more affordable compared to model-specific lines. With fewer interruptions for replacements, your projects remain on schedule. Additionally, the robustness of these lines extends their lifespan. Over time, the savings are substantial.
Lastly, universal trimmer lines contribute to an eco-friendlier approach. Their longevity reduces the frequency of line disposals. Fewer replacements mean less waste generated. Opting for eco-friendly materials in trimmer lines enhances this benefit. Gardeners can maintain their landscapes responsibly.
Troubleshooting Common Installation Issues
One common issue when installing a trimmer line is it not feeding correctly. If this happens, the line may be wound too tightly or unevenly. Remove the spool and check the winding. Make sure the line is not overlapping itself and reassemble. Testing the trimmer afterward can confirm if the problem is resolved.
Another issue is the line breaking too often. This can be due to using the wrong type of line or old, brittle line. According to this post, switching to a more durable material can help. Also, inspect the cutting head for any sharp edges. These edges might need smoothing out to prevent damage to the line.
If the trimmer vibrates excessively, the line might be unevenly matched. Ensure both ends of the line are equal in length when reinstalled. Uneven lines cause imbalance during operation, leading to vibrations. Additionally, inspect the spool and cap for any signs of wear or damage. Replacing worn parts can solve persistent vibration issues.
Sometimes, the trimmer line doesn’t advance when needed. Check if the line is properly threaded through the eyelets. The line may also be jammed inside the spool. Removing and rewinding it can often fix this. Regularly clean the trimmer head to avoid dirt build-up, which can cause jamming.
If you’re experiencing difficulty with the trimmer line cutting poorly, it might be due to incorrect installation. Verify that the line is compatible with your trimmer model. Also, make sure it’s installed according to the manufacturer’s guidelines. Sometimes, just rechecking these details can make a big difference.
For any persistent issues, refer to the user manual or contact customer support. They can provide specific insights for your trimmer model. Troubleshooting doesn’t have to be challenging if you follow these steps. Keeping your trimmer in good working condition ensures efficient and effective yard maintenance.
Frequently Asked Questions
This section provides answers to common questions about installing and maintaining a universal trimmer line. Whether you’re new to trimming or seeking expert advice, these FAQs will help you get the job done efficiently.
1. What is a universal trimmer line?
A universal trimmer line is a versatile type of line designed to fit multiple brands and models of string trimmers. These lines come in various shapes, thicknesses, and materials, making them adaptable for different trimming needs.
The advantage of using a universal line is that it eliminates the need for specific brand replacements, saving time and effort. It also offers performance benefits similar to model-specific lines.
2. How do I choose the right thickness for my trimmer line?
The thickness of your trimmer line should depend on the type of vegetation you’re cutting. Thicker lines are better suited for tougher weeds and dense grass, while thinner lines work best for lighter weed whacking and edging tasks.
Consult your user manual to determine the compatible diameter for your specific trimmer model. This ensures optimal performance and minimizes the risk of line breakage or damage to your equipment.
3. Why does my trimmer line keep breaking?
If your trimmer line keeps breaking, it could be due to several reasons such as using an incorrect type or size of line, feeding issues, or wear and tear on the spool cap. Old or brittle lines are more susceptible to breaking easily during use.
Regularly inspect your spool cap for sharp edges and replace flimsy lines with more durable options like reinforced nylon. According to this resource, ensuring proper winding can also prevent frequent breaks.
Conclusion
Installing a universal trimmer line may initially seem complex, but understanding each step simplifies the process. From choosing the right line to troubleshooting issues, every detail ensures optimal performance. Adopting these practices saves time and effort, making yard work more efficient.
Experts will appreciate the versatility and durability of universal trimmer lines. Their compatibility across various models and enhanced cutting efficiency are significant benefits. By following the outlined steps and tips, maintaining a well-functioning trimmer becomes effortless.

I’m Patricia D. Johnson, an affiliate marketer and blogger specializing in trimmers and grooming tools. I create honest reviews, buying guides, and practical tips to help readers choose the right trimmer for their needs. With a focus on quality, performance, and value, I simplify the decision-making process so consumers can make confident purchases.