
Trimmer heads may seem like minor components, but did you know they play a crucial role in maintaining your equipment’s efficiency? For professionals devoted to impeccable landscaping, installing a trimmer head is almost an art form. A well-installed trimmer head not only extends the life of your equipment but also ensures superior performance.
Historically, the evolution of trimmer heads has brought us from rudimentary designs to highly sophisticated mechanisms, each aimed at optimizing ease of use and durability. Recent data suggests that proper installation can increase the efficiency of commercial-grade trimmers by up to 30%. Mastering the installation process is, therefore, not just a matter of convenience but a critical factor in achieving peak operational standards.
- Gather necessary tools: wrench, screwdriver, and new trimmer head.
- Turn off and unplug the trimmer for safety.
- Lay the trimmer on a flat surface and locate the old head.
- Use a wrench to remove the old trimmer head.
- Align and screw on the new trimmer head clockwise.
- Tighten screws or bolts securely but avoid over-tightening.
- Test the trimmer briefly to ensure proper installation and secure fit.
Source: ytimg.com
How to Install Trimmer Head
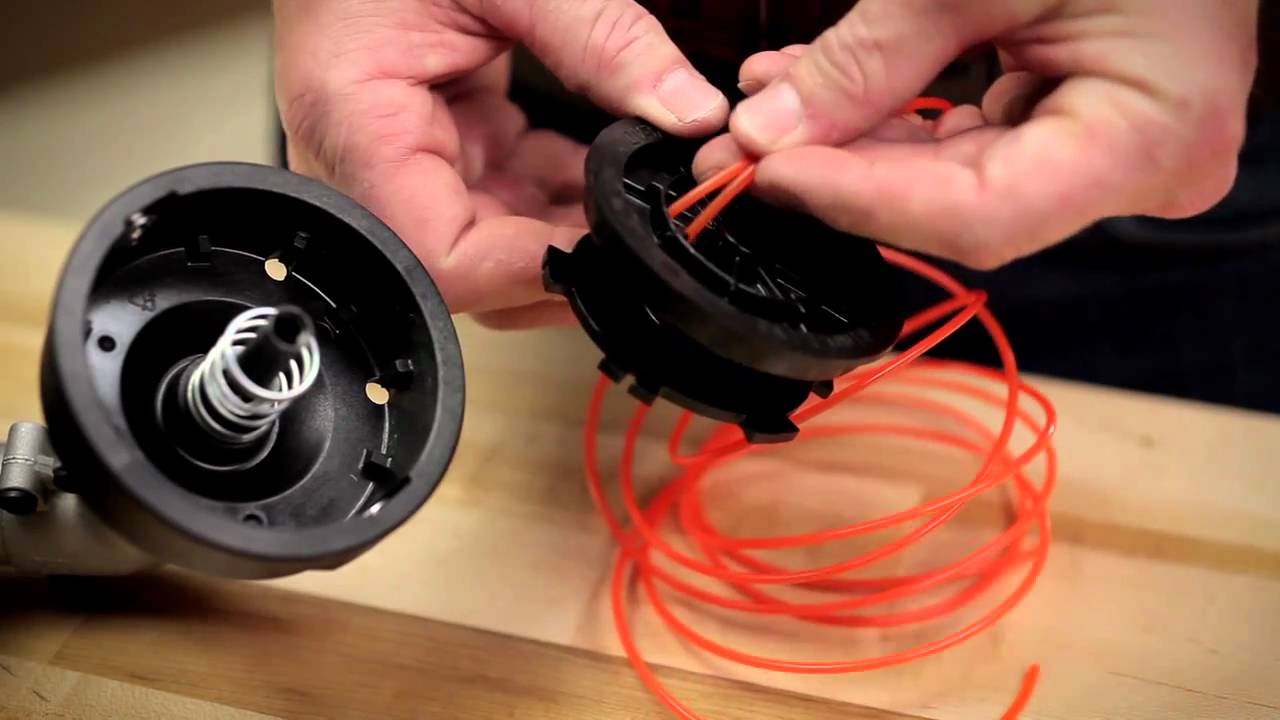
Installing a trimmer head starts with gathering the right tools. You’ll need a wrench, screwdriver, and a new trimmer head. Ensure your trimmer is powered off to avoid any accidents. Lay it on a flat surface for stability. According to this post, it’s crucial to follow specific steps to maintain safety and efficiency.
Next, prepare your trimmer by placing it on a flat, stable surface. Locate the trimmer’s head and find the area where it attaches to the shaft. Use a wrench to loosen and remove the current trimmer head. Be careful with any springs or small parts. Keep them safe as you might need them for the new head.
Now it’s time to attach the new trimmer head. Align it properly with the shaft and twist it to secure it in place. Make sure it’s tightly attached to avoid any wobbling. Tighten screws using the wrench if required. Here is the post that provides more detailed steps on a walk-behind trimmer head installation here is the article.
Finally, double-check everything. Ensure all parts are securely tightened. Turn on the trimmer briefly to see if the head spins correctly. If it vibrates or feels loose, tighten it again. Proper installation extends the life of your trimmer and ensures smooth operation.
Step 1: Gather Necessary Tools
Before you start, make sure you have all the tools you need. These typically include a wrench, screwdriver, and the new trimmer head. It’s essential to have everything ready to avoid interruptions. Lay them out in an organized manner. This preparation can save you a lot of time.
In addition to these tools, safety gear is also important. Wear gloves to protect your hands. Safety glasses will keep debris out of your eyes. According to this expert opinion, having the right tools and safety gear significantly reduces risks.
Here are the basic tools you need:
- Wrench
- Screwdriver
- New Trimmer Head
- Gloves
- Safety Glasses
Having these on hand can streamline the process.
Once you have everything, place your tools within easy reach. This will make the installation process smoother. Now you’re ready to move on to the next steps. Being prepared helps ensure a seamless and efficient trimmer head installation.
Step 2: Prepare The Trimmer
First, ensure your trimmer is turned off and disconnected from any power source. This step is crucial for safety. Lay the trimmer on a flat surface for stability. A clean workspace helps you avoid losing small parts. Make sure the area is well-lit to see all components clearly.
Next, you’ll need to clean the trimmer head area. Remove any grass or debris. This ensures that the new trimmer head will fit properly. Use a brush or cloth to wipe away any dirt. A clean surface makes the installation smoother.
Here are the key preparation steps:
- Turn off the trimmer
- Disconnect the power source
- Lay it on a flat surface
- Clean the trimmer head area
- Keep the workspace well-lit
Following these steps ensures a safer and more efficient process.
Now you’re ready to move on. A well-prepared trimmer makes the next steps easier. Double-check everything to ensure you haven’t missed anything. This will save you time and effort later. You’re now all set to remove the old trimmer head.
Step 3: Remove The Old Trimmer Head
Removing the old trimmer head starts with understanding its locking mechanism. Most trimmer heads are either screw-on or have a button release system. Check your trimmer’s manual to identify the type you have. This helps you avoid any damage. Make sure to wear gloves for safety.
If your trimmer head is screw-on, you’ll need to twist it off. Hold the trimmer steady and rotate the head counterclockwise. It might be tight, so use a wrench if necessary. Be careful not to force it too much. This could strip the threads.
For trimmers with a button-release system, find the release button. It’s usually located near the base of the trimmer head. Press the button and pull the head straight off. This method is quicker and doesn’t require additional tools. Remember to keep all parts in a safe place.
Here’s a quick reference:
- Identify the locking mechanism
- For screw-on heads, twist counterclockwise
- Use a wrench if necessary
- For button-release heads, press button and pull off
- Keep all parts safe
Following these steps ensures a smooth removal process.
Sometimes, the trimmer head might be stuck due to built-up debris. In such cases, clean around the head with a brush. If it still doesn’t budge, a little oil can help loosen it. Be patient and avoid excessive force. Proper removal is key to a successful installation.
Step 4: Attach The New Trimmer Head
Begin by aligning the new trimmer head with the shaft. Make sure the threads match up correctly. This step is crucial for ensuring a secure fit. Hold the trimmer steady to prevent it from moving. Proper alignment makes the attachment process easier.
If your new trimmer head is screw-on, rotate it clockwise. Use your hand to first tighten it. Then, use a wrench to ensure it’s snug but not over-tightened. Be cautious to avoid stripping the threads. A secure fit guarantees smooth operation.
For button-release trimmer heads, align the head and press it onto the shaft. You’ll hear a click sound, indicating it’s securely attached. Make sure to pull lightly on the head to confirm it’s locked in place. No additional tools are needed for this type.
Here’s a quick reference for attaching the new trimmer head:
- Align with the shaft
- For screw-on, rotate clockwise and use a wrench
- For button-release, press until you hear a click
- Ensure a snug fit
- Double-check for secure attachment
This ensures the trimmer head is properly attached and secure.
Finally, turn on the trimmer briefly to check for wobbling. If you notice any imbalance, turn it off and tighten the trimmer head again. Ensuring a proper attachment is key to avoiding future issues. Taking your time now saves stress later.
Step 5: Secure The Trimmer Head
Once the new trimmer head is attached, it’s crucial to secure it properly. This step ensures the head won’t come loose during operation. Begin by tightening any screws or bolts. Use a wrench to make sure they’re firmly in place. Avoid overtightening to prevent damage.
After securing with tools, give the trimmer head a gentle tug. This helps check if it’s securely fastened. If it moves, tighten it some more. Ensuring a firm fit is essential for safe and effective trimming. A well-secured head reduces the risk of accidents.
It’s also a good idea to test the trimmer briefly. Turn it on for a few seconds and observe how the head spins. If everything looks good, you’re all set. If not, turn it off and check the attachment points again. This simple test can save you from future issues.
Here are the steps to secure the trimmer head:
- Tighten screws or bolts with a wrench
- Give the trimmer head a gentle tug
- Test the trimmer briefly
- Observe the head’s spinning
- Recheck attachment points if needed
Following these steps will ensure your trimmer head is securely attached and ready for use.
Finally, store your trimmer properly after securing the head. Keep it in a dry, safe place. Regular maintenance checks can help identify any issues early. This ensures your trimmer remains in top condition. A secure trimmer head allows for efficient and safe operation.
The Importance of Proper Installation
Proper installation of a trimmer head is crucial for several reasons. It ensures the equipment operates efficiently. A poorly installed trimmer head can cause uneven cutting or even damage the machine. Safety is another major reason. An unsecured head can detach during use, posing a serious hazard.
Efficiency is often overlooked but highly important. When the trimmer head is properly installed, it allows the machine to run smoothly. This means you can complete tasks more quickly and with less effort. You’ll save wear and tear on your equipment as well, extending its lifespan. According to this post, a well-installed head also reduces fuel consumption.
Here are key benefits of proper installation:
- Enhanced efficiency
- Improved safety
- Extended equipment lifespan
- Smoother operation
- Reduced fuel consumption
These benefits make taking the time to install the trimmer head correctly well worth it.
A secure trimmer head also improves safety. If the head isn’t tightly fastened, it might fly off while spinning at high speed. This could lead to injuries or property damage. Properly securing the trimmer head minimizes these risks significantly.
Finally, a good installation extends your tool’s lifespan. When parts fit together perfectly, they experience less friction and wear over time. This reduces the likelihood of premature failure and costly repairs. Overall, proper installation is an investment in both performance and longevity.
Common Mistakes to Avoid When Installing Trimmer Head
One common mistake is not aligning the trimmer head properly. Misalignment can lead to wobbling during operation. This not only affects performance but also wears out the trimmer faster. Always double-check the alignment before securing the head. Proper alignment ensures smooth operation.
Another frequent error is over-tightening the screws or bolts. While it’s essential to have a secure fit, applying too much force can strip the threads. This makes it difficult to remove the head later. Use a wrench to tighten, but stop when you feel resistance. Over-tightening can cause long-term damage.
Failing to clean the trimmer head area is also a big mistake. Dirt and debris can prevent the new head from fitting properly. This can result in an unstable attachment. Take a few minutes to clean the area thoroughly. A clean surface ensures a snug fit.
Here are some common mistakes to avoid:
- Misalignment of the trimmer head
- Over-tightening screws or bolts
- Failing to clean the trimmer head area
- Using incompatible parts
- Ignoring safety precautions
Avoiding these mistakes helps ensure a successful installation.
Using incompatible parts is another problem. Make sure your new trimmer head is compatible with your machine. Check the model number and specifications. Using the wrong parts can result in poor performance or even damage. Always verify compatibility before purchase.
Ignoring safety precautions is perhaps the most dangerous mistake. Always turn off and unplug the trimmer before starting. Wear gloves and safety glasses to protect yourself. Following these simple steps can prevent accidents. Safety should always be your top priority.
Tips for Maintaining Your Trimmer Head
Regular cleaning is key to a well-maintained trimmer head. After each use, remove any grass or debris. Use a brush or cloth to clean the head thoroughly. This prevents buildup that can affect performance. A clean trimmer head operates more efficiently.
Inspect the trimmer head for wear and tear. Look for cracks, worn edges, or missing components. Replace any damaged parts immediately. Regular inspection can prevent larger issues down the line. It also ensures your trimmer remains safe to use.
Here are essential maintenance tips:
- Clean after each use
- Inspect for damage regularly
- Keep screws and bolts tight
- Store in a dry place
- Use compatible parts
These tips can extend the life of your trimmer head and keep it running smoothly.
Tighten screws and bolts periodically. Even if initially secure, they can loosen over time. Check them every few uses to ensure they’re still tight. This simple step can prevent accidents. Loose parts can lead to malfunction or even detachment during use.
Always store your trimmer in a dry, safe place. Moisture can cause rust and other damage. Keeping your tools in a proper storage area extends their lifespan. Additionally, use parts and accessories compatible with your model. Using the right parts ensures optimal performance.
Frequently Asked Questions
If you have questions about installing a trimmer head, you’re in the right place. Below are some common queries and their short, informative answers.
1. What tools do I need to install a trimmer head?
You’ll typically need a wrench, screwdriver, and the new trimmer head. Additional safety gear like gloves and safety glasses are also recommended.
A clean workspace ensures you don’t lose any small parts during the installation process. Having everything ready makes the job smoother.
2. How often should I replace the trimmer head?
Trimmer heads should be replaced every season or when you notice significant wear and tear. Regularly inspect your trimmer head for signs of damage or inefficiency.
If it becomes difficult to cut evenly, it’s likely time for a replacement. Keeping a spare trimmer head on hand can help ensure your work isn’t interrupted.
3. Can I use any brand of trimmer head for my machine?
No, always check compatibility between your machine and the new trimmer head. Using the wrong brand can lead to poor performance or even damage your equipment.
Always verify compatibility by checking your user manual or consulting with the manufacturer’s customer service. This precaution saves time and money in the long run.
4. Why is my newly installed trimmer head vibrating excessively?
This could be due to improper alignment or insecure attachment of the trimmer head. Recheck if all screws and bolts are tightly fastened but not over-tightened.
If vibration persists, remove the head and reattach it carefully. Excessive vibration can lead to faster wear and reduced efficiency.
5.What maintenance does a trimmer head require?
Regular cleaning after each use is essential for maintaining a trimmer head’s efficiency. Remove debris and wipe it down thoroughly to prevent buildup that impacts performance.
Tighten screws periodically and inspect for damage regularly to avoid future issues. Proper storage in a dry place will also extend its life span significantly.
Final Thoughts
Installing a trimmer head may seem daunting, but with the right tools and steps, it becomes manageable. A well-fitted trimmer head ensures efficient performance and prolongs the life of your equipment. Always follow safety precautions to avoid any accidents during the process.
Remember, proper installation goes hand-in-hand with regular maintenance. Regularly inspect and clean your trimmer head to keep it in top condition. These simple practices can make a significant difference in achieving optimal performance and longevity for your trimmer.

I’m Patricia D. Johnson, an affiliate marketer and blogger specializing in trimmers and grooming tools. I create honest reviews, buying guides, and practical tips to help readers choose the right trimmer for their needs. With a focus on quality, performance, and value, I simplify the decision-making process so consumers can make confident purchases.