Cutting your own hair at home is a smart way to save money. To get the best haircut, you must know how to put your Wahl clippers together. This guide will show you how to assemble your tool from start to finish.
1. Get Your Tools and Parts Ready
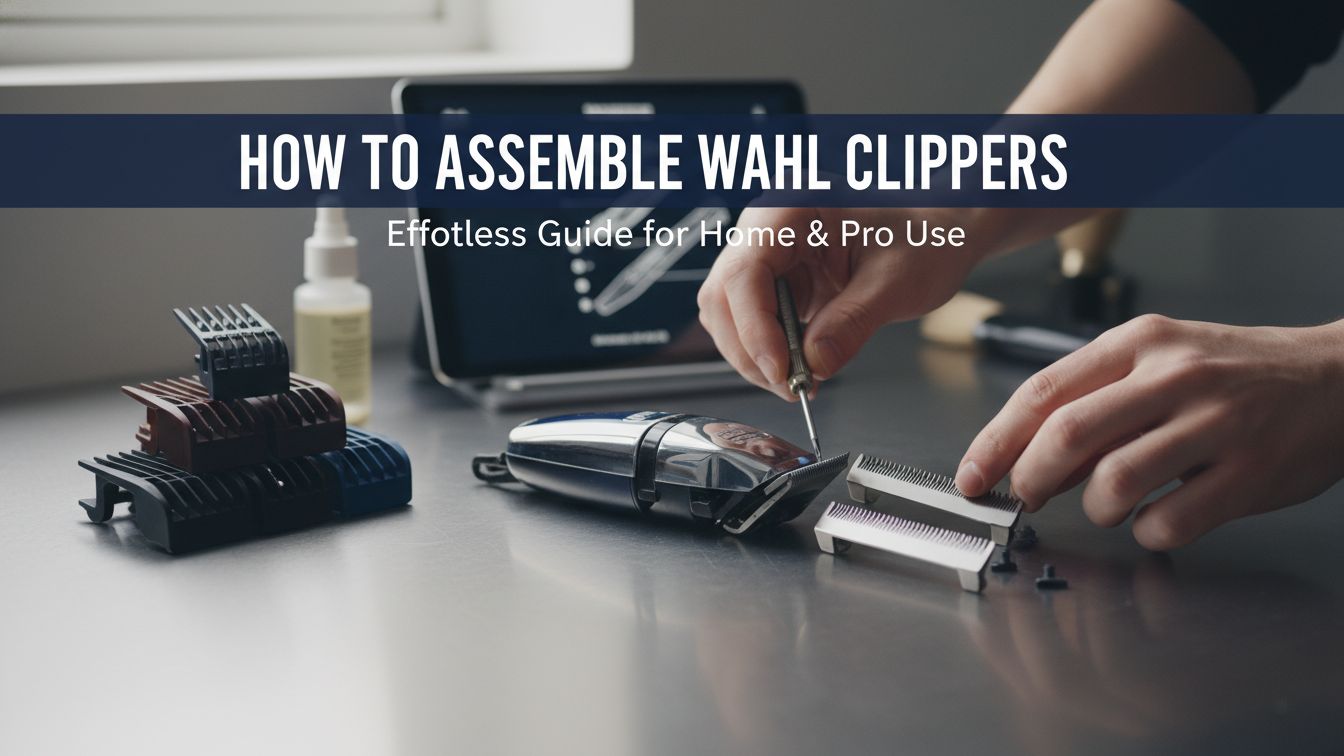
Before you start, you need to make sure you have everything. A Wahl clipper has several small parts. If you miss one, the clipper might not work well or could be unsafe.
First, find a flat, clean table. Put a white towel down so you do not lose any small screws. You will need your clipper body, the two metal blades, and the two small screws. You should also have your clipper oil and a small brush ready.
Having a screwdriver is also a must. Most Wahl clippers use a Phillips-head screwdriver. This is the one that looks like a plus sign (+). Make sure the screwdriver fits the screws perfectly so you do not strip them.

2. Stay Safe While You Work
Safety is the most important thing when you work with tools. Even though clippers are small, they use electricity. They also have very sharp metal edges.
CRITICAL WARNING: Always make sure your clipper is unplugged before you touch the blades. If your clipper has a battery, make sure it is turned off. Never try to assemble your clipper with wet hands.
Keep your fingers away from the sharp teeth of the blades as much as possible. Hold the blades by their flat sides. If you drop a blade, check it for cracks. A broken blade can cut your skin during a haircut.
3. Learn the Parts of Your Clipper
To put the clipper together, you need to know what the parts are called. There are two main blades.
The first is the Large Stationary Blade. This is the big piece of metal that does not move when the clipper is on. It sits against the plastic body of the clipper.
The second is the Small Moving Blade. This is the smaller piece of metal. It moves back and forth very fast to cut the hair.
You also have the Taper Lever. This is the plastic handle on the side of the clipper. It moves the blades closer or further apart. Finally, you have the Power Screw. This is usually on the side and helps the motor run smoothly.
Why Blade Quality Matters
Wahl uses high-carbon steel. This means the blades stay sharp for a long time. However, steel can rust if you do not take care of it. Always look at your blades to make sure they are clean and shiny before you put them on.
4. How the Assembly Process Works
It helps to see the steps in order. Use this chart to understand the flow of the assembly.
graph TD
A[Unplug Clipper] --> B[Clean the Motor Area]
B --> C[Place Small Moving Blade on Drive Finger]
C --> D[Place Large Blade Over Small Blade]
D --> E[Insert and Lightly Turn Screws]
E --> F[Align the Blade Teeth]
F --> G[Tighten Screws Firmly]
G --> H[Add Oil and Test]
5. Putting the Blades on the Clipper
Now it is time to put the pieces together. Follow these steps slowly.
Step 1: Place the Small Blade
Look at the top of the clipper body. You will see a small plastic piece that moves. This is the “drive finger.” Place the small moving blade onto this plastic piece. It should fit snugly. The sharp teeth should point away from the clipper cord.
Step 2: Place the Large Blade
Now, pick up the large blade. Place it over the small blade. The holes for the screws in the large blade should line up with the holes in the clipper body.
Step 3: Start the Screws
Take your two screws. Put them into the holes. Use your fingers to turn them just a little bit.
EXPERT TIP: Do not tighten the screws all the way yet! You need the blades to be a little loose so you can move them into the right spot.

6. How to Line Up the Blades
This is the most important step for a safe haircut. If the blades are not lined up, the clipper might pull your hair or nick your skin. This is called “blade alignment.”
Hold the clipper so you are looking at the side of the blades. The tips of the small moving blade should be about 1/32 of an inch to 1/16 of an inch behind the tips of the large blade.
The small blade must never go past the large blade. If the small blade sticks out further than the large blade, it will cut you.
Check that the blades are straight. The teeth on the left side should match the teeth on the right side. Once they look perfectly straight and the gap is correct, you can tighten the screws with your screwdriver.

7. Understanding the Taper Lever
The taper lever is the small arm on the side of your Wahl clipper. It allows you to change how short the hair is cut without changing the plastic guards.
- Lever Up: The blades are closest together. This gives you the shortest cut.
- Lever Down: The blades are further apart. This gives you a longer cut.
When you assemble your clipper, move the lever up and down. Make sure the large blade stays in place while the small blade moves forward and back smoothly.
8. How to Use Guide Combs
Guide combs are the plastic pieces that snap onto the blades. They help you cut hair to a specific length. Most Wahl sets come with many guards.
To put a guard on, hook the top of the guard over the teeth of the blades. Then, press down on the back of the guard until it clicks into place. It should feel very tight. If the guard is loose, it might fall off while you are cutting hair.
Refer to this table to see which guard you should use:
| Guard Number | Hair Length (Inches) | Hair Length (mm) | Best Use |
|---|---|---|---|
| #1 | 1/8 inch | 3 mm | Very short fades |
| #2 | 1/4 inch | 6 mm | Short buzz cuts |
| #3 | 3/8 inch | 10 mm | Top of the head |
| #4 | 1/2 inch | 13 mm | Longer styles |
| #6 | 3/4 inch | 19 mm | Blending long hair |
| #8 | 1 inch | 25 mm | Keeping hair long |
9. Caring for Your Assembled Clipper
Once your clipper is put together, you must keep it clean. Hair and oil can build up inside. This makes the motor work too hard.
After every haircut, use your small brush to sweep away the hair. Then, use Wahl Clipper Oil. Turn the clipper on. Put three drops of oil across the teeth of the blades. Put one drop on each back corner of the blades.
Let the clipper run for twenty seconds. This helps the oil spread to every part of the metal. Wipe off any extra oil with a clean cloth. This keeps the blades from getting hot and prevents rust.
FAQ: Common Assembly Questions
1. Why is my clipper making a loud “clacking” noise?
This usually means the power screw on the side needs a turn. Use your screwdriver to turn the screw clockwise until the noise stops. If it is too quiet and the blades do not move well, turn it back a little bit.
2. Can I use any oil on my blades?
No. You should only use hair clipper oil. Other oils, like motor oil or vegetable oil, are too thick. They will gum up the blades and ruin the motor.
3. How often should I take the blades off to clean them?
If you use your clippers at home, you should deep clean them once every few months. If you see hair stuck between the two metal blades that the brush cannot reach, it is time to take them apart.
4. What if my blades are rusty?
If the rust is just a small spot, you can clean it with a scrub pad and oil. If the rust is on the teeth, you should buy new blades. Rusty teeth will pull your hair and hurt.
Conclusion
Assembling your Wahl clipper is a simple task once you know the steps. By lining up the blades carefully and keeping them oiled, your clipper will last for many years. Remember to always keep the small blade slightly behind the large blade for safety.
Now that your clipper is ready, you can start your haircut with confidence! Check your blades one last time, pick your guide comb, and enjoy your fresh look.
Ready to start? Pick up your #2 guard and try a simple trim today!

I’m Patricia D. Johnson, an affiliate marketer and blogger specializing in trimmers and grooming tools. I create honest reviews, buying guides, and practical tips to help readers choose the right trimmer for their needs. With a focus on quality, performance, and value, I simplify the decision-making process so consumers can make confident purchases.