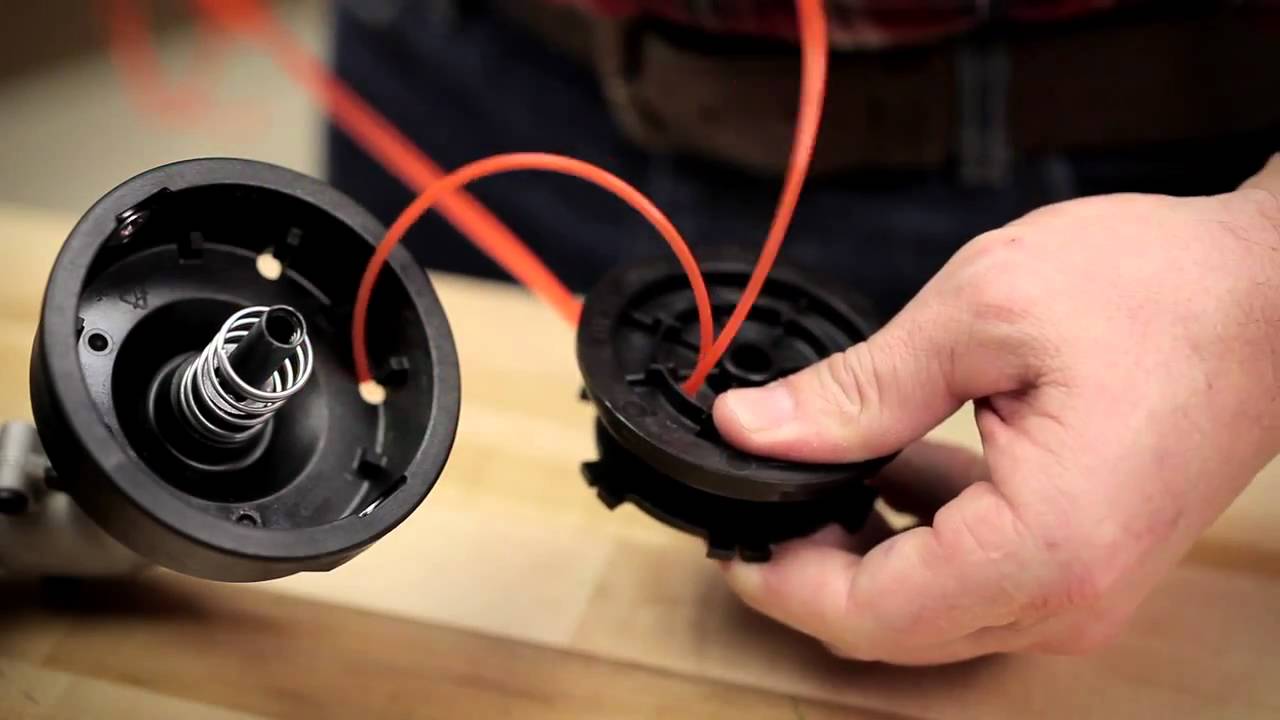
Ever wondered why your trimmer line seems to vanish halfway through a job? A common frustration among even the most seasoned landscapers is figuring out how to effectively feed a trimmer line. It might seem like an endless challenge, but understanding the technique can turn this daunting task into a quick and seamless process.
The technique for feeding a trimmer line has evolved over the years. Early models required manual winding, which was tedious and often led to uneven distribution. Nowadays, advancements like pre-wound spools and easy-load systems have made this process more efficient, reducing downtime and enhancing productivity. Experts find that using a properly fed trimmer line increases the lifespan of the line by up to 20%, making their work more precise and cost-effective.
- Turn off and unplug the trimmer.
- Remove the spool cap by pressing the tabs.
- Select and cut the correct type and length of trimmer line.
- Insert one end into the starter hole on the spool, winding in the indicated direction.
- Securely snap the line through holding slots, leaving about six inches loose.
- Reassemble the spool into the trimmer, ensuring proper alignment.
- Replace and secure the cap, then test functionality by gently pulling on loose ends.
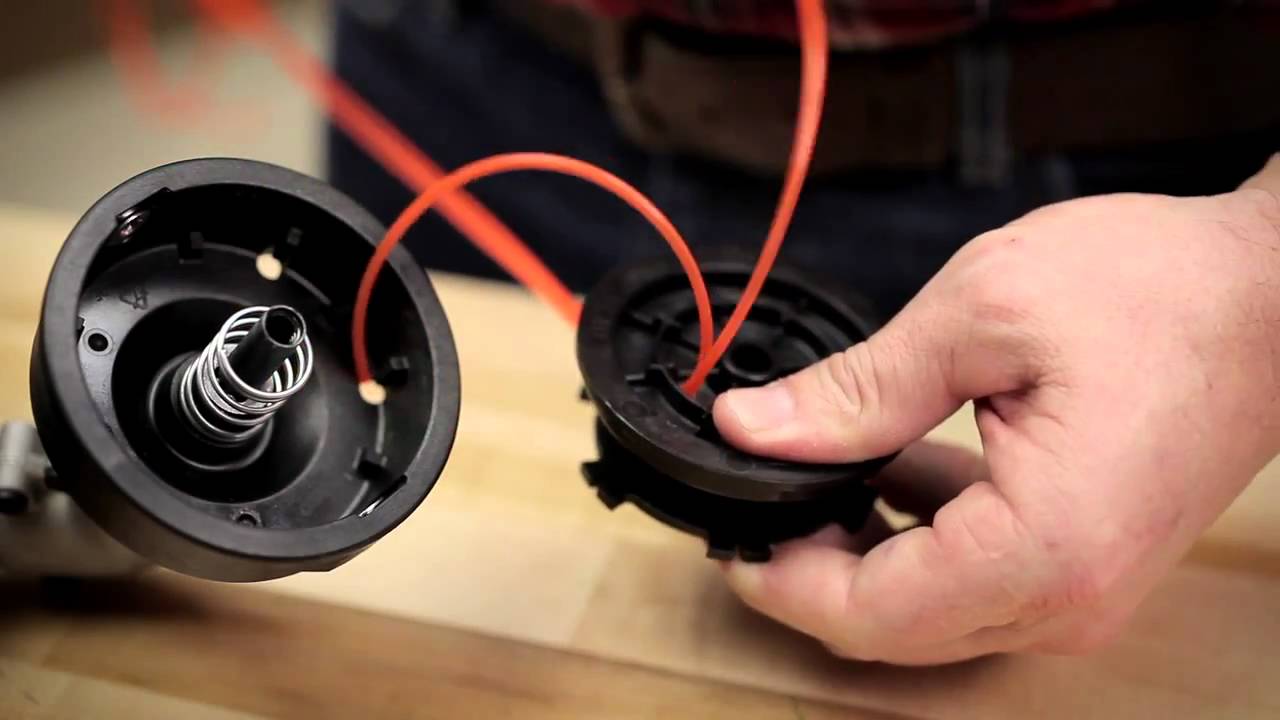
How to Feed a Trimmer Line
Feeding a trimmer line might seem daunting, but following a few steps makes the task manageable. First, ensure your trimmer is powered off and unplugged to avoid accidents. Remove the spool cap by pressing the tabs on the sides. Carefully take out the empty spool, keeping an eye on how it is positioned. This will help when you need to rethread the new line.
Next, select the correct type and length of trimmer line for your device. Different trimmers require specific thicknesses and lengths, which are usually listed in the owner’s manual. According to this post, using a mismatched line can result in poor performance or even damage to your trimmer. Prepare the new line by cutting it to the appropriate length.
To feed the line into the trimmer, find the starter hole on the spool and insert one end of the line. Begin wrapping the trimmer line evenly around the spool in the direction indicated by the arrow. It’s crucial to keep the wraps close and tight to prevent tangling. Leave about six inches of line loose, then snap the line through the holding slots on the spool.
Reassemble the spool into the trimmer and replace the cap securely. Gently pull on the loose ends to make sure the line advances freely. Power up your trimmer to test its functionality. If done correctly, you should see a smoother operation and better cutting performance. For further reading on related tools, here’s the article detailing where to buy specific brands of trimmers.
Step 1: Prep Your Trimmer for Line Feeding
The first step in preparing your trimmer is ensuring it is turned off and unplugged. Safety is paramount, and you must verify that there is no power source connected. Lay the trimmer on a flat surface for better stability. This will make it easier to access the parts that need attention. Don’t rush; take your time to do it safely.
Next, locate the spool cap by examining the trimmer head. Press the tabs on the sides of the cap to release it. Gently remove the cap and set it aside. Look at how the old line is positioned on the spool. This will guide you when you insert the new line.
Clean the trimmer head and spool before adding the new line. This prevents dirt and debris from interfering with the trimmer’s functionality. Use a brush or soft cloth to wipe everything down. According to this expert opinion, a clean spool ensures smoother operation. Make sure to examine the spool for any damages.
Verify you have the correct type and length of trimmer line. Different trimmers may require different line types. Check your owner’s manual for specifics. Having the right line prepared will streamline the next steps. This can save time and ensure your trimmer functions optimally.
Step 2: Choose the Right Trimmer Line
Choosing the correct trimmer line is crucial for optimal performance. Different trimmers require different types and thicknesses of lines. Always refer to your owner’s manual to see the recommended specifications. Generally, thicker lines are better for tough, overgrown areas. Thinner lines, on the other hand, work well for light grass and near delicate plants.
Trimmer lines come in various shapes, such as round, square, and twisted. Round lines are the most common and versatile but may not cut as cleanly as other shapes. Square and star-shaped lines offer a sharper cut, ideal for thicker grass. Some premium lines are designed to reduce noise. Your specific needs will determine the best shape for your trimmer.
Consider the material of the trimmer line as well. Basic nylon lines are economical but wear out faster. Lines with added materials like aluminum or synthetic polymers are more durable. These reinforced lines can handle rougher terrains better. They also tend to last longer, saving you the hassle of frequent replacements.
Don’t overlook branded options available in stores and online. Some trimmers perform best with lines made by the same manufacturer. This ensures compatibility and efficiency. If you’re unsure, stick to the recommendations in your trimmer’s user guide. The right trimmer line is essential for the best results.
Step 3: Feed the Line through Your Trimmer
Feeding the line through your trimmer is the next crucial step. Start by locating the starter hole on the spool. Insert one end of the line into the hole and begin winding it around the spool. Follow the direction indicated by the arrows on the spool. Keep the line tight and even to avoid tangling.
Continue wrapping the line until you have about six inches left. Snap the line through the holding slots on the spool to keep it secure. Make sure the line is not too loose or too tight. Otherwise, it can unspool during operation. Proper tension ensures smooth action.
Next, reassemble the trimmer head. Place the spool back into the trimmer and align it properly. Fit the spool cap back on, pressing it until it clicks into place. Ensure that the loose ends of the line stick out through the eyelets on the trimmer head.
Gently pull on the loose ends to ensure that the line feeds through without resistance. If there’s any snag, you may need to open the cap and adjust the line again. Turn on the trimmer briefly to check its functionality. Properly fed trimmer lines should result in smooth and efficient trimming.
If you find issues, consult troubleshooting guides or the user manual. Sometimes, simple adjustments can fix common problems like line breaks or jams. Do not hesitate to seek professional help if needed. The goal is to ensure the trimmer works at its best.
Benefits of Proper Trimmer Line Feeding
Proper trimmer line feeding is essential for efficient trimming. When the line is fed correctly, it offers smoother cutting performance. This reduces the time spent on each trimming session. Less time trimming means more time for other important tasks. Proper feeding also minimizes line breakage.
A well-fed trimmer line ensures even wear. Uneven wear can cause the line to break more frequently. This means fewer interruptions during your work. You don’t have to stop frequently to replace or adjust the line. This keeps your workflow smooth and uninterrupted.
Another significant benefit is extending the lifespan of your trimmer. Correctly feeding the line reduces stress on the motor and other parts. This means your trimmer will last longer. Over time, this can save you money on repairs and replacements. Proper maintenance enhances durability.
Proper line feeding also improves the quality of your trimming. It allows for more precise cuts, especially around delicate plants and edges. This results in a cleaner, more professional-looking yard. Your lawn will look well-kept and tidy. The overall aesthetic appeal is greatly enhanced.
Finally, maintaining your trimmer line correctly contributes to safety. A malfunctioning trimmer can be hazardous. Proper line feeding ensures that the trimmer operates smoothly. This reduces the risk of accidents. Safety should never be compromised.
Common Mistakes to Avoid While Feeding a Trimmer Line
One common mistake is using the wrong type of line. Not all trimmer lines are created equal, and using the incorrect type can cause issues. Always check your trimmer’s manual to know the appropriate size and type. Using a too-thick or too-thin line can affect performance. It can also lead to frequent line breaks.
Improperly winding the line on the spool is another frequent error. Wrap the line in the direction indicated by the arrows on the spool. Failing to do so can result in tangling and uneven line distribution. This disrupts the trimming process and causes stress on the trimmer. Follow the manufacturer’s instructions for best results.
Many people forget to clean the trimmer head before feeding the new line. Dirt and debris can cause the line to misfeed. Clean the trimmer head with a brush or cloth before inserting a new line. This ensures smooth operation. A clean spool helps in feeding the line effectively.
Incorrect tension of the line is another mistake to avoid. The line should not be too tight or too loose. Adjust it to the right tension to avoid problems. Refer to your manual for guidance if unsure. Proper tension ensures the line feeds out smoothly during operation.
Ignoring signs of wear and tear can also be problematic. Inspect your trimmer for any damaged parts before feeding a new line. Worn-out components can affect performance. Replace any damaged parts to maintain efficiency. This action also prolongs the lifespan of your trimmer.
Lastly, not following the correct assembly process can lead to issues. Ensure the spool and cap are securely in place after feeding the line. Loose parts can cause malfunction. Tighten everything as per the instructions. This guarantees smooth and efficient trimming.
Frequently Asked Questions
When dealing with trimmer maintenance and usage, there are some common questions people often have. Here are answers to frequently asked questions that can help both beginners and experts.
1. How do I know when to replace the trimmer line?
You should replace the trimmer line when it becomes too short or starts breaking frequently. Frequent breaks mean the line has become brittle, reducing its effectiveness. Examine the line for fraying or thinning; these signs indicate it’s time for a new one.
A thicker diameter might be necessary if your existing line easily wears out on dense vegetation. Keeping an eye on the strength of your cutting performance will guide you in making timely replacements, ensuring efficiency during trimming tasks.
2. What types of trimmer lines are available?
Trimmer lines come in various shapes and materials, including round, twisted, square, and multi-sided lines. Round lines are versatile but may not cut as cleanly as other shapes. Twisted lines offer reduced noise and sharper cuts.
Materials range from standard nylon to reinforced options like copolymer or aluminum-infused lines for enhanced durability. Understanding these types helps you choose the best option tailored to your yard’s needs.
3. Why does my trimmer line keep breaking?
Your trimmer line may keep breaking due to various reasons like using an incorrect line type or improper installation. If you’re using a thinner line for heavy-duty trimming, it won’t last long. Another reason could be accidental contact with hard surfaces like stones or concrete.
Solved by choosing the right trimmer line and carefully following installation instructions can alleviate this issue effectively. Proper maintenance is also crucial; ensure that all components function properly to avoid unnecessary strain on the trimmer line.
4. Can I use any brand of trimmer line with my trimmer?
Not all brands of trimmer lines are universally compatible with every model of the string trimmers. It’s best to adhere to recommendations in your owner’s manual for optimal performance and longevity.
If uncertain about compatibility, specialized stores and online resources often have precise guidelines for selecting appropriate brands that work well with your specific equipment model—ensuring better efficiency overall.
5. How do I store my extra trimmer lines during off-seasons?
Proper storage extends the lifespan of your extra trimmer lines greatly; keeping them in a cool, dry environment prevents deterioration over time due to excessive heat or moisture exposure influences negatively otherwise
.
Stacking them loosely allows air circulation while stashed away neatly ensures no bending/kinking occurs—preserving their effectiveness until next use perfectly after off-seasons pass successfully.
);}
Conclusion
Mastering the steps to feed a trimmer line effectively enhances both performance and longevity of your trimming tool. Avoiding common mistakes ensures you get the best results every time. These practices simplify maintenance and boost efficiency, making yard work less of a chore and more of a breeze.
By choosing the right line and following proper procedures, you can achieve a cleaner, more professional trim. Expert advice from trusted sources adds to your knowledge base, helping you make informed decisions. In the long run, proper trimmer care saves time, money, and effort, allowing for optimal trimming performance.

I’m Patricia D. Johnson, an affiliate marketer and blogger specializing in trimmers and grooming tools. I create honest reviews, buying guides, and practical tips to help readers choose the right trimmer for their needs. With a focus on quality, performance, and value, I simplify the decision-making process so consumers can make confident purchases.