
Prepping the trimmer line is the next step in the ‘how to put string in weed trimmer?’ process. The replacement string or trimmer line should be of the correct diameter specified in the trimmer’s manual. This maintains optimal performance.
Stretch out a length of the line (15-25 feet typically). It is best to use a pre-wound spool as it saves time and reduces the chances of line jamming. If you are winding the line yourself, be careful to avoid any twists or overlaps.
If the line is too inflexible to handle, soak it in water for 24 hours before threading it onto the spool. This will make the line more pliable and reduce the chances of breaking.
Selecting quality line material also plays a crucial role in longevity and efficiency of trimming.
Step 4: Winding the Trimmer Line
Now that your line is ready, it’s time to wind it onto the spool. Notice the direction of the arrow on the spool; the trimmer line should be wound in this direction. Following the correct direction is crucial for the functionality of the trimmer.
If your trimmer uses a dual line, find the middle of the string, insert into the divider on the spool, and start winding both ends in the same direction.
Keep tension on the line as you wind to ensure it’s wound tightly. An improperly wound spool can lead to line feeding issues and will impact the performance of your trimmer.
Remember, precision in this step is crucial. Improper winding might result in jamming of the line and decreased efficiency of trimmer.
Step 5: Reassembling the Weed Trimmer Head
After the line is wound onto the spool, thread it through the eyelets or line exit holes of the spool housing. Ensure that you leave a sufficient amount of the line outside the trimmer head while avoiding any tangles.
Next, place the wound spool back into the housing. Make sure it sits properly inside and does not displace the spring. Once the spool is in, thread the end of the line through the holes on the housing and to the outside.
Finally, replace the cover on top of the head. Ensure it is firmly screwed onto the head, and the line is not jammed or hanging out improperly. Start the trimmer and check for automatic line feeding.
Reassembling the trimmer correctly ensures that the line feeds properly while trimming and makes the job of landscaping much easier and efficient.
Knowing how to put string in weed trimmer also gives you the confidence of managing your own tool’s maintenance, saving you time and extra expenses. Enjoy the satisfaction that outdoor care brings, from perfectly trimmed fences to evenly cut grass, all achieved with a perfectly strung weed trimmer.
 Source: wikimedia.org
Frequently Asked Questions
Navigating the specifics of lawn care equipment can be tricky – especially when it comes to fine-tuning the details, such as installing a trimmer line on a weed eater. Here are some commonly asked questions to help you understand this process.
1. What type of string should I use in my weed trimmer?
The type of string or line you should use in your weed trimmer depends on several factors, including the trimmer’s design and the nature of the work. In general, most residential trimmers use a line that’s 0.065 – 0.085 inches in diameter. Commercial-grade gas weed trimmers can handle lines as thick as 0.095 inches.
Keep in mind that thicker lines are more effective for thicker and sturdier vegetation. Make sure you refer to your trimmer’s user manual, as it will specify the appropriate string line for your model.
2. How often do I need to replace the trimmer string?
The frequency of trimmer string replacement relies on how often and heavily you use your weed trimmer. Normally, you’d need a new string after several uses if you’re maintaining a typical suburban lawn. For those using weed trimmers to tame substantial vegetation regularly, string replacement may need to be more frequent.
Always check for signs such as weakened cutting ability or a trimmer line that frequently breaks or snaps. These are the indications that it’s time to replace the string line.
3. Is it difficult to put the string in the weed trimmer?
Installing a string in your weed trimmer can seem daunting at first, but once you get the hang of it, it becomes considerably simpler. The key is to follow the instructions provided in your product’s user manual since the procedure may vary slightly depending on the model of your weed trimmer.
Generally, it involves removing the old string, cutting a new piece of string of an appropriate length, and then winding it onto the trimmer’s spool. Ensure that you wind it in the direction indicated on the spool.
4. Can I use a different brand of string in my weed trimmer?
You can use a different brand of string in your weed trimmer, provided it falls within the diameter range that your specific model can accommodate. There’s no obligation to stick to the same brand as your trimmer. However, do note that the trimmer line’s quality can affect its cutting ability and durability.
As some brands may offer superior product lines, choose wisely. Again, always refer to the user’s manual for guidance on string line specifications for your trimmer.
5. How can I prevent my trimmer string from breaking?
Trimmer string breakage largely depends on the kind of work you’re doing and the quality of the string itself. High-quality lines are less likely to break. Even so, heavy-duty jobs such as cutting thick or woody vegetation can still cause breakage or wear and tear.
To lessen the likelihood of breakage, always ensure that you’re using the right size and type of string for the job. Avoid hitting hard objects, such as rocks or fence posts, as this may cause the string to snap. Regular maintenance and correct usage of your weed trimmer can significantly prolong the lifespan of the string line.
How to Change the Line | Weed Eater String | Replace Weed Wacker [2021]
So, to summarize our talk about placing a string in a weed trimmer, it’s fundamental to know your trimmer specifications first. It’s crucial to purchase the suitable string type and size for your trimmer. Moreover, remember to disengage the trimmer by switching it off and disconnecting the spark plug before starting the process.
Following that, open up the trimmer head, take out the old string spool, and replace it with the new one. Wind the string around the spool in the direction indicated, and be sure it’s tight and neat. When reassembling the trimmer head, ensure the string feeds out properly. With these simple steps, you can easily put string in your weed trimmer and maintain your garden effectively.
Place your weed trimmer on a flat surface ensuring stability. It’s best to work outdoors or in well-ventilated areas. Don’t forget to wear protective clothing, including gloves and safety glasses, to protect you during the process.
Remember, adherence to these safety measures is vital, not only for your personal well-being but also for the efficient functionality of your weed trimmer. It prevents potential damages that may occur to the trimmer.
Your readiness to replace the trimmer string is not just about getting the string into the trimmer but also about your safety and the longevity of your tool.
Step 2: Removing the Spool
Identify the shape and structure of the cutting head of your weed trimmer. Some models have a simple bump knob that you can turn counterclockwise to open, while others might require tools to unscrew and remove the head.
After opening the head, remove the spool from inside the trimmer. It’s important to note the orientation as it needs to be placed back in the same manner. The spool is usually the part that holds the string.
Inspect the inner part of the weed trimmer for any dirt or grass clippings. Cleaning the debris is important to ensure the smooth operation of the trimmer. A brush or an air canister can be used to clean the inner part.
This step is crucial as it not only assists in putting a new string but also provides a chance to do a minor cleanup and maintenance of your device.
Step 3: Preparing the Trimmer Line
Prepping the trimmer line is the next step in the ‘how to put string in weed trimmer?’ process. The replacement string or trimmer line should be of the correct diameter specified in the trimmer’s manual. This maintains optimal performance.
Stretch out a length of the line (15-25 feet typically). It is best to use a pre-wound spool as it saves time and reduces the chances of line jamming. If you are winding the line yourself, be careful to avoid any twists or overlaps.
If the line is too inflexible to handle, soak it in water for 24 hours before threading it onto the spool. This will make the line more pliable and reduce the chances of breaking.
Selecting quality line material also plays a crucial role in longevity and efficiency of trimming.
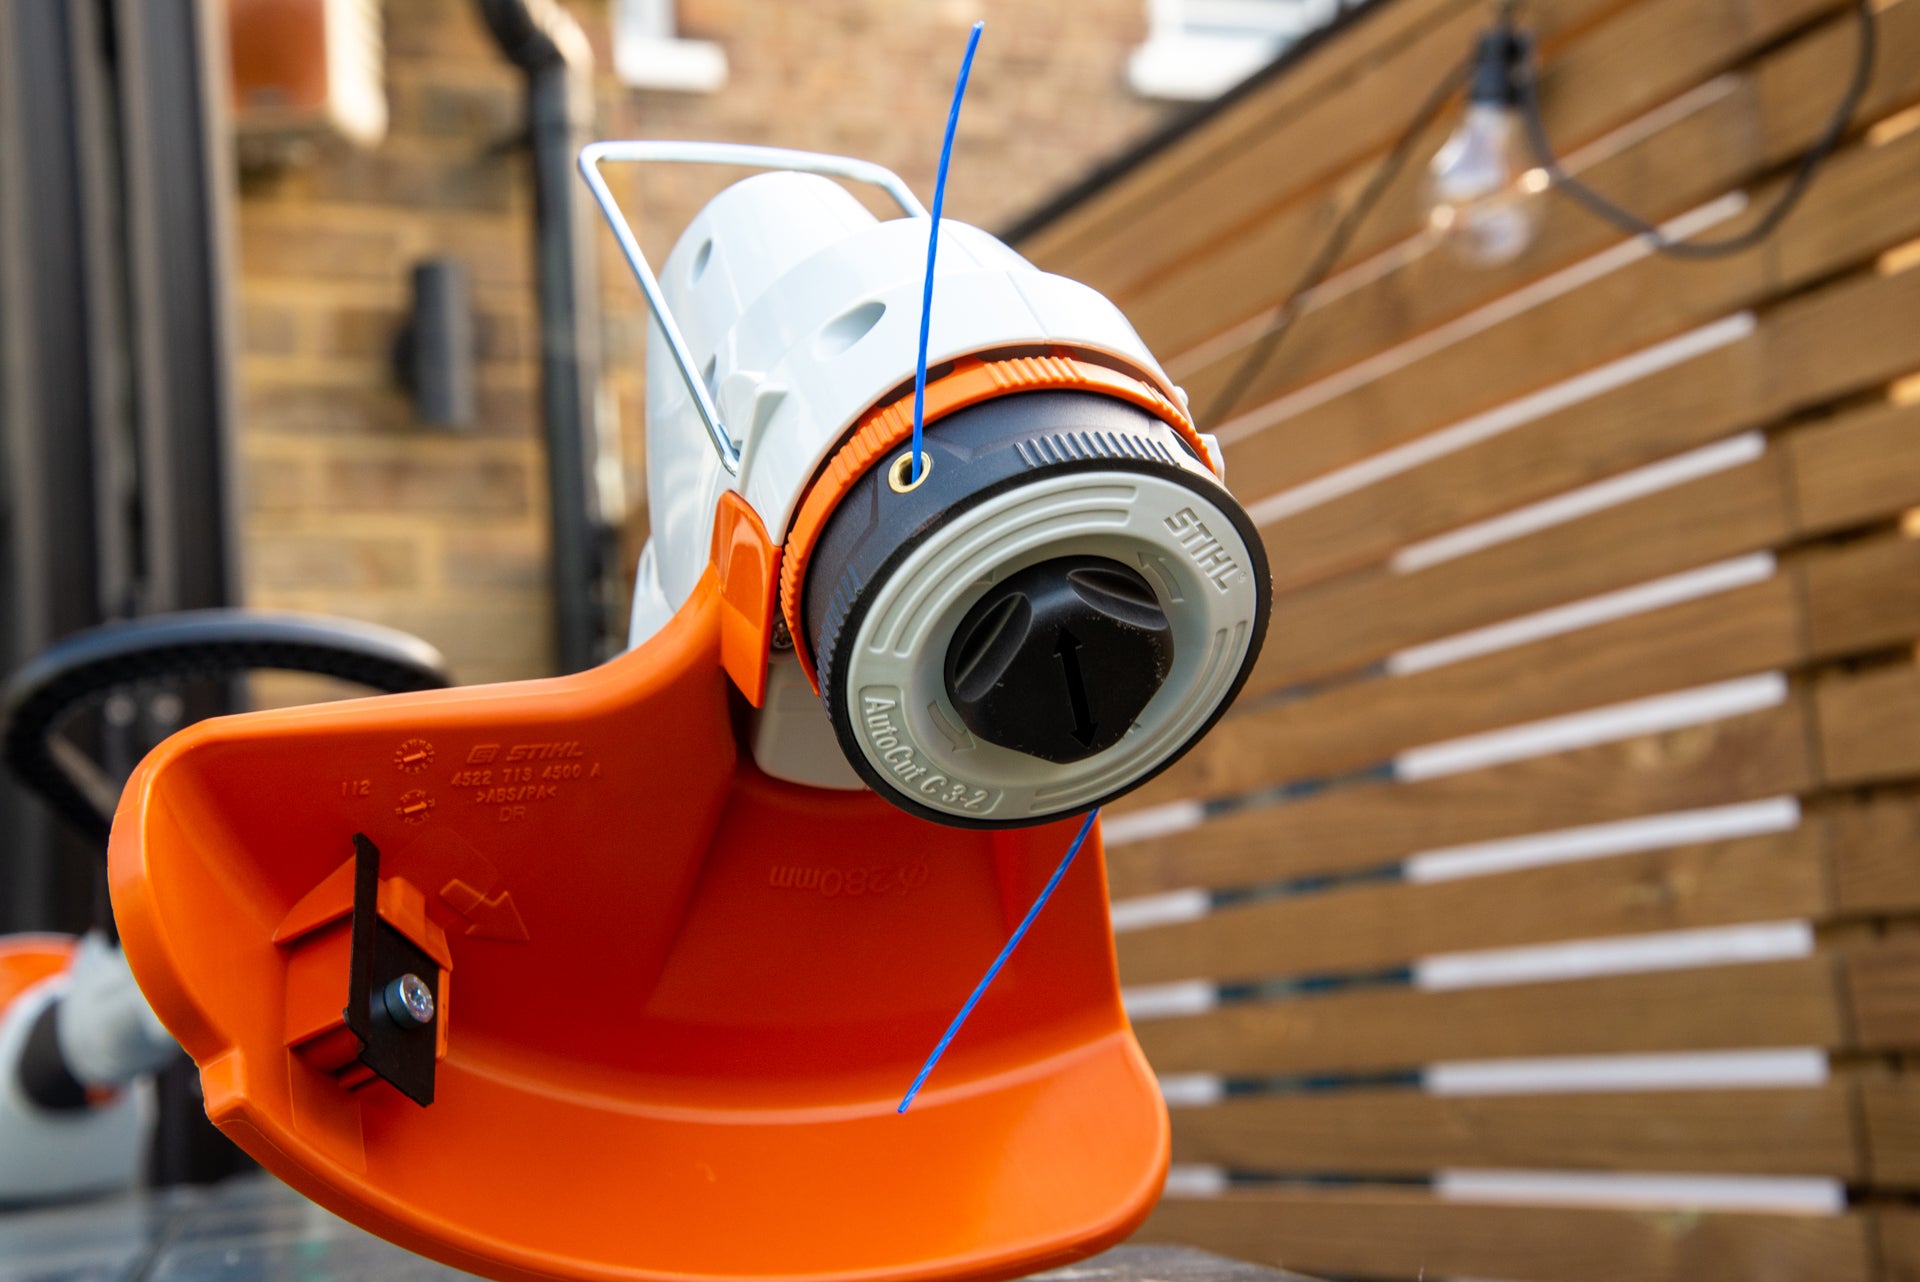
Step 4: Winding the Trimmer Line
Now that your line is ready, it’s time to wind it onto the spool. Notice the direction of the arrow on the spool; the trimmer line should be wound in this direction. Following the correct direction is crucial for the functionality of the trimmer.
If your trimmer uses a dual line, find the middle of the string, insert into the divider on the spool, and start winding both ends in the same direction.
Keep tension on the line as you wind to ensure it’s wound tightly. An improperly wound spool can lead to line feeding issues and will impact the performance of your trimmer.
Remember, precision in this step is crucial. Improper winding might result in jamming of the line and decreased efficiency of trimmer.
Step 5: Reassembling the Weed Trimmer Head
After the line is wound onto the spool, thread it through the eyelets or line exit holes of the spool housing. Ensure that you leave a sufficient amount of the line outside the trimmer head while avoiding any tangles.
Next, place the wound spool back into the housing. Make sure it sits properly inside and does not displace the spring. Once the spool is in, thread the end of the line through the holes on the housing and to the outside.
Finally, replace the cover on top of the head. Ensure it is firmly screwed onto the head, and the line is not jammed or hanging out improperly. Start the trimmer and check for automatic line feeding.
Reassembling the trimmer correctly ensures that the line feeds properly while trimming and makes the job of landscaping much easier and efficient.
Knowing how to put string in weed trimmer also gives you the confidence of managing your own tool’s maintenance, saving you time and extra expenses. Enjoy the satisfaction that outdoor care brings, from perfectly trimmed fences to evenly cut grass, all achieved with a perfectly strung weed trimmer.
Source: wikimedia.org
Frequently Asked Questions
Navigating the specifics of lawn care equipment can be tricky – especially when it comes to fine-tuning the details, such as installing a trimmer line on a weed eater. Here are some commonly asked questions to help you understand this process.
1. What type of string should I use in my weed trimmer?
The type of string or line you should use in your weed trimmer depends on several factors, including the trimmer’s design and the nature of the work. In general, most residential trimmers use a line that’s 0.065 – 0.085 inches in diameter. Commercial-grade gas weed trimmers can handle lines as thick as 0.095 inches.
Keep in mind that thicker lines are more effective for thicker and sturdier vegetation. Make sure you refer to your trimmer’s user manual, as it will specify the appropriate string line for your model.
2. How often do I need to replace the trimmer string?
The frequency of trimmer string replacement relies on how often and heavily you use your weed trimmer. Normally, you’d need a new string after several uses if you’re maintaining a typical suburban lawn. For those using weed trimmers to tame substantial vegetation regularly, string replacement may need to be more frequent.
Always check for signs such as weakened cutting ability or a trimmer line that frequently breaks or snaps. These are the indications that it’s time to replace the string line.
3. Is it difficult to put the string in the weed trimmer?
Installing a string in your weed trimmer can seem daunting at first, but once you get the hang of it, it becomes considerably simpler. The key is to follow the instructions provided in your product’s user manual since the procedure may vary slightly depending on the model of your weed trimmer.
Generally, it involves removing the old string, cutting a new piece of string of an appropriate length, and then winding it onto the trimmer’s spool. Ensure that you wind it in the direction indicated on the spool.
4. Can I use a different brand of string in my weed trimmer?
You can use a different brand of string in your weed trimmer, provided it falls within the diameter range that your specific model can accommodate. There’s no obligation to stick to the same brand as your trimmer. However, do note that the trimmer line’s quality can affect its cutting ability and durability.
As some brands may offer superior product lines, choose wisely. Again, always refer to the user’s manual for guidance on string line specifications for your trimmer.
5. How can I prevent my trimmer string from breaking?
Trimmer string breakage largely depends on the kind of work you’re doing and the quality of the string itself. High-quality lines are less likely to break. Even so, heavy-duty jobs such as cutting thick or woody vegetation can still cause breakage or wear and tear.
To lessen the likelihood of breakage, always ensure that you’re using the right size and type of string for the job. Avoid hitting hard objects, such as rocks or fence posts, as this may cause the string to snap. Regular maintenance and correct usage of your weed trimmer can significantly prolong the lifespan of the string line.
How to Change the Line | Weed Eater String | Replace Weed Wacker [2021]
So, to summarize our talk about placing a string in a weed trimmer, it’s fundamental to know your trimmer specifications first. It’s crucial to purchase the suitable string type and size for your trimmer. Moreover, remember to disengage the trimmer by switching it off and disconnecting the spark plug before starting the process.
Following that, open up the trimmer head, take out the old string spool, and replace it with the new one. Wind the string around the spool in the direction indicated, and be sure it’s tight and neat. When reassembling the trimmer head, ensure the string feeds out properly. With these simple steps, you can easily put string in your weed trimmer and maintain your garden effectively.
Place your weed trimmer on a flat surface ensuring stability. It’s best to work outdoors or in well-ventilated areas. Don’t forget to wear protective clothing, including gloves and safety glasses, to protect you during the process.
Remember, adherence to these safety measures is vital, not only for your personal well-being but also for the efficient functionality of your weed trimmer. It prevents potential damages that may occur to the trimmer.
Your readiness to replace the trimmer string is not just about getting the string into the trimmer but also about your safety and the longevity of your tool.
Step 2: Removing the Spool
Identify the shape and structure of the cutting head of your weed trimmer. Some models have a simple bump knob that you can turn counterclockwise to open, while others might require tools to unscrew and remove the head.
After opening the head, remove the spool from inside the trimmer. It’s important to note the orientation as it needs to be placed back in the same manner. The spool is usually the part that holds the string.
Inspect the inner part of the weed trimmer for any dirt or grass clippings. Cleaning the debris is important to ensure the smooth operation of the trimmer. A brush or an air canister can be used to clean the inner part.
This step is crucial as it not only assists in putting a new string but also provides a chance to do a minor cleanup and maintenance of your device.
Step 3: Preparing the Trimmer Line
Prepping the trimmer line is the next step in the ‘how to put string in weed trimmer?’ process. The replacement string or trimmer line should be of the correct diameter specified in the trimmer’s manual. This maintains optimal performance.
Stretch out a length of the line (15-25 feet typically). It is best to use a pre-wound spool as it saves time and reduces the chances of line jamming. If you are winding the line yourself, be careful to avoid any twists or overlaps.
If the line is too inflexible to handle, soak it in water for 24 hours before threading it onto the spool. This will make the line more pliable and reduce the chances of breaking.
Selecting quality line material also plays a crucial role in longevity and efficiency of trimming.
Step 4: Winding the Trimmer Line
Now that your line is ready, it’s time to wind it onto the spool. Notice the direction of the arrow on the spool; the trimmer line should be wound in this direction. Following the correct direction is crucial for the functionality of the trimmer.
If your trimmer uses a dual line, find the middle of the string, insert into the divider on the spool, and start winding both ends in the same direction.
Keep tension on the line as you wind to ensure it’s wound tightly. An improperly wound spool can lead to line feeding issues and will impact the performance of your trimmer.
Remember, precision in this step is crucial. Improper winding might result in jamming of the line and decreased efficiency of trimmer.
Step 5: Reassembling the Weed Trimmer Head
After the line is wound onto the spool, thread it through the eyelets or line exit holes of the spool housing. Ensure that you leave a sufficient amount of the line outside the trimmer head while avoiding any tangles.
Next, place the wound spool back into the housing. Make sure it sits properly inside and does not displace the spring. Once the spool is in, thread the end of the line through the holes on the housing and to the outside.
Finally, replace the cover on top of the head. Ensure it is firmly screwed onto the head, and the line is not jammed or hanging out improperly. Start the trimmer and check for automatic line feeding.
Reassembling the trimmer correctly ensures that the line feeds properly while trimming and makes the job of landscaping much easier and efficient.
Knowing how to put string in weed trimmer also gives you the confidence of managing your own tool’s maintenance, saving you time and extra expenses. Enjoy the satisfaction that outdoor care brings, from perfectly trimmed fences to evenly cut grass, all achieved with a perfectly strung weed trimmer.
Source: wikimedia.org
Frequently Asked Questions
Navigating the specifics of lawn care equipment can be tricky – especially when it comes to fine-tuning the details, such as installing a trimmer line on a weed eater. Here are some commonly asked questions to help you understand this process.
1. What type of string should I use in my weed trimmer?
The type of string or line you should use in your weed trimmer depends on several factors, including the trimmer’s design and the nature of the work. In general, most residential trimmers use a line that’s 0.065 – 0.085 inches in diameter. Commercial-grade gas weed trimmers can handle lines as thick as 0.095 inches.
Keep in mind that thicker lines are more effective for thicker and sturdier vegetation. Make sure you refer to your trimmer’s user manual, as it will specify the appropriate string line for your model.
2. How often do I need to replace the trimmer string?
The frequency of trimmer string replacement relies on how often and heavily you use your weed trimmer. Normally, you’d need a new string after several uses if you’re maintaining a typical suburban lawn. For those using weed trimmers to tame substantial vegetation regularly, string replacement may need to be more frequent.
Always check for signs such as weakened cutting ability or a trimmer line that frequently breaks or snaps. These are the indications that it’s time to replace the string line.
3. Is it difficult to put the string in the weed trimmer?
Installing a string in your weed trimmer can seem daunting at first, but once you get the hang of it, it becomes considerably simpler. The key is to follow the instructions provided in your product’s user manual since the procedure may vary slightly depending on the model of your weed trimmer.
Generally, it involves removing the old string, cutting a new piece of string of an appropriate length, and then winding it onto the trimmer’s spool. Ensure that you wind it in the direction indicated on the spool.
4. Can I use a different brand of string in my weed trimmer?
You can use a different brand of string in your weed trimmer, provided it falls within the diameter range that your specific model can accommodate. There’s no obligation to stick to the same brand as your trimmer. However, do note that the trimmer line’s quality can affect its cutting ability and durability.
As some brands may offer superior product lines, choose wisely. Again, always refer to the user’s manual for guidance on string line specifications for your trimmer.
5. How can I prevent my trimmer string from breaking?
Trimmer string breakage largely depends on the kind of work you’re doing and the quality of the string itself. High-quality lines are less likely to break. Even so, heavy-duty jobs such as cutting thick or woody vegetation can still cause breakage or wear and tear.
To lessen the likelihood of breakage, always ensure that you’re using the right size and type of string for the job. Avoid hitting hard objects, such as rocks or fence posts, as this may cause the string to snap. Regular maintenance and correct usage of your weed trimmer can significantly prolong the lifespan of the string line.
How to Change the Line | Weed Eater String | Replace Weed Wacker [2021]
So, to summarize our talk about placing a string in a weed trimmer, it’s fundamental to know your trimmer specifications first. It’s crucial to purchase the suitable string type and size for your trimmer. Moreover, remember to disengage the trimmer by switching it off and disconnecting the spark plug before starting the process.
Following that, open up the trimmer head, take out the old string spool, and replace it with the new one. Wind the string around the spool in the direction indicated, and be sure it’s tight and neat. When reassembling the trimmer head, ensure the string feeds out properly. With these simple steps, you can easily put string in your weed trimmer and maintain your garden effectively.
The first step in replacing your weed trimmer string begins with safety measures. Disconnect the power supply to the weed trimmer and ensure that it is cool to touch. If you are using a gas-powered trimmer, drain the tank to prevent any fuel spillage during the process.
Place your weed trimmer on a flat surface ensuring stability. It’s best to work outdoors or in well-ventilated areas. Don’t forget to wear protective clothing, including gloves and safety glasses, to protect you during the process.
Remember, adherence to these safety measures is vital, not only for your personal well-being but also for the efficient functionality of your weed trimmer. It prevents potential damages that may occur to the trimmer.
Your readiness to replace the trimmer string is not just about getting the string into the trimmer but also about your safety and the longevity of your tool.
Step 2: Removing the Spool
Identify the shape and structure of the cutting head of your weed trimmer. Some models have a simple bump knob that you can turn counterclockwise to open, while others might require tools to unscrew and remove the head.
After opening the head, remove the spool from inside the trimmer. It’s important to note the orientation as it needs to be placed back in the same manner. The spool is usually the part that holds the string.
Inspect the inner part of the weed trimmer for any dirt or grass clippings. Cleaning the debris is important to ensure the smooth operation of the trimmer. A brush or an air canister can be used to clean the inner part.
This step is crucial as it not only assists in putting a new string but also provides a chance to do a minor cleanup and maintenance of your device.
Step 3: Preparing the Trimmer Line
Prepping the trimmer line is the next step in the ‘how to put string in weed trimmer?’ process. The replacement string or trimmer line should be of the correct diameter specified in the trimmer’s manual. This maintains optimal performance.
Stretch out a length of the line (15-25 feet typically). It is best to use a pre-wound spool as it saves time and reduces the chances of line jamming. If you are winding the line yourself, be careful to avoid any twists or overlaps.
If the line is too inflexible to handle, soak it in water for 24 hours before threading it onto the spool. This will make the line more pliable and reduce the chances of breaking.
Selecting quality line material also plays a crucial role in longevity and efficiency of trimming.
Step 4: Winding the Trimmer Line
Now that your line is ready, it’s time to wind it onto the spool. Notice the direction of the arrow on the spool; the trimmer line should be wound in this direction. Following the correct direction is crucial for the functionality of the trimmer.
If your trimmer uses a dual line, find the middle of the string, insert into the divider on the spool, and start winding both ends in the same direction.
Keep tension on the line as you wind to ensure it’s wound tightly. An improperly wound spool can lead to line feeding issues and will impact the performance of your trimmer.
Remember, precision in this step is crucial. Improper winding might result in jamming of the line and decreased efficiency of trimmer.
Step 5: Reassembling the Weed Trimmer Head
After the line is wound onto the spool, thread it through the eyelets or line exit holes of the spool housing. Ensure that you leave a sufficient amount of the line outside the trimmer head while avoiding any tangles.
Next, place the wound spool back into the housing. Make sure it sits properly inside and does not displace the spring. Once the spool is in, thread the end of the line through the holes on the housing and to the outside.
Finally, replace the cover on top of the head. Ensure it is firmly screwed onto the head, and the line is not jammed or hanging out improperly. Start the trimmer and check for automatic line feeding.
Reassembling the trimmer correctly ensures that the line feeds properly while trimming and makes the job of landscaping much easier and efficient.
Knowing how to put string in weed trimmer also gives you the confidence of managing your own tool’s maintenance, saving you time and extra expenses. Enjoy the satisfaction that outdoor care brings, from perfectly trimmed fences to evenly cut grass, all achieved with a perfectly strung weed trimmer.
Source: wikimedia.org
Frequently Asked Questions
Navigating the specifics of lawn care equipment can be tricky – especially when it comes to fine-tuning the details, such as installing a trimmer line on a weed eater. Here are some commonly asked questions to help you understand this process.
1. What type of string should I use in my weed trimmer?
The type of string or line you should use in your weed trimmer depends on several factors, including the trimmer’s design and the nature of the work. In general, most residential trimmers use a line that’s 0.065 – 0.085 inches in diameter. Commercial-grade gas weed trimmers can handle lines as thick as 0.095 inches.
Keep in mind that thicker lines are more effective for thicker and sturdier vegetation. Make sure you refer to your trimmer’s user manual, as it will specify the appropriate string line for your model.
2. How often do I need to replace the trimmer string?
The frequency of trimmer string replacement relies on how often and heavily you use your weed trimmer. Normally, you’d need a new string after several uses if you’re maintaining a typical suburban lawn. For those using weed trimmers to tame substantial vegetation regularly, string replacement may need to be more frequent.
Always check for signs such as weakened cutting ability or a trimmer line that frequently breaks or snaps. These are the indications that it’s time to replace the string line.
3. Is it difficult to put the string in the weed trimmer?
Installing a string in your weed trimmer can seem daunting at first, but once you get the hang of it, it becomes considerably simpler. The key is to follow the instructions provided in your product’s user manual since the procedure may vary slightly depending on the model of your weed trimmer.
Generally, it involves removing the old string, cutting a new piece of string of an appropriate length, and then winding it onto the trimmer’s spool. Ensure that you wind it in the direction indicated on the spool.
4. Can I use a different brand of string in my weed trimmer?
You can use a different brand of string in your weed trimmer, provided it falls within the diameter range that your specific model can accommodate. There’s no obligation to stick to the same brand as your trimmer. However, do note that the trimmer line’s quality can affect its cutting ability and durability.
As some brands may offer superior product lines, choose wisely. Again, always refer to the user’s manual for guidance on string line specifications for your trimmer.
5. How can I prevent my trimmer string from breaking?
Trimmer string breakage largely depends on the kind of work you’re doing and the quality of the string itself. High-quality lines are less likely to break. Even so, heavy-duty jobs such as cutting thick or woody vegetation can still cause breakage or wear and tear.
To lessen the likelihood of breakage, always ensure that you’re using the right size and type of string for the job. Avoid hitting hard objects, such as rocks or fence posts, as this may cause the string to snap. Regular maintenance and correct usage of your weed trimmer can significantly prolong the lifespan of the string line.
How to Change the Line | Weed Eater String | Replace Weed Wacker [2021]
So, to summarize our talk about placing a string in a weed trimmer, it’s fundamental to know your trimmer specifications first. It’s crucial to purchase the suitable string type and size for your trimmer. Moreover, remember to disengage the trimmer by switching it off and disconnecting the spark plug before starting the process.
Following that, open up the trimmer head, take out the old string spool, and replace it with the new one. Wind the string around the spool in the direction indicated, and be sure it’s tight and neat. When reassembling the trimmer head, ensure the string feeds out properly. With these simple steps, you can easily put string in your weed trimmer and maintain your garden effectively.
Ever marveled at the freshly trimmed lawns and wondered about the art of balancing the unruly wildness of nature? Trimming weeds is not just about swinging a tool around; it requires the right technique and, of course, the correct setup. One of the critical aspects, yet often overlooked, is correctly installing the string in your weed trimmer.
The history of weed trimmers goes back to the early 1970s, but the simple yet effective technique of string installment remains the same. After safety measures, string replacement is perhaps the most important skill to master. And it’s surprisingly simple! A recent survey showed that professionals can replace trimmer string in just under a minute. And with some practice, we too can reach that proficiency, transforming our backyard wilderness into a serene sanctuary in no time.
- Firstly, disconnect your trimmer for safety.
- Remove the old line if any, from the trimmer spool.
- Then, cut a new string of about 15-25 feet long.
- Wind this string tightly, in the direction of the arrows on the spool.
- Lastly, replace the spool in the trimmer, ensuring the string feeds through the eyelets.
 Source: trustedreviews.com
How to Put String in a Weed Trimmer: Easy Step-by-Step Guide for Beginners
Learning how to put string in weed trimmer is essentially a rite of passage for every homeowner or landscaper. The process, while straightforward, involves intricate steps to ensure the efficient operation of your weed trimmer. With proper know-how, you can ensure that your trimmer is always well-maintained and ready to tackle any unruly vegetation.
Step 1: Safety Precautions
The first step in replacing your weed trimmer string begins with safety measures. Disconnect the power supply to the weed trimmer and ensure that it is cool to touch. If you are using a gas-powered trimmer, drain the tank to prevent any fuel spillage during the process.
Place your weed trimmer on a flat surface ensuring stability. It’s best to work outdoors or in well-ventilated areas. Don’t forget to wear protective clothing, including gloves and safety glasses, to protect you during the process.
Remember, adherence to these safety measures is vital, not only for your personal well-being but also for the efficient functionality of your weed trimmer. It prevents potential damages that may occur to the trimmer.
Your readiness to replace the trimmer string is not just about getting the string into the trimmer but also about your safety and the longevity of your tool.
Step 2: Removing the Spool
Identify the shape and structure of the cutting head of your weed trimmer. Some models have a simple bump knob that you can turn counterclockwise to open, while others might require tools to unscrew and remove the head.
After opening the head, remove the spool from inside the trimmer. It’s important to note the orientation as it needs to be placed back in the same manner. The spool is usually the part that holds the string.
Inspect the inner part of the weed trimmer for any dirt or grass clippings. Cleaning the debris is important to ensure the smooth operation of the trimmer. A brush or an air canister can be used to clean the inner part.
This step is crucial as it not only assists in putting a new string but also provides a chance to do a minor cleanup and maintenance of your device.
Step 3: Preparing the Trimmer Line
Prepping the trimmer line is the next step in the ‘how to put string in weed trimmer?’ process. The replacement string or trimmer line should be of the correct diameter specified in the trimmer’s manual. This maintains optimal performance.
Stretch out a length of the line (15-25 feet typically). It is best to use a pre-wound spool as it saves time and reduces the chances of line jamming. If you are winding the line yourself, be careful to avoid any twists or overlaps.
If the line is too inflexible to handle, soak it in water for 24 hours before threading it onto the spool. This will make the line more pliable and reduce the chances of breaking.
Selecting quality line material also plays a crucial role in longevity and efficiency of trimming.
Step 4: Winding the Trimmer Line
Now that your line is ready, it’s time to wind it onto the spool. Notice the direction of the arrow on the spool; the trimmer line should be wound in this direction. Following the correct direction is crucial for the functionality of the trimmer.
If your trimmer uses a dual line, find the middle of the string, insert into the divider on the spool, and start winding both ends in the same direction.
Keep tension on the line as you wind to ensure it’s wound tightly. An improperly wound spool can lead to line feeding issues and will impact the performance of your trimmer.
Remember, precision in this step is crucial. Improper winding might result in jamming of the line and decreased efficiency of trimmer.
Step 5: Reassembling the Weed Trimmer Head
After the line is wound onto the spool, thread it through the eyelets or line exit holes of the spool housing. Ensure that you leave a sufficient amount of the line outside the trimmer head while avoiding any tangles.
Next, place the wound spool back into the housing. Make sure it sits properly inside and does not displace the spring. Once the spool is in, thread the end of the line through the holes on the housing and to the outside.
Finally, replace the cover on top of the head. Ensure it is firmly screwed onto the head, and the line is not jammed or hanging out improperly. Start the trimmer and check for automatic line feeding.
Reassembling the trimmer correctly ensures that the line feeds properly while trimming and makes the job of landscaping much easier and efficient.
Knowing how to put string in weed trimmer also gives you the confidence of managing your own tool’s maintenance, saving you time and extra expenses. Enjoy the satisfaction that outdoor care brings, from perfectly trimmed fences to evenly cut grass, all achieved with a perfectly strung weed trimmer.
Source: wikimedia.org
Frequently Asked Questions
Navigating the specifics of lawn care equipment can be tricky – especially when it comes to fine-tuning the details, such as installing a trimmer line on a weed eater. Here are some commonly asked questions to help you understand this process.
1. What type of string should I use in my weed trimmer?
The type of string or line you should use in your weed trimmer depends on several factors, including the trimmer’s design and the nature of the work. In general, most residential trimmers use a line that’s 0.065 – 0.085 inches in diameter. Commercial-grade gas weed trimmers can handle lines as thick as 0.095 inches.
Keep in mind that thicker lines are more effective for thicker and sturdier vegetation. Make sure you refer to your trimmer’s user manual, as it will specify the appropriate string line for your model.
2. How often do I need to replace the trimmer string?
The frequency of trimmer string replacement relies on how often and heavily you use your weed trimmer. Normally, you’d need a new string after several uses if you’re maintaining a typical suburban lawn. For those using weed trimmers to tame substantial vegetation regularly, string replacement may need to be more frequent.
Always check for signs such as weakened cutting ability or a trimmer line that frequently breaks or snaps. These are the indications that it’s time to replace the string line.
3. Is it difficult to put the string in the weed trimmer?
Installing a string in your weed trimmer can seem daunting at first, but once you get the hang of it, it becomes considerably simpler. The key is to follow the instructions provided in your product’s user manual since the procedure may vary slightly depending on the model of your weed trimmer.
Generally, it involves removing the old string, cutting a new piece of string of an appropriate length, and then winding it onto the trimmer’s spool. Ensure that you wind it in the direction indicated on the spool.
4. Can I use a different brand of string in my weed trimmer?
You can use a different brand of string in your weed trimmer, provided it falls within the diameter range that your specific model can accommodate. There’s no obligation to stick to the same brand as your trimmer. However, do note that the trimmer line’s quality can affect its cutting ability and durability.
As some brands may offer superior product lines, choose wisely. Again, always refer to the user’s manual for guidance on string line specifications for your trimmer.
5. How can I prevent my trimmer string from breaking?
Trimmer string breakage largely depends on the kind of work you’re doing and the quality of the string itself. High-quality lines are less likely to break. Even so, heavy-duty jobs such as cutting thick or woody vegetation can still cause breakage or wear and tear.
To lessen the likelihood of breakage, always ensure that you’re using the right size and type of string for the job. Avoid hitting hard objects, such as rocks or fence posts, as this may cause the string to snap. Regular maintenance and correct usage of your weed trimmer can significantly prolong the lifespan of the string line.
How to Change the Line | Weed Eater String | Replace Weed Wacker [2021]
So, to summarize our talk about placing a string in a weed trimmer, it’s fundamental to know your trimmer specifications first. It’s crucial to purchase the suitable string type and size for your trimmer. Moreover, remember to disengage the trimmer by switching it off and disconnecting the spark plug before starting the process.
Following that, open up the trimmer head, take out the old string spool, and replace it with the new one. Wind the string around the spool in the direction indicated, and be sure it’s tight and neat. When reassembling the trimmer head, ensure the string feeds out properly. With these simple steps, you can easily put string in your weed trimmer and maintain your garden effectively.

I’m Patricia D. Johnson, an affiliate marketer and blogger specializing in trimmers and grooming tools. I create honest reviews, buying guides, and practical tips to help readers choose the right trimmer for their needs. With a focus on quality, performance, and value, I simplify the decision-making process so consumers can make confident purchases.