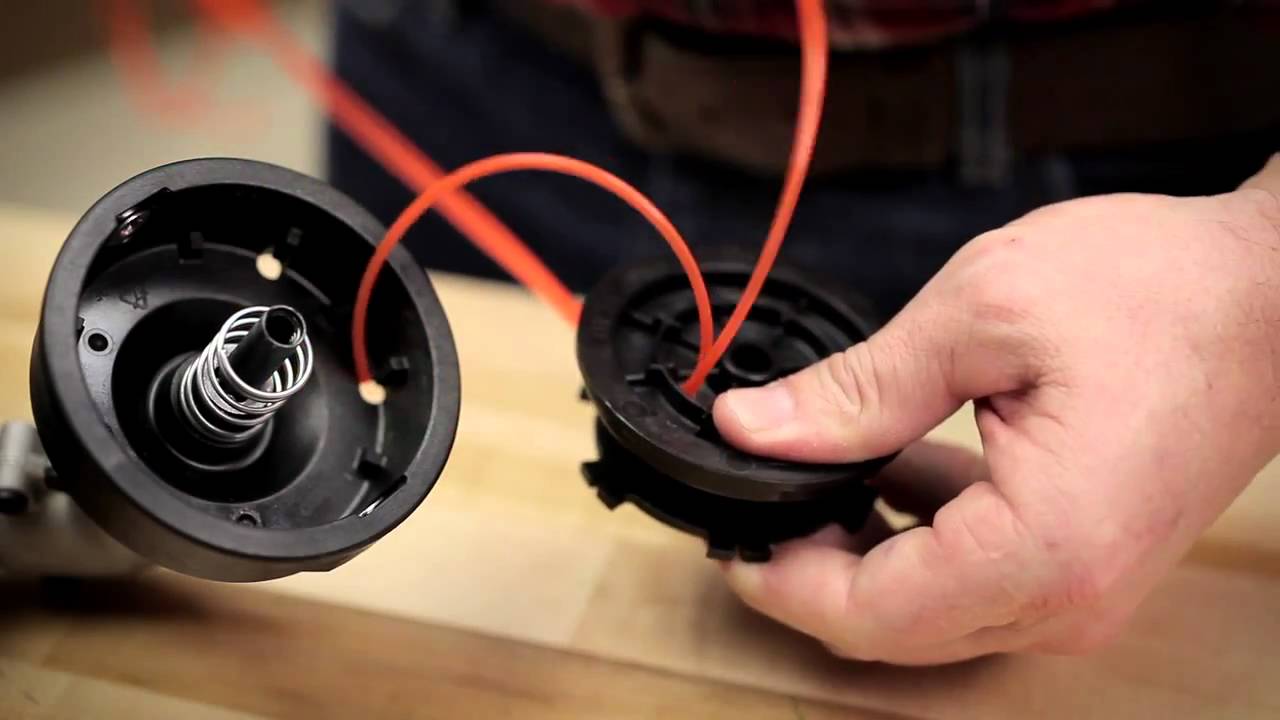
Have you ever considered that adding trimmer line effectively can optimize the performance and lifespan of your trimmer? Many professionals understand that a simple task like this can significantly enhance efficiency in yard work. Properly installing the line not only ensures smoother operation but also reduces wear and tear on the equipment.
The method to add trimmer line has evolved over time, reflecting advancements in design and user needs. With the right technique, experts can complete this task in less than five minutes, significantly reducing downtime. Modern trimmers often feature easy-load mechanisms, making the process more intuitive and less labor-intensive than ever before.
- Power off and unplug the trimmer or remove the battery.
- Remove the trimmer head by pressing or twisting the release mechanism.
- Cut the new trimmer line to the recommended length and insert it into the spool hole.
- Wind the line tightly in the direction indicated on the spool.
- Feed the end of the line through eyelets, reattach the spool, and snap it back into place.
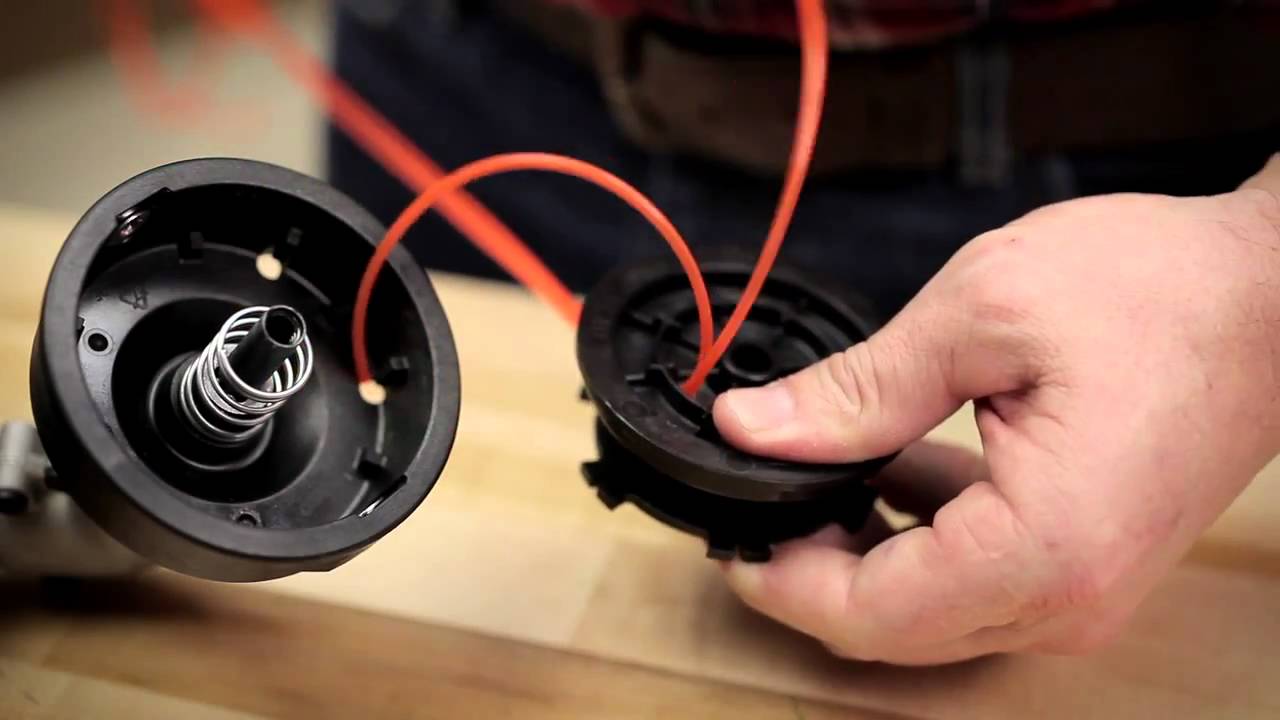
How to Add Trimmer Line
Adding trimmer line to your tool is essential for maintaining its efficiency. First, ensure you have the correct type of line for your trimmer. The line thickness varies depending on the model. Check your trimmer’s manual for recommendations. This step prevents potential damage to your equipment.
Once you’ve chosen the right line, it’s time to remove the trimmer head. Most models have a button or knob to release the spool. Press or turn this mechanism and carefully separate the head. Removing all previous remnants of line is crucial. This clears the way for the new line.
Now, take your new line and cut it to the appropriate length. Insert the cut ends into the eyelets on the spool. Then, wind the line tightly and evenly in the direction indicated on the spool. When you’re done winding, snap the spool back into the trimmer head. Make sure it clicks securely into place to avoid any issues during operation.
Test the trimmer once everything is set. Hold it away from your body and turn it on briefly. The new line should spin smoothly without any interruptions. If you encounter any problems, refer to your trimmer’s manual or check here is the article for troubleshooting tips. Additionally, general information about trimmers can be found according to the article.
Step 1: Choose the Appropriate Trimmer Line
Selecting the right trimmer line is crucial for optimal performance. Different trimmers require different line diameters, so check your manual for specifications. Using the wrong size can lead to inefficiency or even damage. Thicker lines are generally better for tough weeds. On the other hand, thinner lines work well for regular grass trimming.
There are also various shapes of trimmer lines to consider. Round lines are the most common and easy to load. However, square or star-shaped lines can offer better cutting power. According to the this post, different shapes can make a noticeable difference in your trimming tasks. It’s wise to experiment and find what works best for your needs.
Material composition is another factor to think about. Some lines are made of basic nylon, while others include additional materials to enhance durability. Look for features like reinforced cores. These can extend the life of the line significantly. Keep an eye out for these options when making your purchase.
Lastly, consider the brand and quality. Trusted brands often offer better performance and durability. Don’t just go for the cheapest option available. Investing in high-quality trimmer line can save you time and hassle in the long run. Make sure to read reviews to aid in your decision.
Step 2: Removing the Trimmer Head
Removing the trimmer head is a straightforward process, but it requires attention to detail. First, ensure the trimmer is powered off and unplugged or has the battery removed. Safety is crucial, so take precautions. Familiarize yourself with your specific trimmer model. Different trimmers may have unique mechanisms for head removal.
Typically, you’ll find a release button or knob on the trimmer head. Press or twist this mechanism to detach the head. If it’s not coming off easily, don’t force it. Check your manual for specific instructions. This will prevent any accidental damage to your trimmer.
Some trimmers have a spool inside the head that needs to be released before the head comes off. In such cases, carefully remove the spool first. Look for any tabs or catches that hold it in place. Releasing these will allow the head to come off more easily. Make sure to keep all parts in a safe place.
If you’re having trouble, online resources and forums can provide guidance. Many people have shared helpful tips and tricks for different trimmer models. Watching a video tutorial might also be beneficial. Always double-check to ensure everything is correctly disassembled. This will make reassembly much simpler later on.
Step 3: Winding the Trimmer Line
Winding the trimmer line correctly is essential for smooth operation. Start by cutting the line to the recommended length as specified in your trimmer’s manual. Usually, around 15-20 feet is sufficient. Insert one end of the line into the hole on the spool. Make sure it’s secure before starting to wind.
Begin winding the line tightly and evenly around the spool. Follow the direction of the arrow usually marked on the spool. This ensures that the line feeds out properly during use. Take your time to avoid overlapping. Overlapping can cause jams and make the trimmer less effective.
As you wind, try to maintain tension in the line to keep it tight. Loose winding can result in tangles and inefficiency. Make sure each layer of line lays flat and straight. This will help optimize performance. Once you’ve reached the end, leave a small tail of line for feeding through the eyelets.
Most trimmer heads have two slots for the line to pass through. Feed the tail ends through these slots carefully. Snap the spool back into the trimmer head securely. Ensure it clicks into place. If it doesn’t, something may be misaligned, and you should check your work.
Always double-check the winding process before using the trimmer. A correctly wound line ensures smoother trimming and prolongs the life of the trimmer. It also saves you from the hassle of frequent re-winding. Regular maintenance like this keeps your yard work efficient and hassle-free.
The Importance of Properly Adding Trimmer Line
Properly adding trimmer line is crucial for both performance and safety. When the line is installed correctly, it cuts through grass and weeds much more efficiently. This means you spend less time going over the same spot. Reduced strain on the trimmer’s motor is another benefit. A well-wound line can also prolong the lifespan of your trimmer.
Incorrectly added line can lead to a variety of problems. One common issue is line breakage, which happens when the line isn’t wound tightly or evenly. This can create sudden stops and starts during trimming. It also results in your having to frequently stop to fix the line. Moreover, it can cause uneven trimming, making your yard look less tidy.
In terms of safety, a properly added line reduces the risk of accidents. Loose or improperly wound lines can fly off, posing a danger to the user. Always follow the manufacturer’s instructions for winding and installing the line. Consistent practice of proper installation minimizes these risks. It makes your yard work safer and more efficient.
Using the right type of line also affects the trimmer’s effectiveness. Different types of vegetation require different line thicknesses and shapes. For example, thicker lines are better for dense weeds. Thinner lines work well for regular grass. Choose the line that best suits your trimming needs to avoid unnecessary issues.
Overall, making sure the line is correctly added saves time and energy. It enhances the precision and quality of your trimming work. You’ll also reduce wear and tear on your equipment. Proper maintenance and line installation are simple steps that deliver significant rewards. Your yard will look well-kept, and your tools will last longer.
Common Mistakes While Adding Trimmer Line
One common mistake is winding the line unevenly. This often results from not paying attention to the direction of the arrow on the spool. Uneven winding can cause the line to feed poorly or even get jammed. Always follow the directional guides. This ensures smooth operation and reduces frustrations.
Using the wrong type of trimmer line can also cause problems. Different tasks require different thicknesses and shapes of line. Using a line that’s too thick or too thin can either overwork the trimmer or make it ineffective. Check the trimmer’s manual for the recommended line type. Using the specific line designed for your model ensures the best performance.
Another typical mistake is not securing the line properly. If the line isn’t tightly secured in the spool, it can loosen during trimming. This can lead to frequent stops to fix the line. Make sure the line is firmly attached before reassembling the trimmer head. Double-check to prevent unnecessary interruptions.
Failure to remove old line remnants can also be problematic. Leftover pieces can interfere with the new line. This can cause tangling and inefficient cutting. Clear all old line before adding new. Keeping the spool clean enhances performance.
Lastly, not following the manufacturer’s instructions can lead to operational issues. Each trimmer model may have specific requirements for line installation. Skipping steps or guessing can cause problems. Always refer to the manual or online resources for guidance. Accurate steps ensure your trimmer works efficiently and lasts longer.
Frequently Asked Questions
This section answers common questions related to trimmer lines, helping you optimize your trimming tasks. Understanding these nuances can improve the performance and lifespan of your equipment.
1. What is the best type of trimmer line for tough weeds?
For tough weeds, a trimmer line with a thicker diameter and a special shape is recommended. Square or star-shaped lines are excellent choices because they provide more cutting power compared to round lines.
Selecting a line with reinforced cores can also be beneficial. These cores make the line more durable and effective at cutting through heavy vegetation without frequent breaks or frays.
2. How often should I replace the trimmer line?
The frequency of replacing the trimmer line depends on usage and the type of vegetation you’re tackling. For average residential use, replacing it every few months usually suffices, although heavy use may require more frequent changes.
If you’re trimming tougher plants, you may notice faster wear on the line, necessitating quicker replacements. Always keep an eye on its condition during regular maintenance checks.
3. Can using the wrong type of trimmer line damage my trimmer?
Yes, using an incorrect trimmer line can cause significant damage to your equipment. A too-thick or wrong-shaped line can strain the motor, leading to overheating or malfunction.
This often results in uneven operation and reduced efficiency in cutting tasks. It’s crucial to follow manufacturer guidelines for selecting appropriate lines to maintain optimal performance and safety.
4. Are there any tips for keeping trimmer lines from breaking so easily?
The key to preventing breakage is proper winding and secure installation of the trimmer line. Make sure it’s wound tightly and evenly around the spool as instructed by your manual.
Avoid striking hard objects like rocks or pavement while trimming, as these can quickly wear down or break the line. Additionally, cutting at grass level rather than close to hard surfaces helps prolong its life.
5. How do I know when my trimmer line needs replacement?
You’ll know it’s time for a replacement when you see visible signs of wear such as fraying or snapping frequently during use. If you notice an uneven cut pattern or reduced efficiency, these are also indicators that new lines are needed.
Regular checks before each session help identify early signs of wear-and-tear, ensuring uninterrupted work flow and maintaining high-quality trimming results continuously.
Conclusion
Properly adding trimmer line ensures your trimmer operates efficiently and safely. Taking the time to follow each step carefully can save you from future frustrations. Whether you’re dealing with tough weeds or simply maintaining your lawn, the right trimmer line makes all the difference.
Avoid common mistakes like using the wrong type of line or winding it unevenly. These small but crucial steps extend the life of your equipment. By understanding and implementing these practices, you ensure a smooth, hassle-free trimming experience.

I’m Patricia D. Johnson, an affiliate marketer and blogger specializing in trimmers and grooming tools. I create honest reviews, buying guides, and practical tips to help readers choose the right trimmer for their needs. With a focus on quality, performance, and value, I simplify the decision-making process so consumers can make confident purchases.