Are you tired of spending money on professional haircuts or struggling to achieve that perfect trim at home? Well, look no further! In this guide, we will delve into the art of adjusting a bevel trimmer, a crucial skill for anyone who wants to maintain their own hair. Whether you’re a seasoned stylist or a novice barber, this step-by-step tutorial will provide you with the knowledge and confidence to master the art of bevel trimming in no time.
A bevel trimmer is a versatile tool that allows you to create clean and precise lines, giving your hair that polished and professional finish. However, adjusting this tool can be a daunting task for those who are unfamiliar with its inner workings. Fear not! This comprehensive guide will demystify the process and equip you with the skills needed to make the necessary adjustments to your bevel trimmer.
So, get ready to take control of your haircare routine and unlock the secrets to achieving salon-quality results from the comfort of your own home. Let’s dive in!

Source: askmen.com
How to Adjust Bevel Trimmer Like a Pro
In this section, we will provide you with step-by-step instructions on how to adjust a bevel trimmer. Whether you are a professional barber or a DIY enthusiast, knowing how to properly adjust your trimmer is essential for achieving the desired results. By following these instructions, you can ensure that your bevel trimmer is set up correctly and ready to use.
Step 1: Gather the Necessary Tools
Before you begin adjusting your bevel trimmer, make sure you have all the necessary tools at hand. You will need a small screwdriver, typically a Phillips head, to loosen or tighten the adjustment screws. Additionally, keep a clean cloth or brush nearby to remove any excess hair or debris from the trimmer.
It is important to note that the specific tools required may vary depending on the brand and model of your bevel trimmer. Refer to the manufacturer’s instructions or the trimmer’s user manual for any additional tools or specific requirements.
Step 2: Understand the Adjustment Mechanism
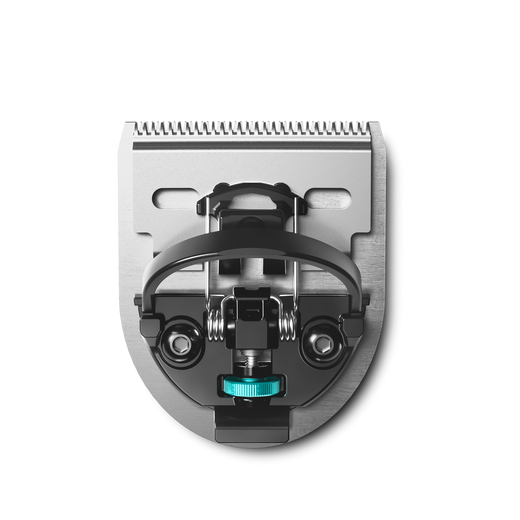
Before diving into the adjustment process, it is crucial to understand how the bevel trimmer’s adjustment mechanism works. Most trimmers have adjustable blades or guards that allow you to change the cutting length or angle.
Identify the adjustment screws or levers on your trimmer. These are usually located near the blade or guard area. Take a moment to familiarize yourself with the specific adjustment options available on your trimmer. This will help you make precise adjustments and avoid any potential damage.
Step 3: Adjust the Cutting Length
One of the most common adjustments you may need to make is the cutting length. To do this, locate the adjustment screw or lever that controls the blade’s position. Depending on your trimmer, you may need to loosen the screw or move the lever to adjust the cutting length.
Use the small screwdriver to turn the adjustment screw counterclockwise to increase the cutting length or clockwise to decrease it. Make small adjustments at a time and test the trimmer on a small section of hair to ensure the desired cutting length is achieved.
Step 4: Fine-Tune the Bevel Angle
In addition to the cutting length, some bevel trimmers allow you to adjust the bevel angle. This feature is particularly useful for achieving precise and clean lines. Locate the bevel adjustment screw or lever on your trimmer, which is typically situated near the blade or guard area.
Similar to adjusting the cutting length, use the small screwdriver to turn the bevel adjustment screw in the desired direction. Experiment with different angles until you find the one that best suits your trimming needs. Remember to make small adjustments and test the trimmer on a small section of hair to ensure the desired bevel angle is achieved.
Step 5: Clean and Maintain
Once you have made the necessary adjustments, it is essential to clean and maintain your bevel trimmer regularly. Remove any excess hair or debris from the blade and guard area using a clean cloth or brush. This will help ensure the trimmer performs optimally and prolong its lifespan.
Additionally, follow the manufacturer’s instructions for any specific maintenance requirements. This may include lubricating the blades, replacing worn-out parts, or periodically checking the overall condition of the trimmer.
Step 6: Final Check and Test
Before using the bevel trimmer on clients or yourself, perform a final check to ensure all adjustments are correctly set. Inspect the cutting length and bevel angle to verify that they meet your desired specifications. Test the trimmer on a small section of hair to ensure it is cutting smoothly and accurately.
If any further adjustments are required, repeat the previous steps until you achieve the desired results. Remember that practice makes perfect, and it may take some time to become comfortable with adjusting your bevel trimmer.
Step 7: Seek Professional Help if Needed
If you encounter any difficulties or are unsure about making adjustments to your bevel trimmer, it is always recommended to seek professional help. Contact the manufacturer’s customer support or consult a professional barber for guidance. They can provide you with expert advice and assistance to ensure your trimmer is adjusted correctly and safely.
Step 8: Stay Updated with the Latest Techniques
Lastly, to maximize the potential of your bevel trimmer, stay updated with the latest techniques and trends in the industry. Subscribe to grooming blogs, watch tutorial videos, and attend workshops or seminars to learn new tips and tricks for using your trimmer effectively.
By continuously improving your skills and knowledge, you can take full advantage of your bevel trimmer and achieve professional-looking results.
Frequently Asked Questions
Here are some commonly asked questions about how to adjust a bevel trimmer:
How do I adjust the cutting depth of my bevel trimmer?
To adjust the cutting depth of your bevel trimmer, locate the depth adjustment lever or knob on the device. This lever or knob is usually located near the cutting blade. Once you’ve located it, simply turn the lever or knob to adjust the cutting depth. Turning it clockwise will increase the cutting depth, while turning it counterclockwise will decrease it. Make sure to check the user manual for your specific bevel trimmer model for any additional instructions or precautions.
It is important to note that adjusting the cutting depth will directly impact the amount of material being trimmed. Always start with a shallower cutting depth and gradually increase it as needed to achieve the desired result. Additionally, before making any adjustments, ensure that the bevel trimmer is turned off and unplugged for safety purposes.
How can I adjust the bevel angle on my trimmer?
To adjust the bevel angle on your trimmer, first, locate the bevel angle adjustment mechanism. This mechanism is typically found near the base of the cutting blade. Once you’ve located it, use the provided tools or knobs to loosen the mechanism and adjust the bevel angle to your desired setting. After adjusting, securely tighten the mechanism to lock the bevel angle in place.
It is crucial to refer to the user manual of your specific bevel trimmer model for detailed instructions on how to adjust the bevel angle. Different models may have different mechanisms or require specific steps to ensure proper adjustment. Always take necessary safety precautions, such as wearing protective gloves and eyewear, when adjusting the bevel angle of your trimmer.
What should I do if my bevel trimmer is not cutting properly?
If your bevel trimmer is not cutting properly, there are a few troubleshooting steps you can follow. First, check if the cutting blade is sharp and properly aligned. Dull or misaligned blades can cause ineffective trimming. If necessary, sharpen or replace the blade according to the manufacturer’s instructions.
Next, ensure that the cutting depth and bevel angle are properly adjusted for the material you are working with. Incorrect settings can lead to poor cutting performance. Additionally, clean any debris or buildup from the cutting blade and make sure it is properly lubricated.
Can I adjust the speed of my bevel trimmer?
The speed of a bevel trimmer is typically not adjustable. Most trimmers come with a fixed speed setting that is optimized for the specific cutting tasks they are designed for. However, some advanced models may have variable speed settings that allow you to adjust the cutting speed based on your needs.
If you require a trimmer with adjustable speed, it is recommended to check the product specifications or consult with the manufacturer to find a suitable model. Keep in mind that adjusting the speed of a trimmer may affect its cutting performance and should be done carefully according to the manufacturer’s instructions.
How often should I adjust the bevel trimmer?
The frequency of adjusting your bevel trimmer depends on various factors, including the type of material you are working with and the intensity of your cutting tasks. It is good practice to regularly inspect and adjust your trimmer before each use to ensure optimal cutting performance.
If you notice any issues such as inconsistent cutting depth, uneven bevel angles, or poor cutting results, it is recommended to perform necessary adjustments immediately. Regular maintenance, including cleaning, lubricating, and inspecting the trimmer, will also help in identifying any adjustment needs. Refer to the user manual for specific guidelines on when and how to adjust your bevel trimmer.

Source: ytimg.com
Final Verdicts:
In conclusion, learning how to adjust a bevel trimmer is a valuable skill for anyone looking to achieve precise and professional-looking cuts. By following the step-by-step instructions provided in this guide, you can easily make the necessary adjustments to ensure that your trimmer is aligned correctly and functioning at its best. Remember to always prioritize safety and take the time to familiarize yourself with the specific model of trimmer you are working with.
Whether you are a professional barber or a DIY enthusiast, mastering the art of bevel trimming can greatly enhance your cutting abilities and elevate the quality of your work. With proper adjustment techniques, you can achieve clean lines, sharp angles, and flawless finishes.
So, don’t be afraid to experiment and practice, as adjusting the bevel trimmer is all about finding the perfect balance between precision and creativity. By honing your skills in this area, you can take your hair cutting game to a whole new level and leave your clients impressed with your expertise.
