Are you tired of struggling with dull Oster trimmer blades that just don’t seem to get the job done? Well, fret no more! In this comprehensive guide, we will walk you through the step-by-step process of sharpening your Oster trimmer blades like a pro.
Whether you’re a professional groomer or a pet owner looking to save a few bucks on grooming expenses, mastering the art of blade sharpening will not only extend the life of your trimmer blades but also ensure a precise and efficient trimming experience every time.
When it comes to grooming tools, Oster is a trusted brand known for its durability and high-quality performance. However, like any other blade, Oster trimmer blades can become dull over time, resulting in uneven cuts and frustrating grooming sessions. But fear not, with just a few simple tools and a little know-how, you can restore your Oster trimmer blades to their former sharpness and get back to achieving professional-looking results in no time.
So, grab your Oster trimmer, roll up your sleeves, and let’s dive into the world of blade sharpening – your furry friends will thank you!

Source: ytimg.com
How To Sharpen Oster Trimmer Blades? Step-by-Step
In order to maintain a clean and precise cut, it is important to periodically sharpen your Oster trimmer blades. Dull blades can cause uneven grooming, leading to discomfort for your pet or less-than-desirable results for your own haircuts. With the right tools and a little bit of patience, you can easily sharpen your Oster trimmer blades at home. Follow these step-by-step instructions to ensure your blades stay sharp and ready for use.
Step 1: Gather the Necessary Tools
Before you begin the sharpening process, make sure you have all the tools you need. You will require a pair of safety gloves to protect your hands, a soft cloth or towel for cleaning the blades, a brush or toothbrush for removing debris, a small flathead screwdriver for disassembling the trimmer, a sharpening stone or sandpaper for sharpening the blades, and some lubricating oil for maintenance.
Ensure that all the tools are clean and in good condition before you start working on your trimmer blades. It is also important to work in a well-ventilated area with good lighting to avoid any accidents or mistakes during the process.
Step 2: Disassemble the Trimmer
To access the blades, you will need to disassemble the trimmer. Start by removing the blade cover or head of the trimmer. This can usually be done by unscrewing a few screws or clips. Once the cover is removed, carefully detach the blades from the trimmer. Take note of how the blades are positioned so that you can reassemble them correctly later on.
Place the blades on a clean surface and use the brush or toothbrush to remove any loose hair, dirt, or debris. Be thorough in your cleaning to ensure the best sharpening results.
Step 3: Sharpen the Blades
Now that the blades are clean and ready, it’s time to sharpen them. If you have a sharpening stone, wet it with water or oil as per the manufacturer’s instructions. Hold the blade at a slight angle and gently run it across the sharpening stone in a circular motion. Repeat this process several times, applying even pressure on both sides of the blade.
If you don’t have a sharpening stone, you can use sandpaper as an alternative. Fold the sandpaper in half and hold it securely. Then, follow the same circular motion technique to sharpen the blades. Remember to work on both sides of the blade evenly to maintain its balance.
Step 4: Lubricate and Reassemble
After sharpening, it’s important to lubricate the blades to reduce friction and ensure smooth operation. Apply a few drops of lubricating oil to the blades, making sure to cover all the surfaces. Allow the oil to sit for a few minutes to penetrate the blades.
Once the blades are lubricated, carefully reassemble the trimmer by following the steps you took to disassemble it. Make sure the blades are correctly aligned and securely fastened. Tighten any screws or clips to hold the trimmer in place.
Step 5: Test and Maintain
With the trimmer fully reassembled, it’s time to test the blades. Turn on the trimmer and let it run for a few seconds to ensure everything is working properly. If you notice any issues or the blades still seem dull, repeat the sharpening process or seek professional assistance if needed.
Lastly, make it a habit to regularly clean and lubricate your trimmer blades to maintain their sharpness and longevity. This will help you achieve the best grooming results and extend the life of your Oster trimmer.
Frequently Asked Questions
In this section, you will find answers to commonly asked questions about sharpening Oster trimmer blades.
How often should I sharpen my Oster trimmer blades?
It is recommended to sharpen your Oster trimmer blades every 6 to 8 weeks, depending on usage. Regular sharpening ensures optimal performance and extends the lifespan of your blades. If you notice a decrease in cutting efficiency or the blades pulling on the hair instead of cutting smoothly, it’s a clear indication that sharpening is needed.
Remember, dull blades not only make the trimming process less effective but can also cause discomfort or irritation to the person or animal being groomed. Regular maintenance is crucial to keep your Oster trimmer blades in top condition.
Can I sharpen my Oster trimmer blades at home?
Yes, you can sharpen your Oster trimmer blades at home using a sharpening stone or a specialized blade sharpener. However, it’s important to note that sharpening blades requires skill and precision. If you are not confident in your ability to sharpen the blades properly, it’s recommended to seek professional assistance.
Improper sharpening can damage the blades or alter their cutting angle, resulting in poor performance. If you decide to sharpen the blades yourself, make sure to follow the manufacturer’s instructions, use the appropriate tools, and take your time to achieve the desired sharpness.
What is the recommended method for sharpening Oster trimmer blades?
The recommended method for sharpening Oster trimmer blades is to use a sharpening stone specifically designed for clipper blades. Start by cleaning the blades thoroughly to remove any dirt or debris. Then, holding the blade at a 30-degree angle, gently slide it across the sharpening stone in a circular motion. Repeat this process several times on both sides of the blade, ensuring even sharpening.
After sharpening, clean the blades again to remove any metal particles that may have accumulated. Finally, apply a few drops of clipper oil to lubricate the blades and prevent rust. It’s important to note that the exact sharpening technique may vary slightly depending on the specific Oster trimmer model, so referring to the manufacturer’s instructions is always recommended.
Can I use any sharpening stone for Oster trimmer blades?
No, you should not use just any sharpening stone for Oster trimmer blades. It’s important to use a sharpening stone specifically designed for clipper blades, as these stones have the appropriate grit and surface hardness to effectively sharpen the blades without causing damage.
Using the wrong type of sharpening stone can result in improper sharpening, leading to decreased performance and potential damage to the blades. It’s best to invest in a high-quality sharpening stone designed specifically for clipper blades to ensure optimal results.
How can I maintain the sharpness of my Oster trimmer blades between sharpenings?
To maintain the sharpness of your Oster trimmer blades between sharpenings, there are a few steps you can take. First, make sure to clean the blades thoroughly after each use to remove any hair or debris. This prevents buildup, which can affect cutting performance.
Additionally, regularly oiling the blades with clipper oil helps to reduce friction and keep them running smoothly. It’s also important to handle the trimmer with care, avoiding dropping or mishandling it, as this can affect blade alignment and sharpness. By following these maintenance practices, you can help prolong the sharpness and overall lifespan of your Oster trimmer blades.
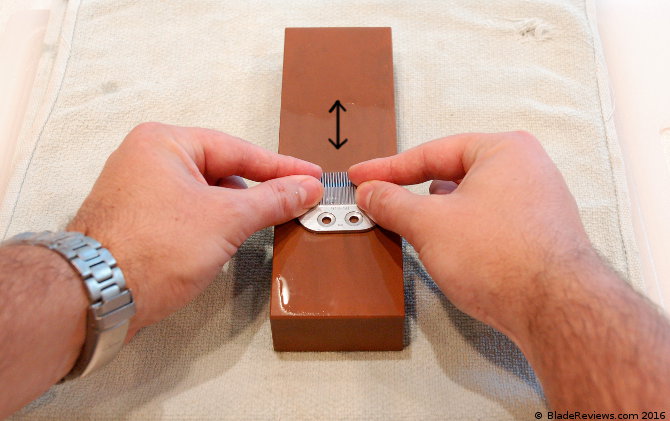
Source: bladereviews.com
Final Verdict
In conclusion, learning how to sharpen Oster trimmer blades is a valuable skill for any pet owner or professional groomer. By following the step-by-step process outlined in this guide, you can ensure that your trimmer blades remain sharp and effective, allowing for precise and efficient grooming sessions. Remember to always prioritize safety by wearing protective gloves and using the appropriate tools for the job.
By regularly sharpening your Oster trimmer blades, you can extend their lifespan and save money in the long run. Additionally, maintaining sharp blades will result in a more comfortable grooming experience for your furry friends, reducing the risk of pulling or snagging their fur. So, don’t let dull blades hinder your grooming routine. Take the time to sharpen your Oster trimmer blades and enjoy the benefits of a well-groomed pet or satisfied clients.
