
Are you feeling a bit frustrated trying to put your Oster trimmer back together? Don’t worry, you’re not alone! Many individuals find themselves in a similar situation, struggling to figure out the best way to reassemble their trimmer. But fear not, because in this guide, we will walk you through the step-by-step process of putting your Oster trimmer back together like a pro.
Whether you’re a beginner or have some experience with DIY repairs, this comprehensive guide will provide you with all the information you need to successfully reassemble your Oster trimmer. We’ll start by breaking down the different components of the trimmer and explaining their functions. Then, we’ll delve into the specific steps you need to follow to ensure everything is properly aligned and secured.
By the end of this guide, you’ll feel confident and accomplished, ready to tackle any future trimming tasks with ease. So, let’s dive in and get your Oster trimmer back to its full functionality!

Source: ytimg.com
How to Put a Oster Trimmer Back Together? Easy Steps
In this step-by-step guide, we will walk you through the process of putting an Oster trimmer back together. Whether you are a professional groomer or someone who likes to groom their own pets at home, knowing how to reassemble your trimmer is essential. By following these instructions carefully, you’ll have your Oster trimmer working like new in no time.
Step 1: Gather the Necessary Tools
Before you begin, make sure you have all the tools you’ll need to put your Oster trimmer back together. You will typically need a small screwdriver, tweezers, and a clean cloth. Having these tools ready will help the process go smoothly.
Step 2: Clean and Inspect the Parts
Before reassembling the trimmer, it’s important to clean and inspect each part. Start by wiping down the exterior with a clean cloth to remove any dirt or debris. Then, carefully disassemble the trimmer, taking note of how each piece fits together.
Inspect the blades, ensuring they are sharp and free from any damage. Clean the blades using a blade cleaner or a small brush to remove any hair or buildup. Additionally, check the motor and other internal components for any signs of wear or damage. If you notice any issues, it may be necessary to replace the damaged parts before proceeding.
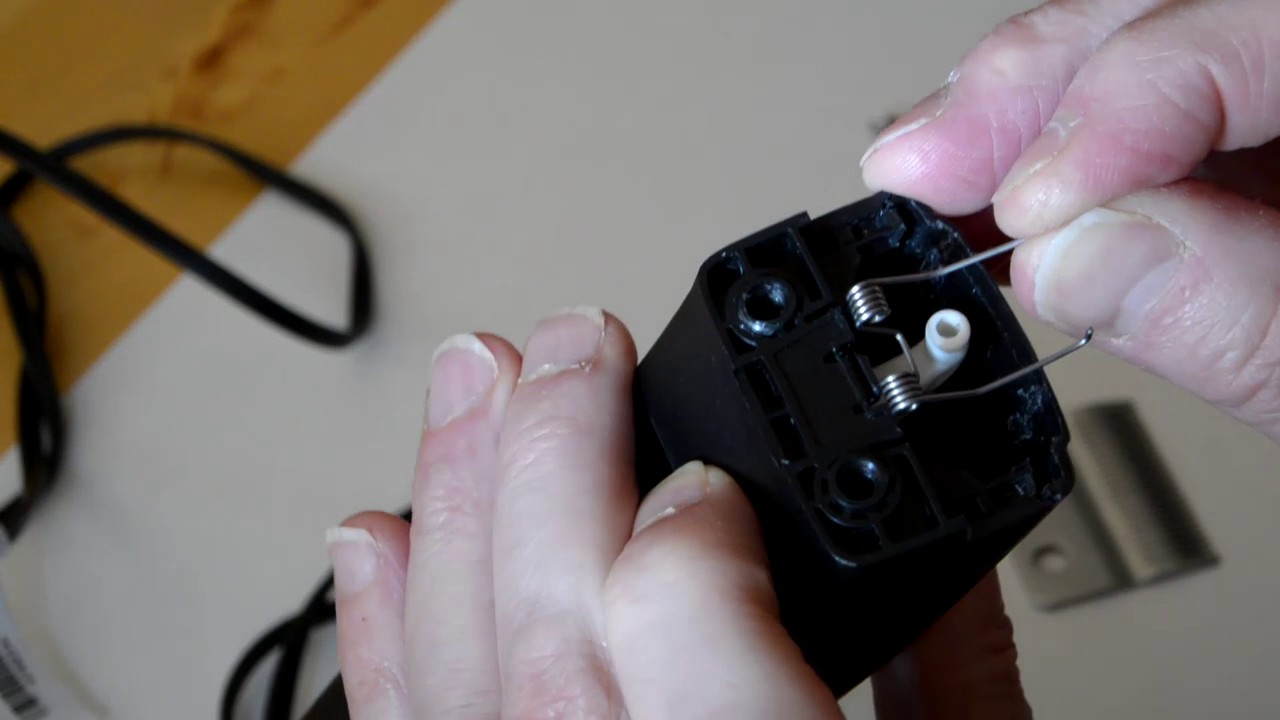
Step 3: Reassemble the Trimmer
Now that you have cleaned and inspected all the parts, it’s time to put your Oster trimmer back together. Start by carefully aligning the blades and sliding them back into place. Use the small screwdriver to secure the blades with the screws provided.
Next, reattach any other components that were removed during the disassembly process. Make sure each piece is placed in its correct position and fastened securely. Use the tweezers if necessary to handle any small or delicate parts.
Once all the parts are reassembled, test the trimmer to ensure it is working properly. Plug it in or insert the batteries and turn it on. Listen for any unusual noises or vibrations that may indicate a problem. If everything sounds and feels normal, congratulations! You have successfully put your Oster trimmer back together.
Step 4: Maintenance Tips
To keep your Oster trimmer in good working condition, it’s important to perform regular maintenance. After each use, clean the blades thoroughly to remove any hair or buildup. Lubricate the blades with a few drops of oil to keep them running smoothly.
Additionally, periodically check the screws and other fasteners to ensure they are tight. Loose screws can cause the trimmer to vibrate or become less effective. If you notice any issues during use, such as decreased cutting power or unusual sounds, it may be time to clean or replace the blades.
Step 5: Troubleshooting
If you encounter any difficulties during the reassembly process or if your Oster trimmer still doesn’t work properly after reassembling, don’t hesitate to seek professional help. Oster customer support or a professional groomer can provide guidance and assistance to resolve any issues you may be facing.
Remember, it’s always better to ask for help than to risk damaging your trimmer or compromising its performance.
Step 6: Final Check
Before concluding the process, make sure to double-check that all the parts are securely tightened and in their proper places. Inspect the trimmer visually and give it a final test run to ensure everything is working as expected.
By following these steps and taking good care of your Oster trimmer, you can enjoy its reliable performance for years to come.
Frequently Asked Questions
Here are some commonly asked questions about putting an Oster trimmer back together:
How do I disassemble my Oster trimmer?
Disassembling an Oster trimmer requires a few simple steps. First, locate the screws that hold the trimmer casing together. Use a screwdriver to carefully remove these screws. Once the casing is detached, you can access the internal components of the trimmer.
Be sure to keep track of the screws and any small parts that may come loose during disassembly. It can be helpful to take pictures or make notes to aid in reassembly later on.
How do I clean the individual components of my Oster trimmer?
To clean the individual components of your Oster trimmer, start by removing any hair or debris that may have accumulated. Use a small brush or toothbrush to gently scrub away any stubborn residue.
For more thorough cleaning, you can disassemble the trimmer further and soak the components in warm, soapy water. Be sure to dry them thoroughly before reassembling the trimmer.
How do I put the blade back on my Oster trimmer?
Putting the blade back on your Oster trimmer requires aligning the blade properly with the trimmer head. Look for the grooves or notches on the blade that correspond to the alignment pins on the trimmer head.
Once aligned, carefully slide the blade onto the trimmer head, making sure it sits securely. You may need to tighten any screws or fasteners to hold the blade in place. It’s important to ensure the blade is properly aligned to prevent any potential injury during use.
What should I do if I encounter difficulty during reassembly of my Oster trimmer?
If you encounter difficulty during the reassembly of your Oster trimmer, refer to the user manual or any instructional guides that came with the trimmer. These resources often provide step-by-step instructions and diagrams to help you navigate the reassembly process.
If you still have trouble, consider reaching out to Oster’s customer support for assistance. They can provide further guidance or connect you with a service technician who can help troubleshoot the issue.
Are there any safety precautions I should take when putting my Oster trimmer back together?
Yes, there are several safety precautions to keep in mind when putting your Oster trimmer back together. Firstly, ensure that the trimmer is disconnected from any power source before starting the reassembly process.
Additionally, handle the blades and other sharp components with care to avoid accidental cuts or injuries. Take your time and be patient during the reassembly to avoid any mistakes or potential hazards. If unsure about any step, consult the user manual or seek professional assistance.
Source: ytimg.com
Final Verdict
In conclusion, learning how to put an Oster trimmer back together is a valuable skill that can save you time and money. By following the step-by-step instructions provided, you can confidently disassemble and reassemble the trimmer, ensuring its optimal performance. Remember to exercise caution and patience throughout the process, as attention to detail is crucial for a successful reassembly.
With the knowledge gained from this guide, you can become proficient in maintaining and repairing your Oster trimmer. Not only will you be able to troubleshoot and fix common issues, but you will also be able to customize and modify your trimmer to suit your specific needs. By taking the time to familiarize yourself with the inner workings of the trimmer, you can extend its lifespan and enjoy precise and efficient trimming for years to come. So, roll up your sleeves, grab your tools, and embrace the opportunity to become a skilled Oster trimmer technician!
