Are you tired of struggling with dull Andis trimmer blades that just can’t seem to give you that clean, precise cut you desire? Look no further! In this comprehensive guide, we will take you through the step-by-step process of sharpening your Andis trimmer blades, ensuring that you achieve salon-quality results from the comfort of your own home.
Whether you are a professional hairstylist or a grooming enthusiast, having sharp trimmer blades is essential. Dull blades not only compromise the quality of your work but can also be frustrating to use. But fear not! With our expert tips and techniques, you will learn how to effectively sharpen your Andis trimmer blades, giving them a new lease of life and allowing you to create stunning haircuts with ease. So, grab your Andis trimmer and let’s dive into the world of blade sharpening mastery!

Source: bladereviews.com
How To Sharpen Andis Trimmer Blades? Proven Tricks
Are your Andis trimmer blades starting to dull and not giving you the clean cut you desire? Don’t worry, sharpening your Andis trimmer blades is a simple process that you can do at home. In this guide, we will walk you through the step-by-step process of how to sharpen Andis trimmer blades effectively.
Step 1: Gather the Necessary Tools
Before you start sharpening your Andis trimmer blades, make sure you have all the necessary tools at hand. You will need a small screwdriver, a brush or toothbrush, a sharpening stone, and some blade oil. Having these tools ready will ensure a smooth and efficient sharpening process.
Step 2: Disassemble the Trimmer
To properly sharpen the Andis trimmer blades, you need to disassemble the trimmer first. Use the small screwdriver to remove the screws holding the blade in place. Once the blade is detached, clean it thoroughly using a brush or toothbrush to remove any hair or debris.
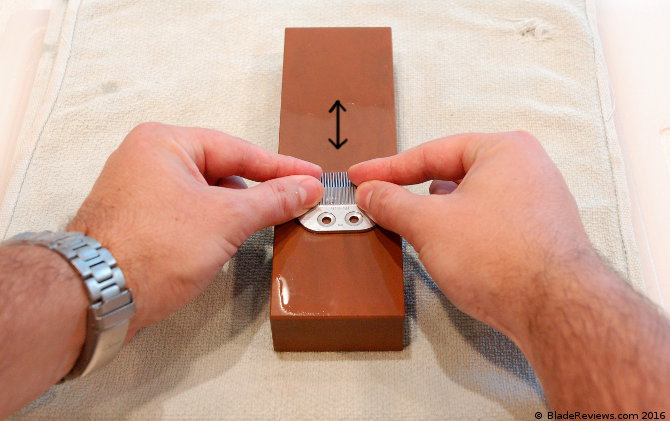
Step 3: Sharpen the Blade
Now that you have a clean blade, it’s time to sharpen it. Take the sharpening stone and apply a few drops of blade oil on it. Hold the blade at a 30-degree angle and gently slide it across the sharpening stone in a sweeping motion. Repeat this process on both sides of the blade until you achieve a sharp edge.
Step 4: Reassemble and Test
Once you are satisfied with the sharpness of the blade, carefully reassemble the trimmer by attaching the blade back in place and tightening the screws. Before using the trimmer, it is recommended to test the sharpness by trimming a small section of hair. If the blade cuts smoothly and cleanly, you have successfully sharpened your Andis trimmer blades.
Step 5: Maintenance
To ensure the longevity of your Andis trimmer blades, it is essential to maintain them properly. After each use, clean the blade using a brush or toothbrush to remove any hair or debris. You can also apply a few drops of blade oil to keep the blades lubricated. Regular maintenance will help prolong the sharpness of your Andis trimmer blades and prevent them from dulling quickly.
Step 6: Additional Tips
Here are a few additional tips to keep in mind when sharpening Andis trimmer blades:
- Always refer to the manufacturer’s instructions for your specific model of Andis trimmer.
- Take your time when sharpening the blades to ensure precision and avoid any accidents.
- Consider investing in a professional blade sharpening service if you are not confident in sharpening the blades yourself.
By following these steps and tips, you can maintain the sharpness of your Andis trimmer blades and achieve clean, precise cuts every time. Remember to prioritize safety throughout the process and handle the blades with care.
Frequently Asked Questions
Here are some commonly asked questions about how to sharpen Andis trimmer blades:
How often should I sharpen my Andis trimmer blades?
It is recommended to sharpen your Andis trimmer blades every 3 to 4 months, depending on usage. If you use your trimmer frequently or for professional grooming purposes, you may need to sharpen the blades more frequently. Regular sharpening helps maintain the performance and longevity of your trimmer blades.
When you notice that the blades are not cutting as effectively or are pulling on the hair, it’s a good indication that they need sharpening. It’s important to keep a regular schedule for sharpening to ensure the best cutting performance and avoid any discomfort for your pet.
Can I sharpen Andis trimmer blades at home?
Yes, you can sharpen Andis trimmer blades at home using a sharpening stone or a specialized blade sharpener. However, it requires some skill and knowledge to do it properly. If you are not confident in your sharpening abilities, it’s recommended to take your blades to a professional sharpener or contact Andis customer service for guidance.
When sharpening at home, make sure to follow the manufacturer’s instructions and use the appropriate tools. Take your time and be careful not to overheat the blades, as this can affect their cutting performance. Properly sharpened blades will ensure a clean and comfortable trim for your pet.
What tools do I need to sharpen Andis trimmer blades?
To sharpen Andis trimmer blades, you will need a sharpening stone or a specialized blade sharpener. It’s important to use the right tools for the job to ensure effective and safe sharpening. Additionally, you may need a screwdriver to remove the blades from the trimmer for easier sharpening and cleaning.
When choosing a sharpening stone, opt for a fine-grit stone specifically designed for clipper blades. This will help achieve a smooth and sharp edge. If you prefer a specialized blade sharpener, make sure it is compatible with Andis trimmer blades and follow the instructions provided by the manufacturer.
How do I properly sharpen Andis trimmer blades using a sharpening stone?
To sharpen Andis trimmer blades using a sharpening stone, start by removing the blades from the trimmer. Follow the manufacturer’s instructions on how to safely detach the blades. Once removed, hold the sharpening stone at a 45-degree angle and gently move the blade back and forth across the stone.
Make sure to maintain a consistent angle and apply light pressure. Continue sharpening until you have achieved a smooth and sharp edge on both sides of the blade. After sharpening, clean the blades thoroughly to remove any metal shavings and reattach them to the trimmer. Test the blades on a small area before using them on your pet.
Can I send my Andis trimmer blades to a professional for sharpening?
Yes, you can send your Andis trimmer blades to a professional sharpener for sharpening. Many professional sharpening services specialize in clipper blade sharpening and can provide high-quality results. Sending your blades to a professional ensures that they will be sharpened correctly and maintain their original quality.
Before sending your blades, make sure to clean them thoroughly and package them securely to prevent any damage during transit. It’s also a good idea to inquire about the turnaround time and cost of the service. Professional sharpening can save you time and effort, and you can feel confident in the performance of your Andis trimmer blades after sharpening.
Final Verdict
In conclusion, mastering the art of sharpening Andis trimmer blades is a skill that every professional groomer or pet owner should strive for. By following the step-by-step process outlined in this guide, you can ensure that your trimmer blades are always sharp and ready to tackle any grooming task. Remember, a sharp blade not only improves the quality of your grooming work but also ensures the comfort and safety of your furry friends.
Investing time and effort into properly maintaining and sharpening your Andis trimmer blades will pay off in the long run. Not only will it save you money by prolonging the lifespan of your blades, but it will also enhance your overall grooming experience. So, don’t hesitate to give your trimmer blades the attention they deserve and enjoy the satisfaction of achieving professional-quality results every time you groom your beloved pets. Happy grooming!
